fallOccasionally Crafty: fall
Showing posts with label fall. Show all posts

Tuesday, October 17

DIY Vampire Bat BOO Kit (BOO It Forward)


This shop has been compensated by Collective Bias, Inc. and its advertiser, MARS Incorporated. All opinions are mine alone. #BOOItForward #CollectiveBias


We love to BOO our neighbors!  Do you BOO?  It's when you drop off a cute basket or bag of treats to your neighbors, anonymously, with instructions to BOO It Forward to other neighbors in a certain amount of time.  It's such a fun way to get into the Halloween spirit!

You might remember that last year, we moved to a new city across the country.  This year, we're excited to pick out a few of our new neighbors to BOO.  I picked up a few supplies at Walmart, including some American Greetings gift bags


and this bag of delicious MARS® Candy found exclusively at Walmart.


I really wanted to buy this specific bag to last throughout all our Halloween events.  I actually found it by the College Football display, though you may find yours in the seasonal candy aisle or in a special display!  So, if you want this awesome bag, check everywhere or don't be afraid to ask a store manager for help!


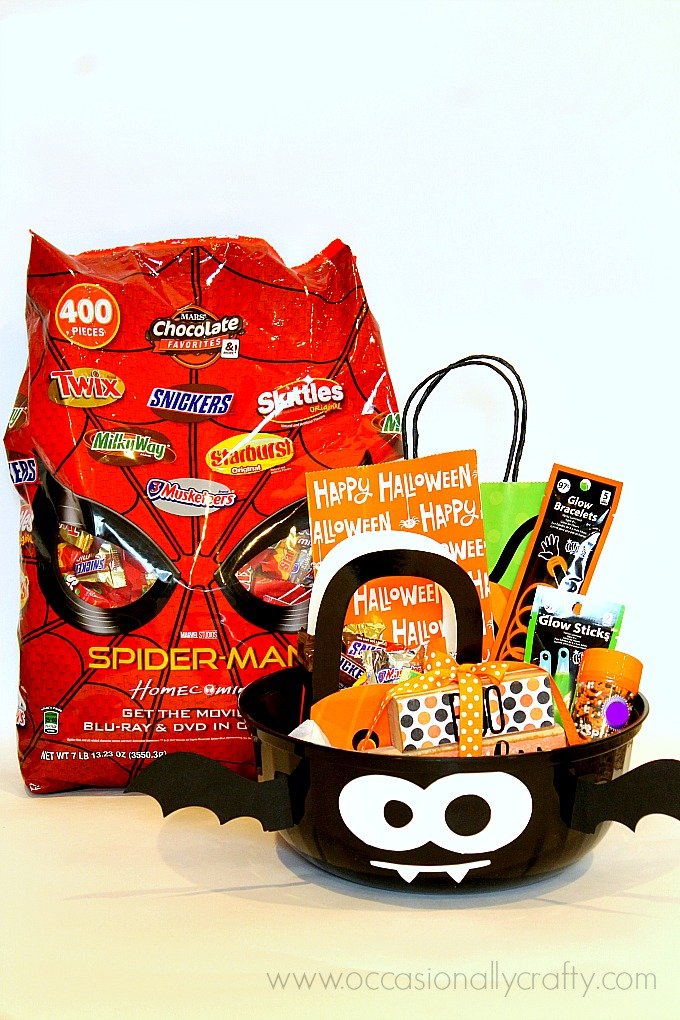
I also picked up a black bowl and some other fun Halloween goodies for my BOO Kit.  I knew I could make it into a really fun Vampire Bat Bowl!  Let’s do some friendly neighborhood BOO'ing!

I used my cutting machine and some adhesive vinyl to make this cute little bat face


and also to cut out some wings for my bat.  


Then, I glued the wings on each side of the bat bowl.


If you don't have a cutting machine, you could easily trace some clipart onto some white paper (for the face) or black paper (for the wings).  Could you imagine Frankenstein on a green bowl?  Or a ghost on a white bowl?  The possibilities are endless!


Now it's time to fill up the BOO kit!  I included a cute little bag filled to the brim with my favorite MARS® candies, some glow in the dark goodies, Halloween sprinkles, the American Greetings gift bags (for the neighbors to use when they BOO It Forward) and a cute Halloween wooden stacker set I also made with my cutting machine.


I finished off with this BOO card with instructions for the neighbors. 


If you want to make your own BOO Kit to BOO it Forward,  you could also include a movie.  Get the Spider-Man Homecoming DVD & Blu-Ray on October 17th at Walmart.

(Do you NEED this value bag for your BOO kit?  Hover over the photo to click through to Walmart.com to buy it!)


Once I had everything just the way I wanted it, I put it in a cellophane bag and tied it with some cute Halloween ribbon.  


We're so excited to deliver this to our new neighbors this Halloween season!  Who will you BOO?


Friday, October 6

Dollar Store Halloween Crafts: Halloween Door Hanger

Using just three dollar store items and some spray paint, you can make your own cute Halloween door hanger!

DIY Halloween Dollar Store Door Hanger


Hey everyone-- thanks for stopping by today, whether you are a regular reader or just joining us through the blog hop.  I went to our local Dollar Tree in search of inspiration for some Halloween crafts, and came away with supplies for three different projects!

Today I'm going to show you how I turned this

DIY Halloween Dollar Store Door Hanger


into this.

DIY Halloween Dollar Store Door Hanger


First, I picked up some Rustoleum spray paint in Rustic Orange.  This stuff is great because it has awesome coverage, and it bonds to plastic, which was really important since my tray is made out of plastic.

I turned my platter over so I'd have a great shape to build from and sprayed two coats of spray paint, leaving time for drying in between.

DIY Halloween Dollar Store Door Hanger


Once it was dry, it was time to turn this yard sign into parts for my hanger.  I chopped off the stick part, then cut it into pieces to form a stem for my pumpkin.

DIY Halloween Dollar Store Door Hanger


I attached the stem with hot glue, then attached the "Beware" part of the yard sign onto my pumpkin as a banner.

DIY Halloween Dollar Store Door Hanger


I finished off with a bow made from cute Dollar Tree Halloween ribbon!

Halloween Bow

This is perfect to welcome all your Halloween guests to your door!

DIY Halloween Dollar Store Door Hanger

Pin this to make it later!

Use just three dollar store supplies and some spray paint to make your own Halloween Door Hanger!


Now, Please join Barb Garrett of The Everyday Home and all of these other fabulous bloggers participating in this Dollar Store Halloween Crafts Blog Hop.


Note: This post may contain affiliate links. By clicking on them and purchasing products through my links, I receive a small commission. That's what helps fund this blog so I can keep bringing you fun new craft projects to try at home!

Friday, September 29

DIY Copycat Pumpkin Patch Wooden Sign

It's finally fall!  Even though fall officially started last week, we had a late heat wave here in Iowa.  5 days of 90+ degrees was no fun!  Even though I'm used to that from being a Phoenix girl, I wasn't expecting it here!  Now we are in the 40's and 50's at night and the 60's and 70's during the day-- perfect!

Here in my new house, I have a mantel with a really big, blank wall behind it.

So, when I decorate, I have to put big things up there or it kind of looks ridiculous.


I saw this tutorial from Sincerely, Sara D and knew I wanted to make my own, oversized version for my fall mantle.  So, I did!

DIY Extra Large Pumpkin Patch Wooden Sign

Friday, September 8

Make your own Fall Printable with PicMonkey.

Bring a little fall inside with this cute Fall Subway Art Printable

DIY Printables with Picmonkey

Since Labor Day is over, it's time to break out the fall decor.  Right?  Right?

(I may have been accused of putting fall stuff out too early, which is nonsense.  Must have all the fall things!)

Anyway, I got this darling file as a freebie some time back, and finally decided to print it out and frame it.

It's not free anymore, but you can purchase a copy here.  I'll show you how I use these files to make my own printable decor.

First, download your file and save it somewhere you'll remember it.

Then, open up Picmonkey.  I am a premium member but you don't need it for this tutorial. Choose "Design", then "Blank Canvas".

DIY Printables with Picmonkey

Next, choose your canvas size.  I'm eventually going to print this as an 8x10, so I choose 8.5x11.


DIY Printables with Picmonkey

Set your canvas, or background, color.  Most often I choose white, as I will with this design.  Hit "Apply" and you're good to go.

DIY Printables with Picmonkey

Next, you're going to import that design you downloaded.  Click on Overlays, which is the butterfly design on the left hand column.  Then click "Add your own".

DIY Printables with Picmonkey

You'll then navigate to your file and click open (not pictured).

This should bring up your design somewhere on your blank canvas.  

DIY Printables with Picmonkey

At this point, you can play with your design, changing the size and placement, and sometimes even the color.  

Once you have it the way you want it, either "save" it, or "export" it.  This is kind of confusing.  If you save it, that means you want to come back and work on it later.  It's saving a copy to the Picmonkey hub.  If you export it, then you are saving it to your computer.  Let's choose that option so we can print it.

DIY Printables with Picmonkey

Name your file, choose your resolution (I almost always choose "Pierce), and export it.  This will let you choose a location on your computer to save it, and then you are done!

DIY Printables with Picmonkey
I love using Picmonkey to make printables, invitations, and more.  It's so easy and so many features are free.  And no, this is not sponsored in any way.  I just love Picmonkey!

DIY Printables with Picmonkey

Happy fall, y'all!

Check out some of my other fun fall projects:


Fall Printable with Mini Banner


Fall Burlap Wall Hanging


Faux Pumpkin Flower Centerpiece

Note: This post may contain affiliate links. By clicking on them and purchasing products through my links, I receive a small commission. That's what helps fund this blog so I can keep bringing you fun new craft projects to try at home!

Wednesday, November 2

Fall Printable with Mini Banner

*Hey all- I'm not back from my blogging break, but I am sharing some posts I didn't publish on my blog last year, hoping you'll find them somehow and check them out!  I hope you're doing awesome!

Fall Printable Mini Banner

I think banners and buntings are pretty much the cutest thing ever, so I’ve created a fun one for fall just for you!
Download your free fall printable here.
Download your mini banners here (with “Fall” and blank)
Print your fall printable and trim to fit your frame.


Fall Mini Banner PrintableInsert it into the frame and secure the back.
Print out your mini banner, then cut each shape out.
Fall Mini Bunting

Use hot glue to adhere your banner to baker’s twine, yarn, or even thread.  Drape your banner across the top of your frame.  I like to put mine just to the side a bit.
Fall Printable and Mini Banner

That’s it!  Now you have a cute decoration for fall.  Use this idea to dress up any plain framed quote or picture.
Thanks for stopping by today! 


Note: This post may contain affiliate links. By clicking on them and purchasing products through my links, I receive a small commission. That's what helps fund this blog so I can keep bringing you fun new craft projects to try at home!
 photo New Signature.png

Thursday, October 3

Three Things Thursday #8


Three must-try PUMPKIN recipes!

Now that October has officially begun, so can fall! That means we begin the plethora of pumpkin recipes. I love pumpkin and even had to narrow down a few of my choices to present you with just three! I have made all of these recipes and think they are definitely blog worthy!

1. Pumpkin Chocolate Chip Brownies
This recipe comes from Seeded at the Table, and they are amazing! I make them a few times every holiday season :)

2. Pumpkin Pancakes
Who says pumpkin can only be used for dessert? These pumpkin pancakes are sinfully delicious! This is a family recipe.


3 C flour
3 TBSP sugar
1/2 tsp salt
2 TBSP baking soda
3 C milk
1/3 C oil
3 eggs
1 1/2 tsp pumpkin pie spice
1 (15oz) can pumpkin puree
12 oz sour cream

This will make a LOT of batter, but it uses a whole can of pumpkin puree, so make a bunch and freeze some for later, or invite your friends over for a fall breakfast feast. You'll still need syrup, and you can make your own easily. Find the recipe here

3. Pumpkin Granola
Most of you remember the granola that I make. Since it's fall I had to find something a little different for my granola and this Pumpkin Granola from Squash Blossom Babies hits the spot! It is light, healthy and tasty!


Now you want to start baking, right? What are your favorite pumpkin recipes?

Connect with us! You can find us here:
Image Map