July 2014Occasionally Crafty: July 2014

Wednesday, July 30

Bathroom "Refresh" with Cutting Edge Stencils and GIVEAWAY!

You guys.

Our master bathroom is strange.  I don't know who agreed to this design, but it really is a little bit awkward.
The bathroom is adjacent to the master bedroom, but there is no door between them- just a nice wide arched opening.  (Privacy is so overrated!)

Inside the main part of the bathroom,  you'll find an extra wide shower, and across from that, the sink and vanity.

The toilet has its own little closet.  I'm living in 21st century America and I have a water closet.  A W. C.  Who would've thought?  

I have done basically nothing for my little toilet room except put a little cabinet to hold any necessary items you might need while in there.  But, I have been longing to pretty it up for a while now.  So, I took advantage of one of Cutting Edge Stencil's brand new stencils to make this little toilet closet a little nicer.  (Did you see my sneak peek on Instagram?) 

(Because it is this little room with a crappy light, it was really difficult to get decent pictures.  I can't even fit in it far enough back to get a decent shot, so I had to stand outside and lean in.  Everything looks a bit crooked but I promise, it's not. Bear with me please- this is NOT my best photo work.)


When I checked out the new line of stencils, I was instantly drawn to the Little Diamond Allover Stencil.  I don't know why.  I am not usually a geometric person, but I just kept coming back to that one.  So I trusted my gut and ordered it.

This is a perfect stencil for a stencil newbie (which I am)!  I didn't use a roller, though you certainly could.  I just used a few nice stencil brushes, and I used some acrylic paint and chalk paint I already had on hand- simply because it matched the colors I needed.  

I made sure to use a spray adhesive to keep the stencil in place, along with some painter's tape.  Then, I dabbed just the smallest amount of paint on the brush and filled in each diamond.  I did three coats of the blue and two coats of the dark gray. I wasn't sure how it would turn out because the diamonds are a little funky- not exactly even.  But when I pulled off the stencil to move it I was thrilled with how it looked.


The blue is from Plaid's FolkArt line- Baby Blue.  The dark gray is is DecoArt's Americana Chalky Finish paint in Relic.

Now, I needed a little something for the wall.  I wanted a shelf, no! A canvas print. How about a wreath?  Or a framed quote ?  What quote is appropriate for a toilet room? (Let it Go?)

Then inspiration struck. 


 Michael's had this 11x14 frame on clearance for $1.79.  I painted it to match the wall, then stuck it and my painted, distressed mason jar on the wall with some Command Strips.  The flowers are a hydrangea bunch from IKEA I've had for a few years.  Both the frame and the jar are painted with the Americana Chalky Paint from DecoArt.


I have to admit I am in love with this.  It might be my favorite thing in the whole house.  Right now, anyway.


I finished it off with a new basket to hold the TP- Ross for $4.99.  Because, when you have a toilet room, you need a place for extra toilet paper.

I still have plans to replace the awful glass globe light on the ceiling.  But we're well on our way to having a much nicer little toilet closet. After all, we do spend a significant amount of time in there :)


Want to try out a stencil for yourself?  Cutting Edge Stencils can be used for room redos, furniture makeovers, curtains, pillows, craft projects, and more.   Check out their blog for design ideas!
They are graciously offering one of you $50 to purchase your own stencil!  Enter to win via the Rafflecopter below.  Make sure to read the terms so you know you qualify.  It's open until Monday August 4th, so get those entries in! Good luck!
a Rafflecopter giveaway


Connect with us! You can find us here:
Image Map

Wednesday, July 23

Teaching Children the Importance of Work

Hey everyone!  
Just a quick note to tell you that you can find me over at What's Up Fagans today, where I am talking about how to teach our children the importance of work!  I share some things we do in our family, and I'd love to have you chime in what works for you and your family!  You can find my post here.
Connect with us! You can find us here:
Image Map

Thursday, July 17

Browned Butter Brown Sugar Muffins

Have you entered the Pley giveaway to win a  LEGO set or a subscription to rent your favorite sets? EVERYONE who enters gets a code for a 1-month subscription- so don't forget to enter!

Does anyone else make muffins with dinner?  Or is it just me?

I know muffins are typically a "breakfast" thing or even a "snack" thing, but I love a good muffin with my dinner sometimes.

I have had a recipe for Brown Sugar Muffins for awhile.  They were good, but they weren't outstanding.  And if I'm going to eat a muffin, I really want it to be worth it, you know?

So I went in search of ideas to improve this muffin recipe, and after making a few small but important changes, I made a muffin that is light, fluffy, and sweet (but not too sweet).


The addition of browned butter and an extra egg just gives it a richness that my recipe was lacking before.  I also used buttermilk instead of my usual plain milk.


These muffins were absolutely delicious right out of the oven.  They are definitely best served warm!

Here's the recipe: (thanks to A House in Holland for the suggestions!)

Browned Butter Brown Sugar Muffins

Ingredients:
1/2 cup butter or margarine
2 cups flour  (I used all-purpose)
1 tsp baking powder
1/2 tsp baking soda
1/2 tsp salt
1 cup brown sugar
2 large eggs
1 tsp vanilla extract
1 cup buttermilk

Directions:

1.  Preheat oven to 400 degrees
2.  In a small sauce pan, brown the butter, letting it cook over low heat for 5-7 minutes.  Butter should turn a golden brown color and have a slightly nutty taste/smell.  Remove from cooktop and let cool for at least five minutes before using.
3.  Meanwhile, combine flour, baking powder, baking soda, and salt in a small bowl.  Set off to the side.
4.  In the bowl of a mixer, combine brown sugar and eggs.  Beat until light and fluffy.  Add browned sugar and vanilla.
5.  Add half of the flour mixture to the wet ingredients and mix by hand until combined.  Add the buttermilk and mix.  Then add the rest of the flour mixture and mix until just combined, without any dry ingredients showing.
6.  Divide batter evenly into 12 lined muffin cups.  Bake for 15-17 minutes, until a toothpick inserted in the middle of a muffin comes out cleanly.  Serve and enjoy!


If you like these, you might want to try some of our other recipes, or check out our Bread/Rolls/Muffins Pinterest board below.
Follow Occasionally Crafty (Valerie)'s board Bread, Rolls, Muffins on Pinterest.


P.S.  I'm linking up to some parties listed here: come check them out!


Connect with us! You can find us here:
Image Map

Wednesday, July 16

Taking a Moment for Mesothelioma: Heather's Story

Has cancer struck your family?
Chances are, if it hasn't yet, it will.  Each year 14 million people are diagnosed with some form of cancer.
My brother is a childhood leukemia survivor.  He overcame the odds and not only survived, but thrived!
Both my father and father-in-law have had prostate cancer.  My dad recently found that his may be recurring for the third time, and is in that difficult waiting period of testing and observing.
source
Recently I learned about a woman named Heather Von St. James, who was told shortly after giving birth in 2005 to her sweet daughter Lily, that she had mesothelioma and had 15 months to live.   You can learn more about her story here.
source
My daughter was also born in 2005.  I can't imagine looking into her sweet face and being told I would never see her talk, never see her grow older.  Miss her first school dance, her first kiss.  Her graduation.  Her wedding.
Luckily Heather got wonderful care and was able to beat the odds. Today she is an 8 year cancer survivor, and she and her family are doing their best to keep others from having to go through what she did.
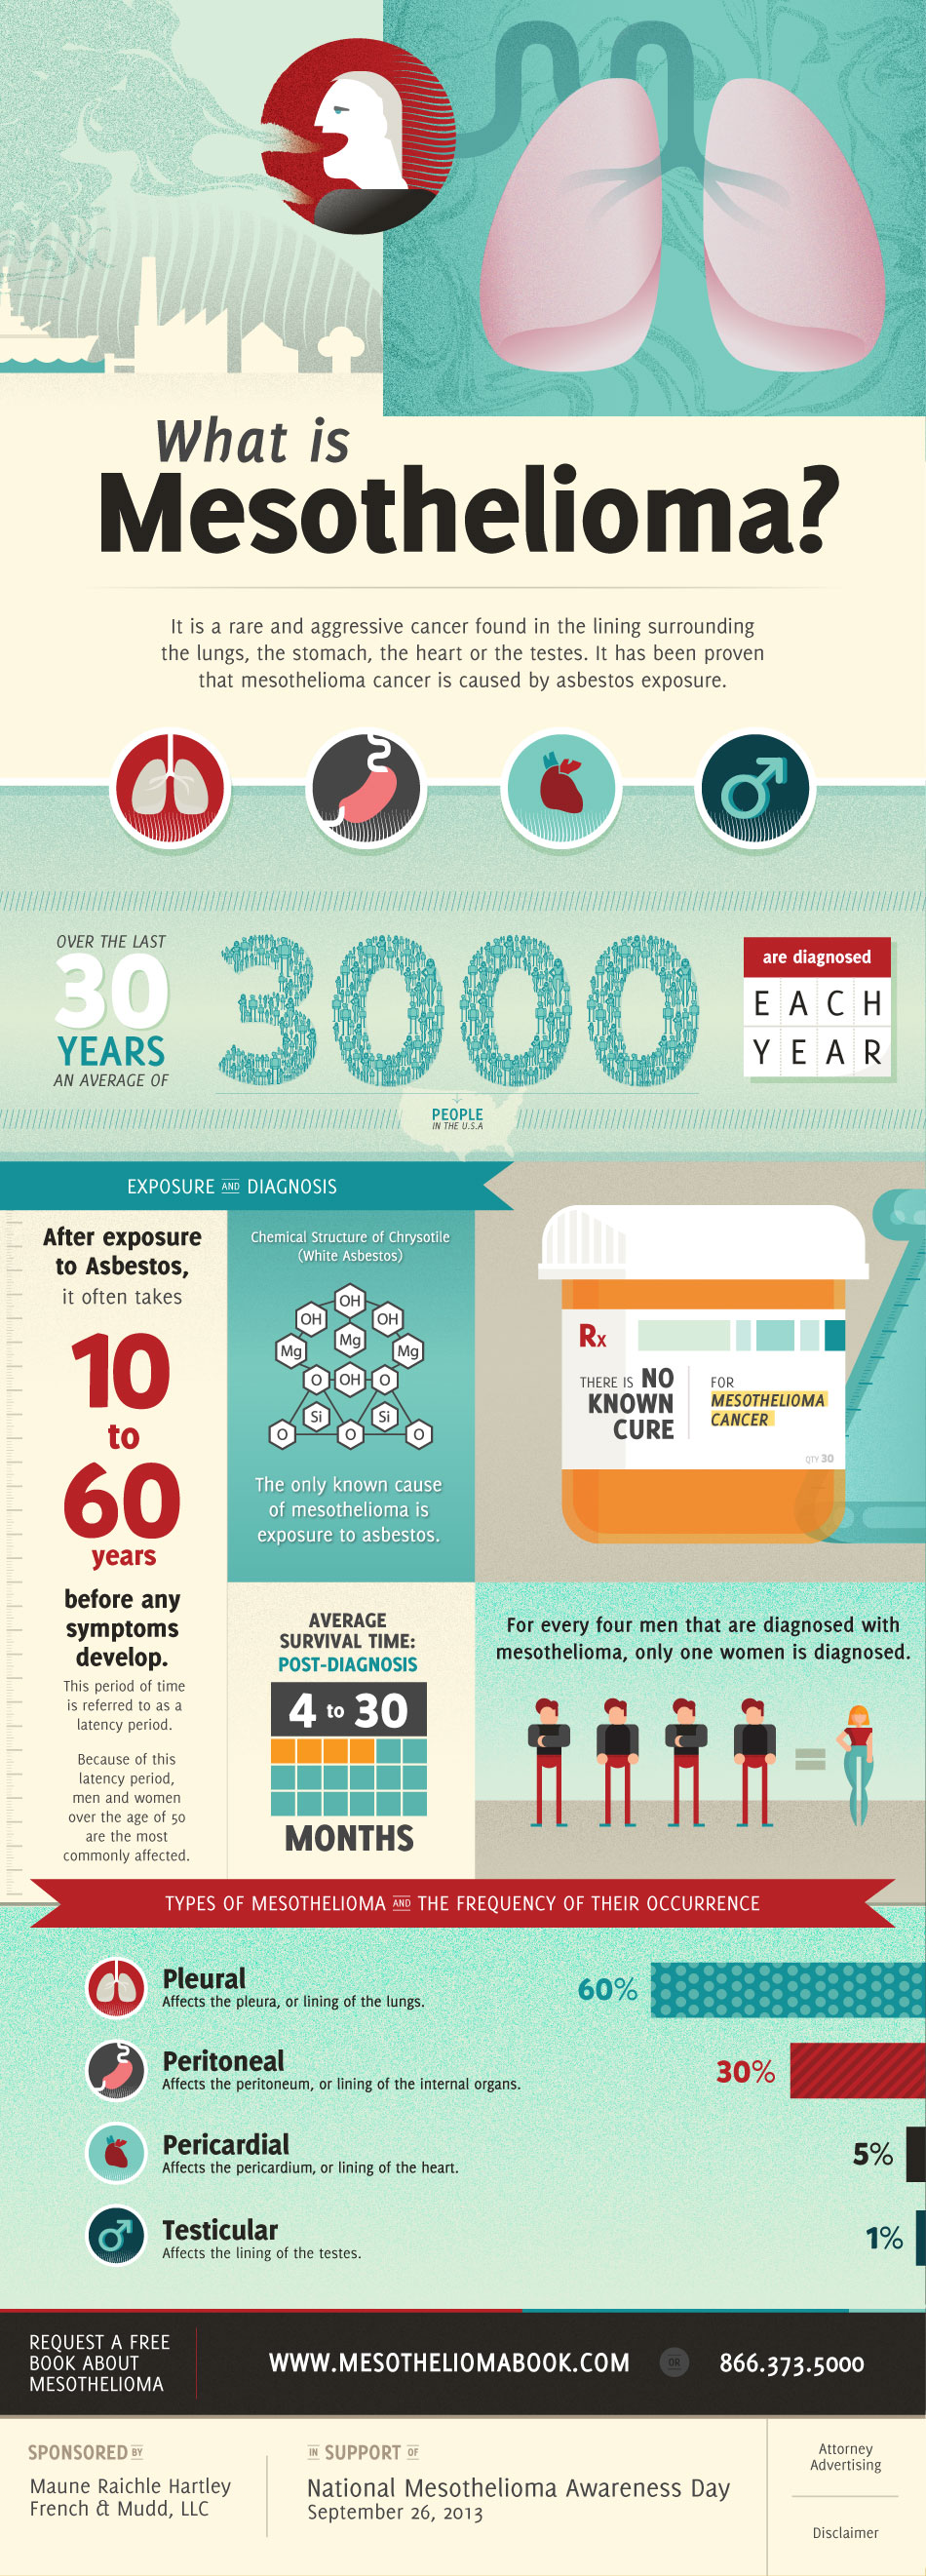
You see, mesothelioma is preventable.  I'll say that again: mesothelioma is preventable.  It's only known case is exposure to asbestos.
As a child of the '80's, I certainly remember when things were closed down to remove asbestos from the walls and such.  Even our favorite shopping mall went through this transformation.  The companies that used asbestos knew as early as 1925 that asbestos was dangerous to the workers, to their families, and to the public. The companies commissioned medical studies that revealed these dangers. But the companies chose profits over safety and hid these studies. They provided no warnings about the dangers. As a result, thousands of Americans have been killed by asbestos.   

Amazingly, asbestos can still be found in buildings today. It can be found in older homes, schools, factories, and commercial buildings.

Shockingly, despite the known health risks, there is no ban on asbestos in the USA.  

Sadly, USA Veterans are most likely to develop mesothelioma.

I'm writing this post today simply to bring awareness.  Heather was blessed to beat the odds and see her little girl grow older.  Most victims of mesothelioma aren't as lucky.

Please share this with your friends, family, and readers.  Taking a "moment for 'meso'" spreads awareness to those who can help, and hope for those suffering through this cancer.

Click the photo to enlarge
mesothelioma infographic
source


If you feel inclined to help donate to research or awareness, you can reach out to the Mesothelioma Cancer Alliance at www.mesothelioma.com
Connect with us! You can find us here:
Image Map

Tuesday, July 15

Cutting Edge Card Stencils!

How many of you remember my bathroom makeover using Cutting Edge Stencils? I still get so many compliments and it looks as good as it did when I first put it up!

Cutting Edge Stencils contacted us a few weeks ago to see if we were interested in trying any of their new products. Um, yes! Valerie is in the middle of a bedroom/bathroom remodel and she found the perfect stencil to use. Look for her results in the near future. 

My interest was peaked when they were featuring card sized stencils for crafting projects! You know how much I love making my own cards, so I had to give it a try.

I picked the Birch Forest stencil. I've always loved this one but couldn't commit to doing a whole room with it. A card is the perfect place for some trees! On the Cutting Edge website it shows a lot of cards that were painted on or maybe even inked with stamper pads. I wanted to go for a different look so I decided I was going to use the stencil and a pen to trace outlines of trees.

I tried a red pen on white card stock. I tried black pen on tan card stock. And then I tried a white pen on black card stock and I love how it looked!


Now that I had the perfect setting for my card it was time for my creativity to kick in. I am most likely going to use this for an upcoming wedding, so I cut out some cute little birds on my Silhouette, used crafting wire for a nest, stamps for my words and a button brad to pull it all together!


Now for a review of the stencil. I love how sturdy the Cutting Edge Stencils are. Even this one was very easy to work with. I didn't find myself slipping and making mistakes, even when I was trying multiple color combinations. I was, however, surprised at the size of the stencil. My card is your standard 4x6 size, and the stencil is obviously much larger. I could only use a portion of the stencil for the card. If you're interested in using their card stencils, they have two sizes, card and page. I think I was sent the page size instead of the card size, so be sure to pick accordingly. Still, I made it work and love the results!


You can see the entire collection of card stencils here, and be sure to check out everything they have to offer! I've been wanting to brave my textured walls and try another wall stencil again!
Connect with us! You can find us here:
Image Map

Friday, July 11

Giveaway! Win a Lego Set or Pley.com Subscription to Rent Legos


Remember when I made a video?  I told you all about Pley.com and how awesome I thought it was.

UPDATE:  I still think it's awesome!

We recently went to Legoland, which if nothing else deepened the love my kids have for Legos.  


My kids love getting a new set each week and I love that I don't feel like I am wasting tons of money on sets that get destroyed right after they are built.  

But, I'm not here to write another review.  Today, Pley is generously offering a giveaway for my readers with THREE winners!

The First Prize Winner receives a 6-Month "Super Fan" Subscription to Pley, which means you can get sets like The Lego Movie Ice Cream Machine


Legends of Chima Lennox' Lion Attack


Or even Lego Girl's Heartlake Stables


There are about 269 Lego Sets available in this subscription level, so every Lego fan can find something they like!

The Second Prize Winner receives a Three Month "Super Fan" Subscription.

And, the Third Prize Winner receives a Free LEGO set!  You can choose from the following sets:
LEGO Teenage Mutant Ninja Turtles Mutation Chamber Unleashed 
LEGO Teenage Mutant Ninja Turtles Stealth Shell in Pursuit
LEGO Star Wars Jedi Interceptor
LEGO Creator Treehouse 
LEGO Super Heroes Artic Batman vs. Mr. Freeze, Aquaman on Ice

And the most "awesome" part- EVERYONE who enters the giveaway will receive a promo code for a FREE 1-month trial subscription to Pley!  

All entries are via the Rafflecopter form below.  The giveaway opens now and will be open until Monday night, July 21st.  Good luck!

a Rafflecopter giveaway


Connect with us! You can find us here:
Image Map

Tuesday, July 8

"Special Date" Stenciled Wall Canvas

Do you remember that I am doing a master bedroom redo?  I've got the big stuff done, like painting, choosing bedding, etc.  What I have problems with is decorating and staging.  I can see what I want it to look like in my head, but I have a difficult time pulling things together to make it perfect.

So, until I get that finished, I am showing you projects I've done for the bedroom a little at a time.  I showed you my Striped Canvas Wall Art before, and today I'm sharing what I put on the other side of the window. This is my Special Date Stenciled Canvas.


Monday, July 7

Find Me At The Girl Creative

Hey everyone- just checking in to let you know I'm featured as a summer contributor over at The Girl Creative today.  I hope you'll stop by and check out my Vinyl Liberty Sign!   (I know the 4th has passed, but it's a simple project to pin for next year, or even to make for Patriot's Day coming up in September!)

Click here to check it out!  Thanks and see you back here tomorrow with a new post!


Connect with us! You can find us here:
Image Map

Thursday, July 3

Patriotic Round-up!

I hope you all are about to have a wonderful weekend of celebrating our country and spending time with friends and family! I get to spend it with my immediate family tonight, and then head up to see my mom, brother and Valerie! Yay! I don't get to see Valerie very often so any chance I get is awesome.
If you have some time off of work it may just be the perfect time to throw together a last minute craft.  A lot of the patriotic supplies are on sale so it's a great time to get your craft on!
You could do this easy burlap star banner to complete your mantle!

Try this patriotic wreath with necklaces from the dollar store!
Wooden blocks always open up the possibilities for great decorations.
Do you have one of these stars on your house? Here's a way to spruce it up!

Whatever your plans are this weekend, be safe and make memories!
Connect with us! You can find us here:
Image Map