October 2011Occasionally Crafty: October 2011

Monday, October 31

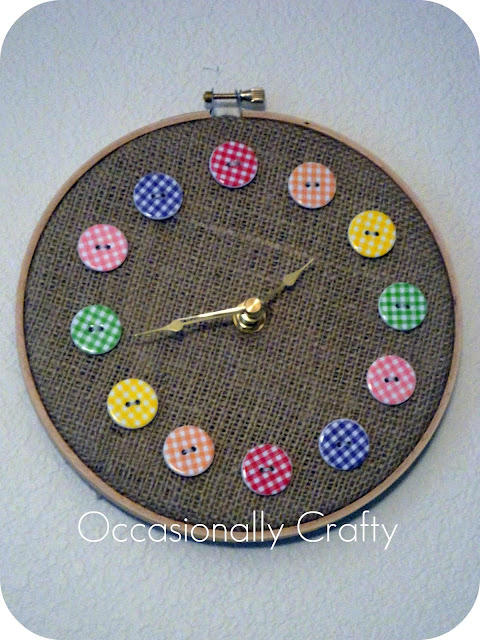
Pinterest Envy- Button Clock

This was originally created for a guest post at Crafting and Creativity!

Today's project was inspired by this picture I found on Pinterest.  (You can follow me here:)
Edited:  I want to add this button that My Marbles created:  Isn't it awesome?  I hope to be able to use it more often:

Edited*** This button clock was made by Mason Bee, and is just one of her many beautiful creations!


I haven't seen a tutorial to make this particular kind of clock, but using instructions I found across the web, it was easy to adapt for a fabric clock.

Materials needed:
1 embroidery hoop (mine was about 7 inches)
Sturdy fabric of choice- I used burlap, but you could use anything
12 cute buttons
Embroidery Thread to match your buttons
Hot glue (optional)
Scissors
3/8 in or smaller Clock Movement Kit- about $7 at any craft store, or cheaper with a coupon!

Here's how I made mine:

First, I cut my burlap to fit my embroidery hoop, leaving enough fabric to stretch it taut on all sides.  You may have to double layer your fabric, depending on how thin it is.  You need something sturdy, and you don't want anything see-through.  I placed it in the hoop and pulled it tight on the front and back.


Then, I laid out where I wanted my buttons to go and marked them with a water-soluble pen.


Next, I found the center of my button circle and marked it.  This is where you will assemble your clock movement kit.

Now, mine didn't come with any directions, so I had to do some searching to find out how to put it together.  Mine was an Artminds brand, but it is pretty standard.  Here's how it goes together:

Clock Hands Mounting Instructions
source

Take all the clock parts out of the package and disassemble anything that is put together.
1.  Cut a small slit in your fabric- enough to push the arm of the big black movement piece together.  The rubber washer goes on the back- between the black box and your fabric.
2.  Slide brass washer (circle) over the shaft
3.  Attach the hex nut (the other larger brass pice)- screw it tight to the fabric
4.  Gently but firmly press the hour hand onto the shaft at the 12:00 position.
5.  Gently but firmly press the minute hand onto the shaft at the 12:00 position.
6.  Gently screw minute hand nut (small brass circle) in place
7.  Gently but firmly press your minute hand onto the shaft.


Once my movement kit was attached, I hot glued it to the back of the fabric for extra stability.


Next, I hot-glued my buttons in place- just a tiny dot.  This isn't necessary, but it saves me a lot of time in the next step.

I hand-sewed my buttons to the fabric using two strands of embroidery thread.  I think I made three or four stitches per button.  Just make sure they're on good!

All that's left is making it look pretty.  Carefully trim the excess fabric away from your hoop.  I basically put my scissors flush with the hoop, then cut all the way around.  I sealed the ends by drawing a thin line of hot glue across the cut edge.  This keeps it secure and keeps it from fraying.

That's it- pop a battery into the movement kit and you've got a cute (and functional) clock for your craft room, or anywhere else you need a little cuteness.  Can you imagine the possibilities with all the cute buttons out there?


I'm linking this up to:

Visit thecsiproject.com

Photobucket

Friday, October 28

Tori's Tidbits

I'm not sure how I'm going to survive this weekend.  Tonight is our church's Trunk or Treat, which I am in charge of.  This weekend, our Primary (children's Sunday School) is putting on its annual program, which I am also in charge of.  Tomorrow is our "dress rehearsal" and pizza party (which, yes, I am in charge of), and the program is on Sunday.  That's on top of normal responsibilities, like, say, laundry.  Someone give me energy now!

On to blog business:  I know I have been bugging you with a lot of new sponsors lately.  I just want you to know that I do this, not for the very teensy tiny bit of money it brings in, but because there are so many great shops and products out there that I know you will love!  I have found some of my favorites through advertising on some of my favorite blogs, and if I can introduce YOU to something new, I'm excited!

At this point, most of my sponsors are advertising for FREE on my blog, so I promise my opinions on their products are really mine, and not because I'm getting paid to say it.  I will never promote something I don't think is cute, fun, or useful!

That being said, I have another new sponsor for you this month:  Tori's Tidbits!


I'm just going to tell you right now, there are some GREAT gifts for your kiddos here at this shop.  I LOVE these car caddies, available in different fabrics:

Car Caddy - Cabana Stripes  - Ready to ship

I know my boys would love playing with this when we're out and about, and I love that it's portable!

These roll-up Crayon Caddies are adorable too- and I love that they come with a little notebook!  

Crayon Caddy with Crayons and Memo Pad


Need a special baby gift, but don't sew?  Tori makes baby blankets, quilts, and burpcloths to match!

Baby Blanket with Burp Cloths Gift Set - Monkeys - Ready to ship


As you're shopping this holiday season, think of buying handmade and check out Tori's Tidbits!

Have a great weekend!
Photobucket

Thursday, October 27

Three Things Thursday

Welcome to Three Things Thursday, where I get to share with you some fun finds from the linky parties I visit each week.  I love to share some great crafty inspiration with you.  Here are three things that caught my eye this week:

1.  I think this Eclectic Bracelet from The Scrap Shoppe is just gorgeous!  You could dress it up or down, and it goes with just about anything!


2.  Freshly Completed blogged about How to Win a Pumpkin Carving Contest, with a picture of the judge (which in this case was the bishop of her church!)  I think this is such a fun, creative idea!  I have my own pumpkin decorating contest coming up....


3.  CuteBugDesigns is putting together a whole pirate party, and I am in love with this Pirate Fondant Figure she created.  She even offers a tutorial for you if you are ambitious!  I would love to learn more about fun cake decorating like this.


Thanks for the inspiration ladies!  Feel free to grab a button if you like!


Photobucket


Photobucket

Wednesday, October 26

Scrappin' Wednesday- Splashin' Away!

Living in Phoenix, the Splash Pad is a staple of summertime entertainment.  When we visited our family in Oregon last summer, we were excited to find they had recently opened a splash pad in Redmond.

Here's the layout I created to remember our trip to the splash pad with the cousins.  It is on a white background, so just imagine you can see it as a page:

Thanks for stopping by to see it!


Photobucket

Tuesday, October 25

New Sponsor- Coquette Bath

I've got another great sponsor for you to meet this month. Let me introduce you to Coquette Bath!

"Coquette Bath offers handmade soap, candles, lip balm, perfume, lotion bars, body spray, sachets, and more! Since 2001, I've been crafting quality for you. 

If I won't use it for my family, I won't sell it to you and yours. I use only the highest quality ingredients. All 'making' is done in small batches for quality control and freshness. You will love my products!"


She offers several different types of Sugar Cube Scrubs, like these Pink Grapefruit Cubes.


Pink Grapefruit Sugar Cube Scrub

The lotion bars are great for travel, and sound like a great way to pamper your skin!


Clouds Lotion Bar Solid Stick Moisturizing formula cocoa butter shea

How about an ultra-soft, extra creamy lip balm?  It comes in many different flavors.  Great stocking stuffers (hint, hint)!

Dark Chocolate Lipbalm, Creamy Rich Flavor Moisturizing, Kiss

These beautifully wrapped, individually poured hand soaps sound divine!  


Vanilla Lime Soap, Shea Enriched, Simple Indulgence, Handmade Soap

When you're looking for a unique gift, I hope you'll check out Coquette Bath for something she won't forget!

Photobucket

Monday, October 24

Halloween Embroidery Hoop Art

I originally created this for a guest post at Love and Sugar Kisses.

I had a lot of fun putting together a fun Halloween project for you.  I came up with this cute Halloween Embroidery Hoop Wall Hanging.


I have to give a shout-out to Nike from Thrive, who turned me on to these cute  Riley Blake's Halloween Fabrics.  (You can see how she used them here).  They are just so darn cute.  I picked out some of my favorite characters to use in my Halloween decorating.  Let me tell you- I am not so much into the ghoulish side of Halloween decor.  I like to keep it fun and cute, and these little guys fit the bill.


Anyway, here's what you need:
3 5 inch embroidery hoops
1/2 yard of fabric- solids or small prints work best
A printer and paper (or a really good eye!)
Felt- I used craft felt in white, black, and green
Fine-tip marker or fabric pen/paint
Hot glue
Scissors
A quick note- I kind of worked backwards from what might be logical to you.  I put my fabric in the hoops first, then decorated them.  You might want to go the opposite way.  It doesn't really matter, as long as you get your decorated fabric centered in your hoop.
1.  Cut fabric to fit your embroidery hoop.  You should have enough to pull it taut, and have extra sticking out on all sides.  Do this for all three hoops.


When you like how it looks, cut off the excess.  I place my scissors right against the hoop and cut in a circle.


Finish up by drawing a line of hot glue along the edge of the fabric to seal it and hold it in place.


2.  Print your embellishment patterns and cut them out.  I found some .jpg images online, so just do a google search for what you want.  

3.  Trace your images onto felt and cut out.


4.  Adhere to the fabric using hot glue or fabric glue.  I'm a little bit of a lazy crafter, so I just hot glued them on.
5.  I used a ruler to mark the lines on my mummy.


And don't forget his little green face!


6.  Outline details with fine-tip marker or fine tipped bottle of fabric paint.


7.  Add words to your fabric by freezer paper stenciling- or you could even use letter stickers or regular stencils.  A great tutorial for freezer paper stenciling can be found here.


8.  Determine how far apart you want your hoops to hang, and cut 2 strips of ribbon to match, leaving an extra 1/2 inch for gluing.  Glue to the inside back of each embroidery hoop to connect them.


9.  Tie a bow and glue it to the top.


10.  Hang it up and admire your creation!


I know Halloween is almost here, but this didn't take me much time- you could easily make it in an afternoon (or evening!)

I'm linking up to some fun parties this week- go party along with me!

HookingupwithHoH

Photobucket

Friday, October 21

New Sponsor- Frank and Bella Jewelry

I wanted to take a minute to introduce you to one of my sponsors this month, Frank and Bella Jewelry!

Frank and Bella's has beautiful, unique earrings.  I am in love with these adorable owl earrings, which come in several different colors.

Black Owl Earrings - Kidney Wire

These Copper Wire-Wrapped Earrings certainly make a bold statement.  They fit lots of different styles and colors.


copper wire wrapped earrings - kidney wires

You can never go wrong with a simple pearl hoop.

Green Pearl Earring, Sterling Silver hoop  - The Lucy Earring

The wood and citrine in the Jenny Earrings give a perfectly natural accent to your outfit.

Wood, Quartz and Citrine, Sterling Silver - The Jenny Earring


I hope you'll emember Frank and Bella when you're looking for some unique earrings that will get noticed!


Photobucket