October 2015Occasionally Crafty: October 2015

Friday, October 30

Last-Minute Halloween Candy Printable


If you miss the trick-or-treaters while you're out with your kids, leave your candy out with this spooky Candy Printable for the neighbor kids!


Halloween is TOMORROW night, and that means this printable is coming your way just in time!

I was just listening to the morning radio show, and they were talking about how it is super lazy and annoying when people just leave out a bowl of candy with a note to just take one.

But, if you're family is like mine, both mom and dad are taking the kids out for trick-or-treating, and by the time you get home, pretty much everyone else has already gone out and you would be left with a bowl full of candy you don't need.

So, go ahead and leave out that bowl of candy for the neighbors.  I've whipped up a fun printable you can display along with it.

And if you just don't feel like opening your door 100 times on Halloween, hey- I won't judge you!  Feel free to use this printable too!


Download your copy here (or right-click to open in a new window and print).

Happy Halloween!  

 photo New Signature.png

Wednesday, October 28

Fall Shadowbox Decor

Use acorns to decorate for fall with this easy Fall Shadowbox!Use acorns to decorate for fall with this easy Fall Shadowbox!
It’s probably because I live in Phoenix and it’s still 90 degrees outside, but I love fall and all the colors and scents that go along with it.  I made this shadowbox to display on my entryway table.  It’s simple to make with just a few supplies.

Monday, October 26

Fall Printable with Mini Banner

Dress up any frame with this free printable Fall Mini Banner!

Dress up any printable with this cute mini banner!


Today I'm sharing both this free Fall printable and the printable mini banner over at Kenarry: Ideas for the Home.

Adding a cute little banner or bunting is an easy way to dress up any frame! 

I hope you'll stop by and give it some love :)


 photo New Signature.png

Wednesday, October 21

Kitchen Makeover- Progress So Far

If you follow me on Instagram, then you know I'm in the midst of a kitchen makeover.
Now that my kids are all in school, I decided- might as well spend all my time making over my kitchen!  It's so much better than doing laundry or cleaning!
First up, I painted the walls.  They all needed a fresh coat of paint, and I decided this old red wall had to go. I knew I would staining the cabinets dark, which meant the walls needed to be light.
By the way- this is a picture from 2010.  Since then, we have put in a french double door and some of the decor has changed.  But pretty much everything else is the same as this picture.
We don't have really have much money to put into a remodel, but after ten years of living here, I'm willing to put in the work to give it a facelift.  Plus, we are planning on moving in the next year or two, so anything I do will help bring more appeal for a new buyer.
So my first step was to paint all my walls a very, very light griege called Asiago, generously provided  to me by Valspar.  It is one of those colors that can look gray or beige depending on what surrounds it.  I'm still deciding if I want to stay with it or go a shade darker.  


I had to cover the red wall with a coat of Valspar's All-Purpose Primer and Sealer.  That stuff is awesome!  It covered the red thoroughly so that I could paint a light color right on top.  Use this in your next cover job- you won't be disappointed!
But, the other huge thing I am doing is staining all my kitchen cabinets using Java Gel Stain by General Finishes.  This is a massive project that is going to take me awhile.  Each cabinet needs three coats of stain and three coats of poly- plus drying time.  
So I am working in stages.  So far I've completed the counter that looks out towards the living room, and I LOVE it.  It is going to totally transform my kitchen when I'm done.


We also replaced our old black hood with a white one to match our appliances.  Nothing fancy- but at least now they match.
Still to do:
  • Finish staining cabinets
  • Add hardware
  • Paint pantry doors (one broke and the new one is a different color!)
  • New window treatment
  • New kitchen accessories
  • Paint "gather" sign to hang over window
  • Refinish kitchen table and chairs

This picture shows our mismatched doors- and gives a better idea of the paint color on the walls.

Whew!  We still have a long way to go.  My goal is to be finished by Thanksgiving.  I've got a month!  Wish me luck!

Opinions needed:  what accent colors would you use with the java cabinets and neutral walls?
 photo New Signature.png

Saturday, October 17

Get Organized for the Holidays

If seeing this image makes you panic a little, you're not alone!
Buddy the Elf - Only 11 More Fridays Until CHRISTMAS!!!!

Today I'm sharing some tried and true ways to get organized for Christmas.  If you haven't started already, it's time to get on the ball, people!

Friday, October 16

How To Use Jar Candles in your Holiday Decorating

Use chalk paint or scrapbook paper to make your candles as festive as your decor!


This shop has been compensated by Collective Bias, Inc. and its advertiser. All opinions are mine alone. #LoveAmericanHome #CollectiveBias

I love scented candles.  There is something so warm and welcoming about walking into the house and getting a whiff of vanilla, cinnamon, or whatever the fragrance is.  I love how it fills the house and just makes me feel happy.

I don't love that candles are a little obvious. 

Hello, my house smells.  So I'm burning a candle to make it smell better!

So, I thought I'd share two different ways you can blend candles like these from American Home™ by Yankee Candle® brand into your seasonal or everyday decor
 

Since my home is decorated for Halloween, I wanted to make my candles fit with my holiday decor!

Thursday, October 15

The Handmade Hangout #70

Welcome to the Handmade Hangout- where you can link up all things made by YOU!


Instead of features, this week I featured 20 of my favorite Cute and Sweet Halloween Treats from last week's linky!


I can't wait to see what you all link up this week!  Here's just a few little rules:


1.  Become a follower of the blog where you linked up.  Of course we'd love it if you follow all our hosts on whatever platforms you use most!

Allison from A Glimpse Inside

Becca from From Gardners to Bergers

Kim from Too Much Time on My Hands

Heather from Twin Dragonfly Designs

Valerie from Occasionally Crafty

Alli from Made with HAPPY


2.  Share our button or party link in your post or wherever you share your linky parties

Occasionally Crafty

 
Link up your projects!


 photo New Signature.png

Monday, October 12

20 Cute and Sweet Halloween Treats


 Wow you guys!  This week's Handmade Hangout was chock full of all sorts of awesomeness!  I knew I wouldn't be able to pick only three favorites, so I put together a roundup of the cutest Halloween snacks and treats!  You will die when you see how cute these are!


Friday, October 9

DIY MARVEL's The Avengers Pillowcases

Sew your own cute pillowcases with this easy DIY Tutorial!


This shop has been compensated by Collective Bias, Inc. and its advertiser. All opinions are mine alone. #AvengersUnite #CollectiveBias
I guess it was inevitable that in a house full of boys, we would become huge superhero fans.  Even my daughter has gotten into the spirit of things.  We have taken all our kids to see the movies, we buy the DVD's, and we even have some toys and other goodies featuring our favorite characters.
Of course we purchased MARVEL's The Avengers: Age of Ultron the first day it came out (last Friday!)  We picked it up at Walmart for an awesome price, then decided to grab some Halloween costumes too.  My kids actually have other costumes picked out, but they love to play dress-up, so we made sure to grab Spider-Man and The Hulk.  My daughter wanted Black Widow, but they didn't have it in any of our local stores.  We settled for ordering it online and will pick it up later this week.

Both the costumes and the DVD were easy to find.  The Boy's Licensed Halloween costumes were full of these costumes, and the DVD/Blu-Ray were right at the front of the store.


I thought it would be fun to celebrate the DVD release of MARVEL's The Avengers: Age of Ultron  by making my kids some pillowcases featuring their favorite characters.  We have movie nights in our living room where everyone settles in with their pillows and blankets, so this would be a perfect treat for our movie night!

I don't even sew that much, but my friend showed me a super-easy way to make cute pillowcases awhile back, and I used her instructions to make up this tutorial.

Thursday, October 8

The Handmade Hangout #69 + FEATURES!

Welcome to the Handmade Hangout- where you can link up all things made by YOU!


This week I'm featuring three of my favorite projects from last week's linky.

1.  Halloween Yarn Garland from Growing Up Gabel:  Isn't this the cutest little banner you ever did see?  It is adorable!

Decorate your mantle or home for Halloween with this easy Halloween garland! Made from yarn and few other simple craft supplies, this fun decoration is perfect for kids!

2.  Pumpkin Chocolate Chip Cookie Cups from Spoonful of Flavor.  These look and sound amazing- with two of my favorite flavors!

Pumpkin Chocolate Chip Cookie Cups with Pumpkin Cream Cheese Frosting | Pumpkin lovers will go crazy for these frosted mini cookie cups!

3.  DIY Fall Wood Banner from The CSI Project:  I love the colors, the antlers, the flowers- it's gorgeous!


If you love these, click through and pin them from the original post!  Now, on to this week's linky.  Just a few little rules we'd love you to follow:


1.  Become a follower of the blog where you linked up.  Of course we'd love it if you follow all our hosts on whatever platforms you use most!

Allison from A Glimpse Inside

Becca from From Gardners to Bergers

Kim from Too Much Time on My Hands

Heather from Twin Dragonfly Designs

Valerie from Occasionally Crafty

Alli from Made with HAPPY


2.  Share our button or party link in your post or wherever you share your linky parties

Occasionally Crafty


Link up your projects!


 photo New Signature.png

Wednesday, October 7

Fall Burlap Wall Hanging


This Fall Burlap banner is the perfect touch for your home this fall!

I recently shared this FALL Burlap Banner as part of the Burlap Lover's Blog Hop, but in case you missed it, I wanted to share it here!  Fall and Burlap go together like peanut butter and jelly, don't you think?   (affiliate links may be used below)

What you'll need:
Wide Burlap Ribbon- plain or printed
Chevron Burlap Ribbon
4 Wooden Tiles (I used a coaster kit from Michaels)
Adhesive
Paint
Vinyl or Stencil for Letters
Instructions:
  • Cut a 22 inch-long piece of the wide burlap ribbon.  This will be your base.  Cut the end into a banner or pointed shape, whichever you prefer.  Set aside.
  • Paint your wooden tiles in desired color.  I used the PVPP method to stencil my letters
    • P- Paint the whole tile the color you want your letter to be (shown white).  Let dry completely.
    • V- Place a vinyl letter in desired place.
    • P- Paint over the letter in your final color (shown black)
    • P- Peel off your vinyl letter to reveal a perfectly stenciled letter.
  • Glue your tiles securely to the burlap ribbon, leaving about an inch at the top and several inches below the last tile.
This Fall Burlap banner is the perfect touch for your home this fall!
  • Tie a bow with the chevron ribbon and glue it to the plain burlap.
Simply hang this on a nail or pushpin wherever you need a gorgeous piece of fall decor!

This Fall Burlap banner is the perfect touch for your home this fall!


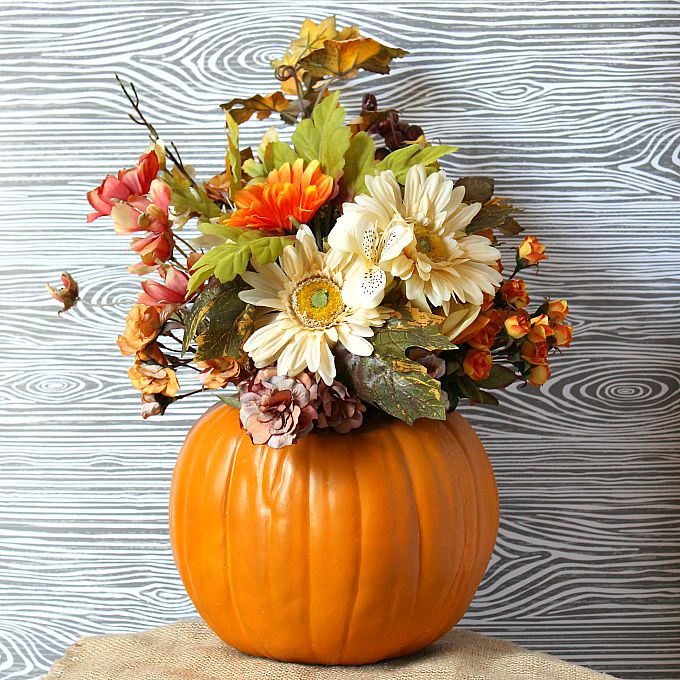
If you love fall decor, you might also like my DIY Faux Pumpkin Vase,

Turn a fake pumpkin into a beautiful floral centerpiece for fall!


or my Free Fall Pumpkin Printable!


This free fall printable is for all you pumpkin lovers.


Thanks so much for stopping by today!

 photo New Signature.png

Tuesday, October 6

Orange Fanta Pound Cake with Chocolate Orange Oreo Glaze

Delicious pound cake recipe made with orange soda and drizzled with chocolate-orange icing, topped with OREO crumbles.  This dessert is perfect for Halloween or for any occasion!

This shop has been compensated by Collective Bias and its advertiser. All opinions are mine alone. #SpookySnacks #CollectiveBias

Two of my favorite complementary flavors are orange and chocolate.  In fact, in college I would occasionally splurge on one of those chocolate oranges at our school's bookstore as a reward after a difficult test or for consolation for a bad week.
Well, these flavors also happen to be perfect for Halloween, as orange and black are traditional Halloween colors!  What better way to create the perfect Halloween recipe than with Orange Fanta and OREOs? 
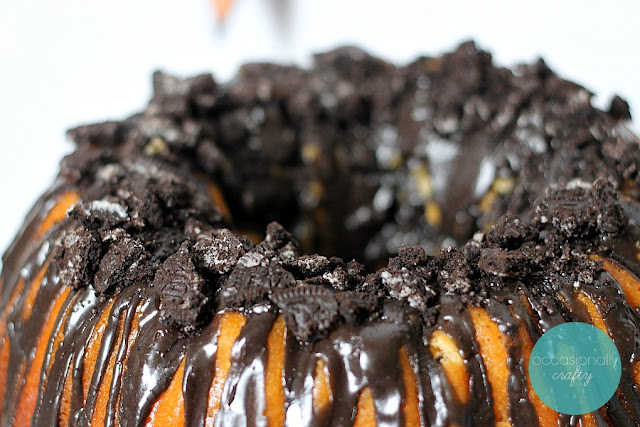
This Orange Fanta Pound Cake is drizzled with creamy, chocolate orange icing, then sprinkled with Oreo crumbles for the perfect topping.
I was so excited to see these Spooky "Glow-in-the-dark" Oreos when I was at Walmart, so I picked them up along with the Fanta and other ingredients for this recipe.  My kids will adore having a special treat from the leftovers.
It is the season of Halloween parties, Trunk-or-Treats, and more.  I was asked to bring a dessert to our church's party, so this is what I will be bringing.  It is so easy to make- and looks like you spent all day in the kitchen!
Delicious pound cake recipe made with orange soda and drizzled with chocolate-orange icing, topped with OREO crumbles.  This dessert is perfect for Halloween or for any occasion!


Orange Fanta Pound Cake with Orange Chocolate OREO Glaze

Click here for a printable recipe

Ingredients:

Cake
3 Sticks Butter, softened
3 Cups Sugar
5 eggs
3 cups flour
1/2 tsp salt
1 cup and 2 tbsp Orange Fanta 
2-4 drops orange food coloring
1 Tbsp Orange Zest (optional)

Chocolate Glaze
2 1/4 cup powdered sugar
3/4 cup cocoa powder
2-3 drops black food coloring
1/4 cup Orange Fanta
1 tbsp orange juice (opt)
1 tsp Orange Zest

Topping
8-10 crushed OREOs

Preheat oven to 325 degrees.

In the bowl of an electric mixer fitted with the paddle attachment, cream together butter and sugar. Add eggs one at a time, mixing after each addition. Combine flour and salt, then add it 1 cup at a time, mixing after each addition. With the mixer on low, slowly add 1 cup plus 2 tablespoons orange pop until combined. Add orange food coloring to deepen the orange color.  Add orange zest if desired for more orange flavor.

Thoroughly spray a bundt pan with nonstick baking spray. Add large spoonfuls of batter until the pan is filled, then even out the surface. Bake for 1 hour to 1 hour 10 minutes, or until a toothpick comes out clean. Remove the pan from the oven and let it sit in the pan for 5 minutes. Carefully turn it out onto a cooling rack and let it cool completely.  

Here's a tip- place your cooling rack on top of a cookie sheet or tray.  That way when you drizzle your icing and OREOs in the next step, the tray will catch the extras and cleanup will be much easier!

Combine all the glaze ingredients in a bowl and gently whisk until thick (you might need to adjust the quantities here and there). Slowly pour to drizzle all over the cake.  Let the glaze set slightly, then sprinkle crushed OREOs on top.  Slice and serve!

Now I'm going to let you in on a little secret.  When I turned the cake out of the bundt pan, a good chunk of the top didn't come with it :(   I was able to peel it out and set it on top of the cake.  The icing and OREOs hide all flaws!  So, don't be intimidated to try a bundt cake if you've never done it before!  This is the perfect trial recipe!

Delicious pound cake recipe made with orange soda and drizzled with chocolate-orange icing, topped with OREO crumbles.  This dessert is perfect for Halloween or for any occasion!

For more fun Halloween recipes using Fanta and OREO, including a Walmart-exclusive recipe from 
Evette Rios, host of the CBS show Recipe Rehab, check out the #SpookySnacks social hub.

Delicious pound cake recipe made with orange soda and drizzled with chocolate-orange icing, topped with OREO crumbles.  This dessert is perfect for Halloween or for any occasion!


 photo New Signature.png

Monday, October 5

"You've Been Booed" Popcorn Box

Turn a plain popcorn box into a fun Halloween treat holder!  Boo your neighbors with this "You've Been Booed" Chalkboard Gift Basket!

A simple World Market popcorn box can be just about anything you want!  I am joining with 60 other bloggers today to show you what we created with the same popcorn box!


One of our favorite Halloween traditions is to "Boo" our friends and neighbors.  You know the deal- you leave them a Halloween treat, and then they are do the same to one of their friends or neighbors.  You include instructions and a little sign for them to hang up so other people know who has been "Boo-ed".  

Turn a plain popcorn box into a fun Halloween treat holder!  Boo your neighbors with this "You've Been Booed" Chalkboard Gift Basket!


I thought this popcorn box would be the perfect container for this!  I started by simply painting my box with Americana Chalkboard Paint by DecoArt.  Then I used my chalk marker to write "You've Been Booed!" on the front.  I attached some cute orange polka-dot ribbon to use as a handle, then filled the inside with some Halloween goodies.

I put my instructions on the back of this doodle by Laura Kelly.  I just colored it in.  Isn't it cute?

Turn a plain popcorn box into a fun Halloween treat holder!  Boo your neighbors with this "You've Been Booed" Chalkboard Gift Basket!


Now I just need to actually get out the door and "boo" someone!  

Turn a plain popcorn box into a fun Halloween treat holder!  Boo your neighbors with this "You've Been Booed" Chalkboard Gift Basket!


Check out what all the other bloggers did with their popcorn box, but before you do, enter this awesome giveaway to win some goodies from our sponsors!  Up for grabs:
  • Sizzix Big Shot Machine
  • $50 World Market Gift Card and Halloween Treats
  • Udderly Smooth Prize Pack (love these lotions!)
  • 50 Custom Designed Lollipics (like the one in my box!)


Terms and conditions apply.  Good luck!


 photo New Signature.png