





Rabbits and stray dogs have a sixth sense for finding the one garden you’re actually proud of. My first fence attempt involved way more trial and error than I’d like to admit: crooked posts and one sagging gate
But once I figured out the right order of steps, the whole project stopped feeling like a guessing game. Turns out, a DIY garden fence doesn’t demand advanced carpentry skills. Like many beginner woodworking projects, it mainly takes careful measuring, patience, and a willingness to fix small mistakes as you go.
Ready to skip my early mistakes and get it right the first time? Here’s exactly where to start.
Can You Build a Garden Fence Yourself?
Yes, you can build a DIY garden fence yourself if the area is manageable and you are comfortable with basic outdoor work. A small garden enclosure can often fit among manageable weekend DIY projects, while larger or more complicated fences may require more time, tools, and experience.
Your choice of material also affects how easy the project is to build and maintain. Common options include:
- Welded wire fencing: A rigid metal grid that allows sunlight and visibility while providing a sturdy garden barrier. Galvanized or coated versions offer better resistance to moisture and corrosion.
- Hardware cloth: A stiff wire mesh with smaller openings, making it useful where smaller animals may enter. It works well along the lower section of a fence, though cut edges can be sharp.
- Wood fencing: Creates a solid or partially open barrier and can provide more visual screening around the garden.
- Plastic or poly fencing: Lightweight, rust-free, and easy to handle, making it suitable for simple garden boundaries. However, it is generally less rigid and impact-resistant than metal or wood.
Tools You Need
A few well-chosen tools can make the build feel much more manageable from the start. You don’t need a fully stocked workshop to build a basic garden fence.
|
Major Tool |
Purpose |
Used For |
|---|---|---|
|
Tape measure |
Measures distances |
Laying out the fence |
|
Stakes and string |
Marks straight lines |
Setting the fence layout |
|
Post-hole digger |
Digs narrow holes |
Installing fence posts |
|
Shovel |
Removes and replaces soil |
Preparing post areas |
|
Level |
Checks alignment |
Keeping posts plumb |
|
Drill/driver |
Drives screws |
Attaching fencing and hardware |
|
Wire cutters |
Cuts metal mesh |
Trimming garden fencing |
|
Work gloves |
Protects hands |
Handling wire and lumber |
|
Safety glasses |
Protects eyes |
Drilling and cutting |
Here’s How to Build a DIY Garden Fence Step-by-Step
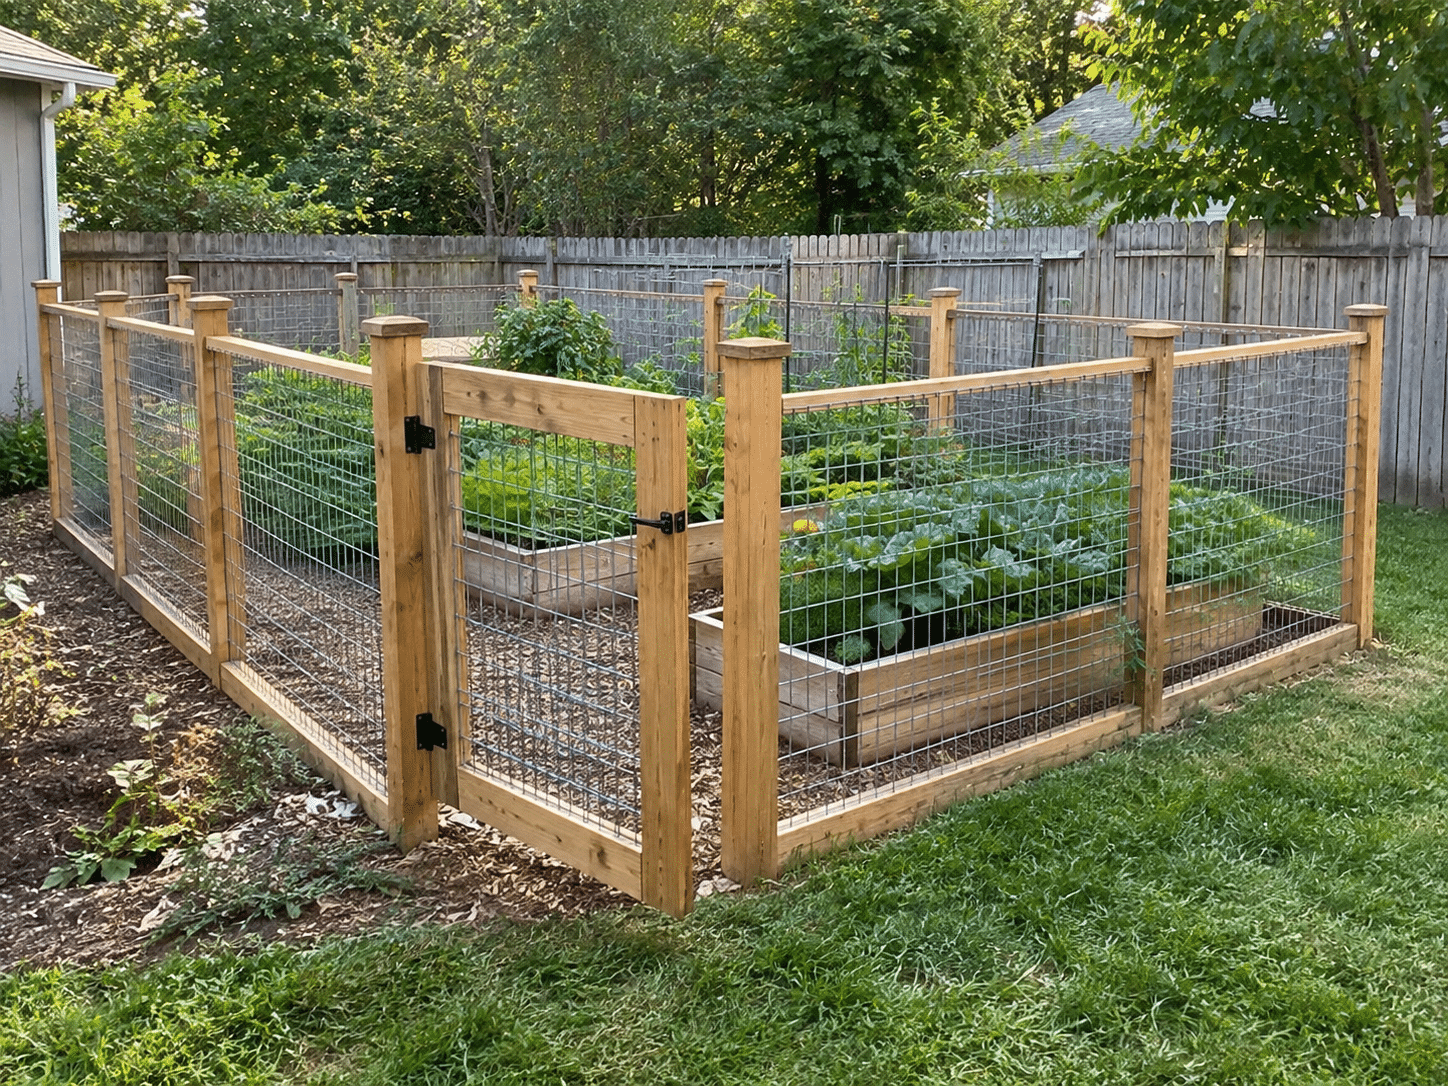
A fence build feels much easier when the work follows a clear order. I find that getting the early stages right makes everything that follows feel far more manageable. The steps below take you through the full build in a practical sequence:
Step 1: Measure and Mark the Garden Area
Start by defining the exact area you want the fence to enclose. A clear layout helps you establish the fence path before any groundwork begins.
- Measure the perimeter: Measure each side of the planned fenced area and record the lengths.
- Mark the corners: Place a stake at every corner of the fence layout.
- Choose the gate location: Mark where you want to enter and leave the garden.
- Run a string line: Stretch mason’s string between the corner stakes to show the fence path.
Step 2: Mark and Dig the Post Holes
The posts create the main support structure for your garden fence. Place them according to the layout, accounting for corners and the gate opening.
- Mark each post: Identify the locations of corner, gate, and intermediate posts.
- Check the spacing: Follow the spacing recommended for your chosen fencing and post system.
- Dig the holes: Use a post-hole digger or auger to create each opening.
- Clear loose soil: Remove loose dirt from the bottom so each post has a stable base.
Tip: Check for underground utilities before digging. In the US, you can contact 811 to have underground public utility lines marked.
Step 3: Set and Level the Fence Posts
Take your time with the posts because they determine how straight and stable the finished fence will be. Work from the main support points outward.
- Position each post: Place the post in the center of its prepared hole.
- Check for plumb: Hold a level against two adjacent sides and adjust the post until vertical.
- Secure the post: Backfill or set it using the method appropriate for your post type and site conditions.
- Recheck alignment: Confirm the posts still follow the string line before the setting process is complete.
Tip: Recheck the level after securing each post because a post can shift slightly while the surrounding material is being added.
Step 4: Attach the Fencing
Once the posts are secure, you can form the actual garden barrier. Working progressively along the fence line makes the material easier to control.
- Start at a corner: Secure the end of the fencing firmly to a corner post.
- Keep it evenly tensioned: Pull the fencing taut enough to reduce sagging without distorting the material.
- Fasten each section: Securely attach the fencing to each post with suitable outdoor fasteners.
- Trim the excess: Carefully cut extra mesh or wire at the end of the fence run.
Step 5: Install the Garden Gate
The gate needs to open freely while still closing securely against its posts. Correct positioning is especially important before tightening all the hardware.
- Position the gate: Place it inside the prepared opening with suitable clearance around its edges.
- Attach the hinges: Fasten the hinges securely to the gate and supporting post.
- Test the swing: Open and close the gate to check for rubbing or binding.
- Install the latch: Position the latch where the gate closes naturally against the opposite post.
Step 6: Inspect and Finish the Fence
A final inspection catches small problems before regular garden use begins. Walk around both sides instead of checking the fence from only one direction.
- Check the fasteners: Tighten or replace anything that feels loose.
- Inspect the bottom edge: Look for unintended openings between the fencing and ground.
- Check exposed wire: Bend back or trim sharp ends that could cause injury.
- Test the gate: Confirm that it swings smoothly and the latch holds securely.
Pick the Right Garden Fence Height for Your Space
Fence height is only one part of choosing the right setup. The mesh size, bottom protection, and fence style can matter just as much. Before measuring the perimeter, decide whether the fence will surround the entire garden or only specific features such as raised garden beds.
|
Garden Situation |
Suggested Fence Setup |
Key Consideration |
|---|---|---|
|
Small vegetable garden |
2–3 ft fence with fine mesh |
Helps block rabbits and smaller animals |
|
Garden with digging pests |
3–4 ft fence with buried mesh |
Extend the bottom below ground or use an apron |
|
Garden near deer activity |
7–8 ft tall fence |
Height is more important than small mesh openings |
|
Garden with dogs nearby |
4–6 ft sturdy fence |
Use strong posts and secure the lower edge |
|
Raised garden beds |
2–3 ft lightweight barrier |
Good for focused protection around a smaller area |
|
Sloped garden |
Height varies with terrain |
Keep the bottom close to the ground to reduce gaps |
|
Temporary seasonal garden |
2–4 ft removable mesh fence |
Use easy-to-move posts and lightweight materials |
|
High-pressure wildlife area |
Taller reinforced fencing |
Strong corners and secure gates become more important |
Disclaimer: These are suggested ranges rather than fixed requirements. The best fence height and setup can vary with local wildlife, terrain, fence material, garden size, and local rules.
Protecting Your Garden Fence From Wear and Damage
A little upkeep can prevent small issues from turning into bigger repairs. Seasonal changes can also affect how well the fence holds up over time.
- Check the posts: Look for leaning, shifting, or loose sections.
- Tighten fasteners: Secure any screws, staples, or clips that have loosened.
- Repair damaged mesh: Fix holes, bends, or torn sections early.
- Inspect the gate: Make sure it opens, closes, and latches properly.
- Watch the bottom edge: Check for gaps or signs of digging.
- Clear nearby growth: Trim plants that press against the fence.
- Look for wood damage: Check wooden parts for rot, cracks, or splitting.
- Recheck after storms: Inspect the fence after heavy rain or strong winds.
Conclusion
Funny how a couple of crooked posts and one stubborn gate can teach you more than any manual would. My first attempt had a gate that swung shut on its own like it had a personal vendetta against me.
But once your posts stand straight and the mesh sits snug, the whole DIY garden fence just clicks into place, no more guessing, no more awkward gaps.
Your garden’s finally got the backup it deserves, minus the wildlife buffet situation. So go ahead, grab that shovel; your garden’s been waiting long enough for its glow-up.
Frequently Asked Questions
What Is the Cheapest Way to Fence a Garden?
Simple wire or mesh fencing with basic posts is often among the lower-cost options. Actual cost depends on fence size, material, and local prices.
Do I Need a Permit for a Garden Fence?
Permit requirements vary by location, fence size, and property rules. Check with your local building or zoning department before construction.
Can You Build a Garden Fence on Uneven Ground?
Yes. Fencing can follow a slope or be installed in stepped sections, depending on the material and the amount of elevation change.
How Long Does a Garden Fence Last?
Lifespan varies widely by material, installation, weather exposure, and maintenance. Metal, wood, and plastic fencing age differently outdoors.