

If your last creative project was a school art class you’d rather forget, this is your sign to give it another shot. Canvas art hits differently when nobody’s grading it, and you’re just making something because you want to.
It can be textured, abstract, geometric, or completely chaotic, and it’s still yours. The trick is finding an idea that genuinely clicks and then just starting. No overthinking, no waiting until you feel “ready.”
Scroll down and find the idea that makes you think, “Okay, I could actually do that.”
Can Canvas Art Projects Help You Relax and Recharge?
Yes, because DIY canvas art is more than a fun project; it can also help you feel better. Painting, adding texture, and working with colors can give your mind a break from daily stress.
Many people find that creative activities help them relax and stay focused on the present moment. Even simple projects can feel calming because they encourage you to slow down and enjoy the process.
Creating something with your own hands can also boost confidence and give you a sense of accomplishment. Best of all, you end up with unique artwork that brightens your space and reflects your personal style.
DIY Canvas Art Projects Anyone Can Make at Home
A blank canvas does not have to be intimidating. Either you are picking up a brush for the first time or just looking for a fresh project, there is always a new technique worth trying.
From easy pours to dimensional plaster art on canvas, these diy canvas art ideas come with everything you need to get started:
1. Raised Geometric Plaster Art
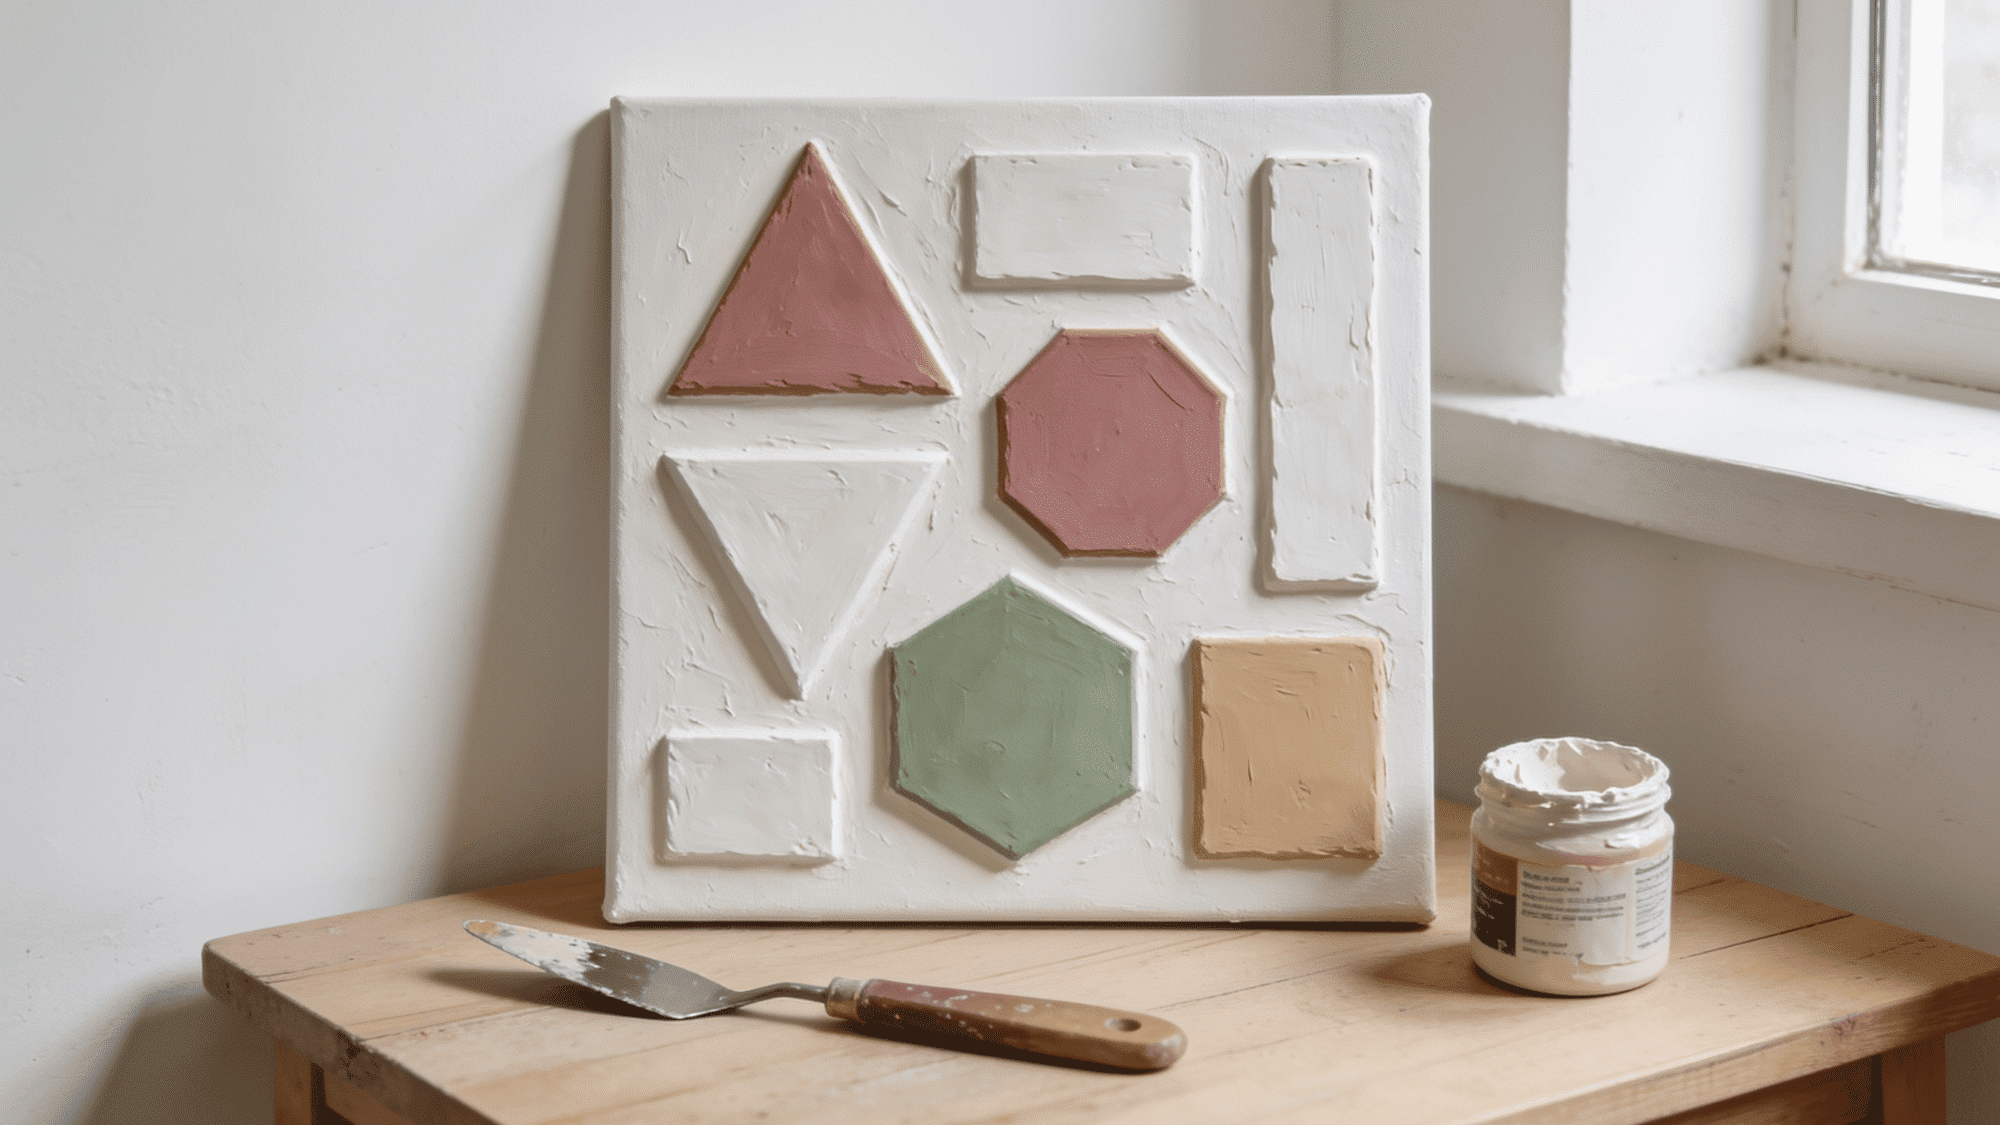
Plaster art on canvas turns flat shapes into something you can actually feel. The raised edges catch the light differently throughout the day, making the piece look different every time you walk past it.
Materials Needed:
| Material | Type/Variant | Purpose |
|---|---|---|
| Joint compound or plaster | Lightweight or thick | Building raised shapes |
| Palette knife | Flat or angled | Spreading and shaping plaster |
| Stretched canvas | Cotton, any size | Base surface |
| Acrylic paint | Any colors | Final coloring |
| Matte varnish spray | Clear finish | Sealing completed piece |
How to Make It:
- Lightly sketch geometric shapes onto canvas first
- Apply thick plaster inside each shape with a palette knife
- Let dry fully before painting (12 to 24 hours)
- Layer two to three paint tones for depth
- Seal the finished piece with matte varnish
2. Fluid Pour Painting
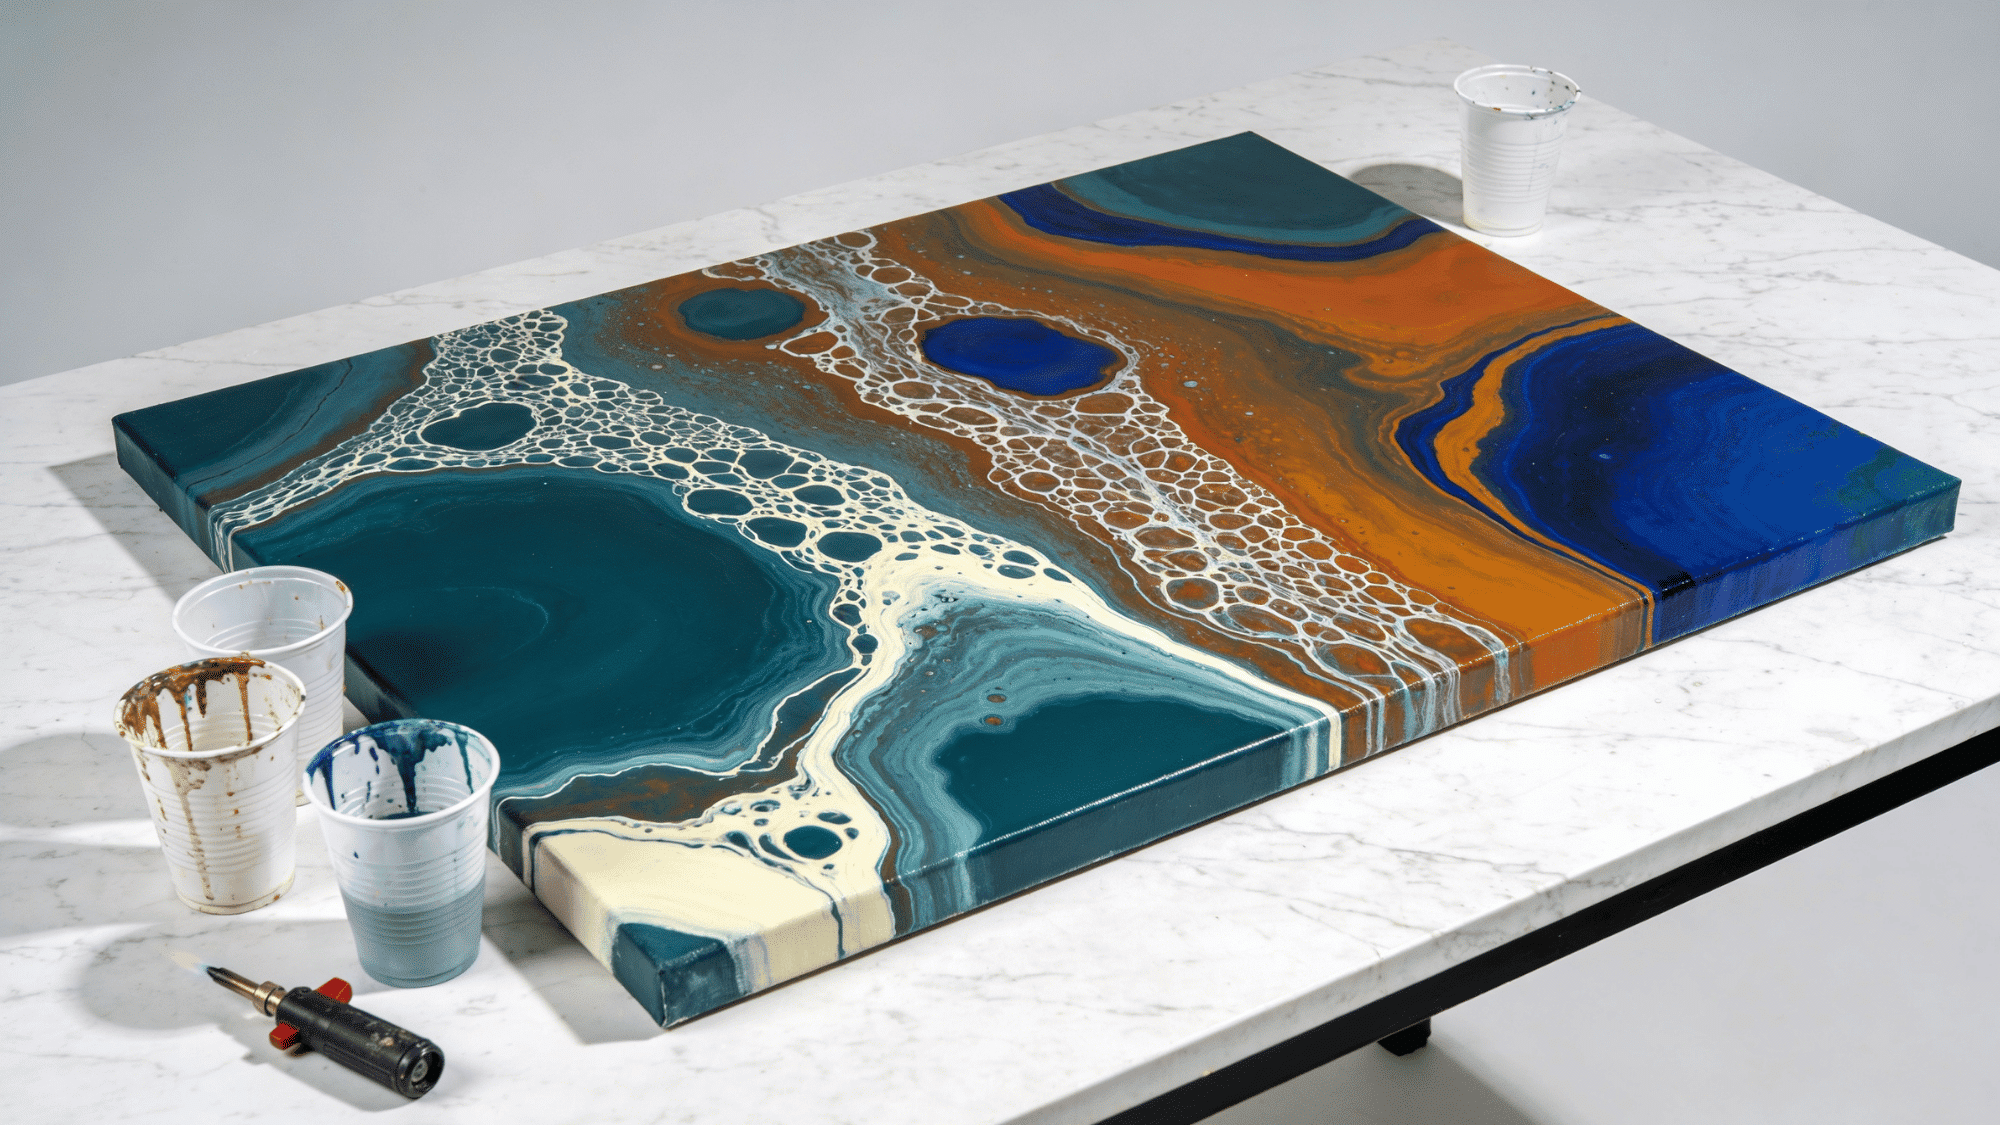
This diy canvas art style is one of the few where less control gives you better results. Colors blend and separate on their own, and no two pours ever come out the same.
Materials Needed:
| Material | Type/Variant | Purpose |
|---|---|---|
| Fluid acrylic paint | Any colors | Main pouring medium |
| Pouring medium | Floetrol or GAC800 | Smooth flow and cell formation |
| Pre-gessoed canvas panel | Any size | Base surface |
| Plastic cups | Disposable | Mixing and layering colors |
| Butane torch | Small handheld | Popping surface bubbles |
How to Make It:
- Mix each paint color separately with pouring medium
- Layer all colors into one cup without stirring
- Flip the cup onto the canvas center and slowly lift
- Tilt the canvas in every direction until covered
- Torch the surface lightly to pop bubbles
3. Sand and Gesso Textured Painting
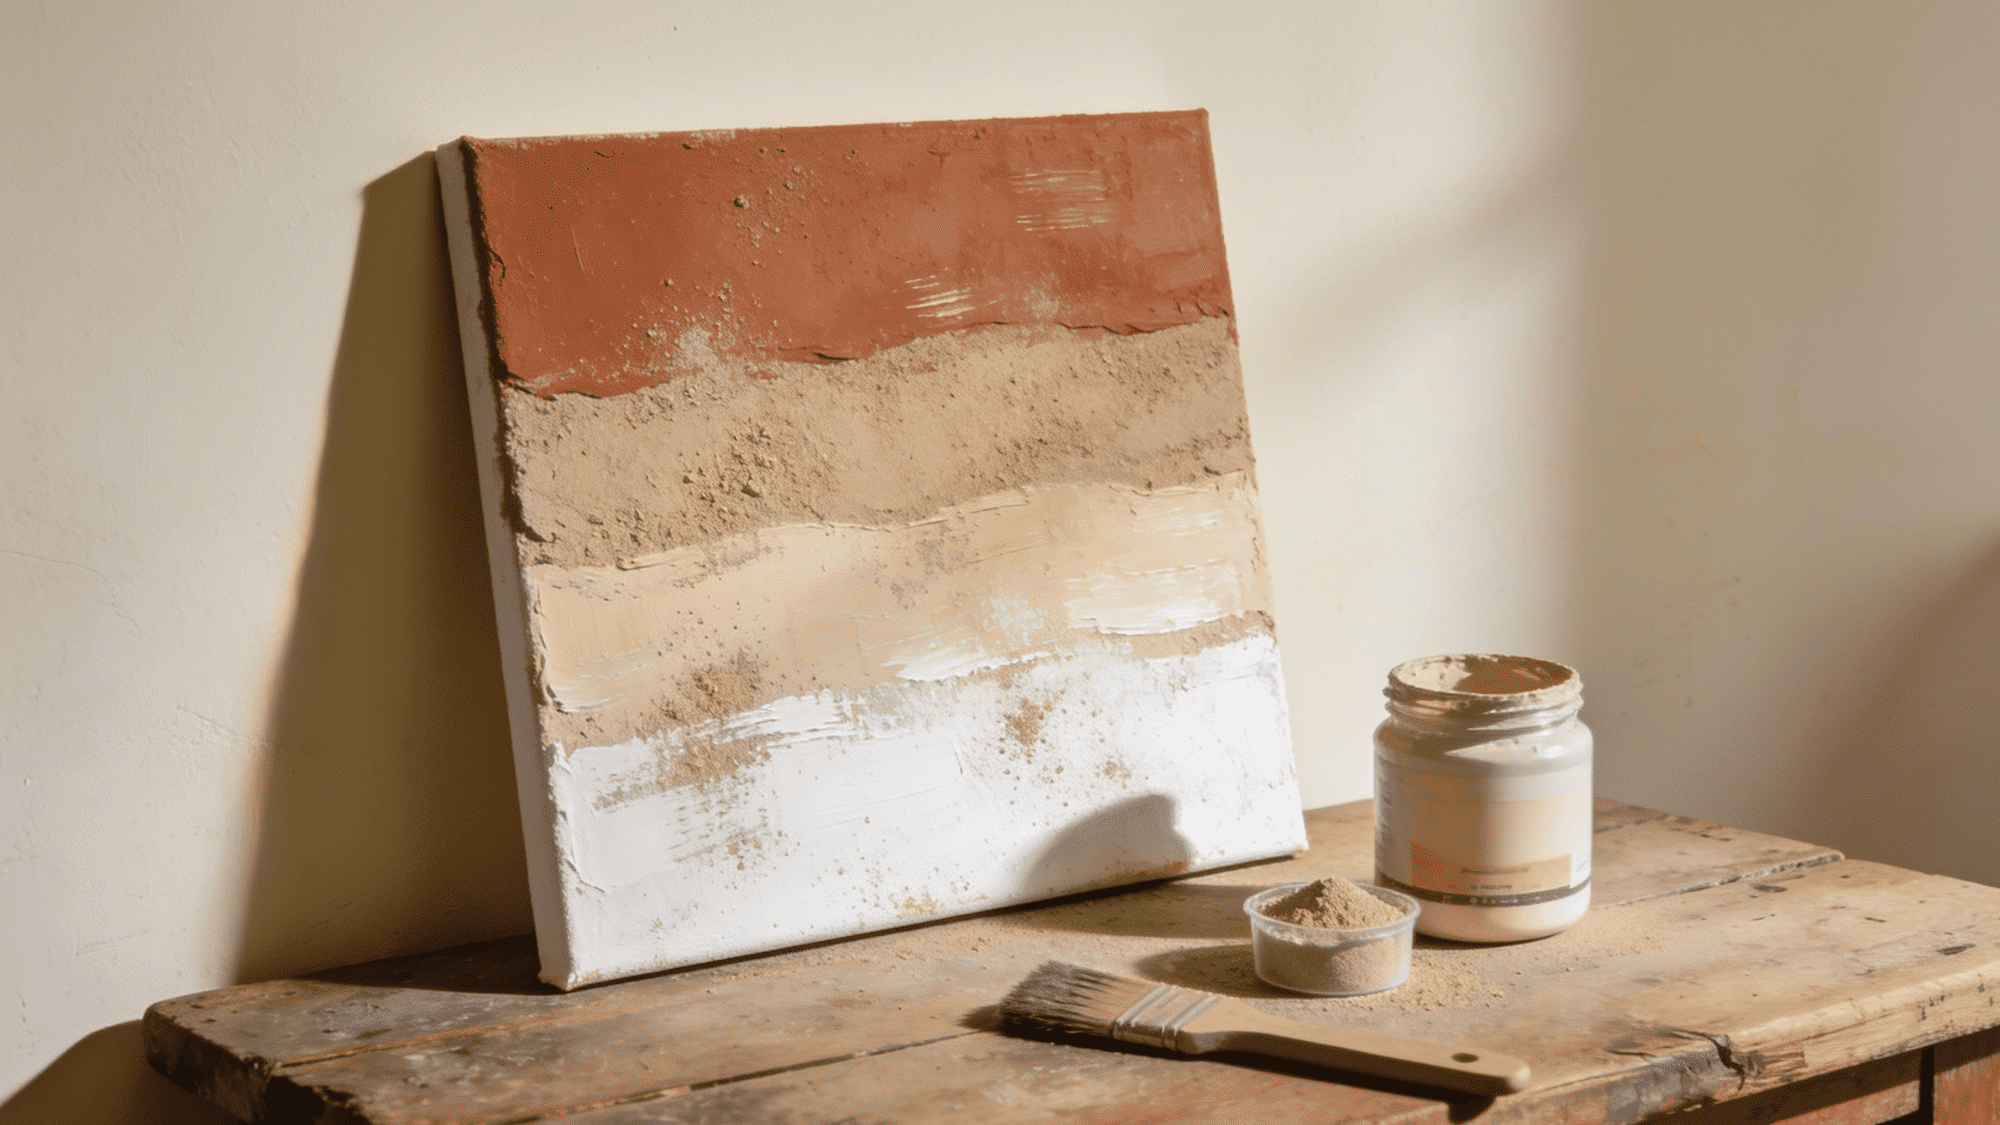
Mixing sand into gesso before you paint gives the surface a gritty, natural feel that flat paint cannot replicate. It works especially well with earthy or coastal color palettes.
Materials Needed:
| Material | Type/Variant | Purpose |
|---|---|---|
| Fine craft sand | Washed and dried | Adding surface texture |
| Gesso | White or clear | Binding sand to canvas |
| Stretched canvas | Medium-weight cotton | Base surface |
| Stiff flat brush | Hog hair bristle | Applying sand-gesso mix |
| Acrylic paint | Earthy or coastal tones | Painting over texture |
How to Make It:
- Mix fine sand into gesso until paste-like
- Brush unevenly over canvas in loose strokes
- Let it dry fully for at least 12 hours
- Apply thin acrylic color washes over the surface
- Dry brush a lighter tone over peaks for highlights
4. Palette Knife Landscape
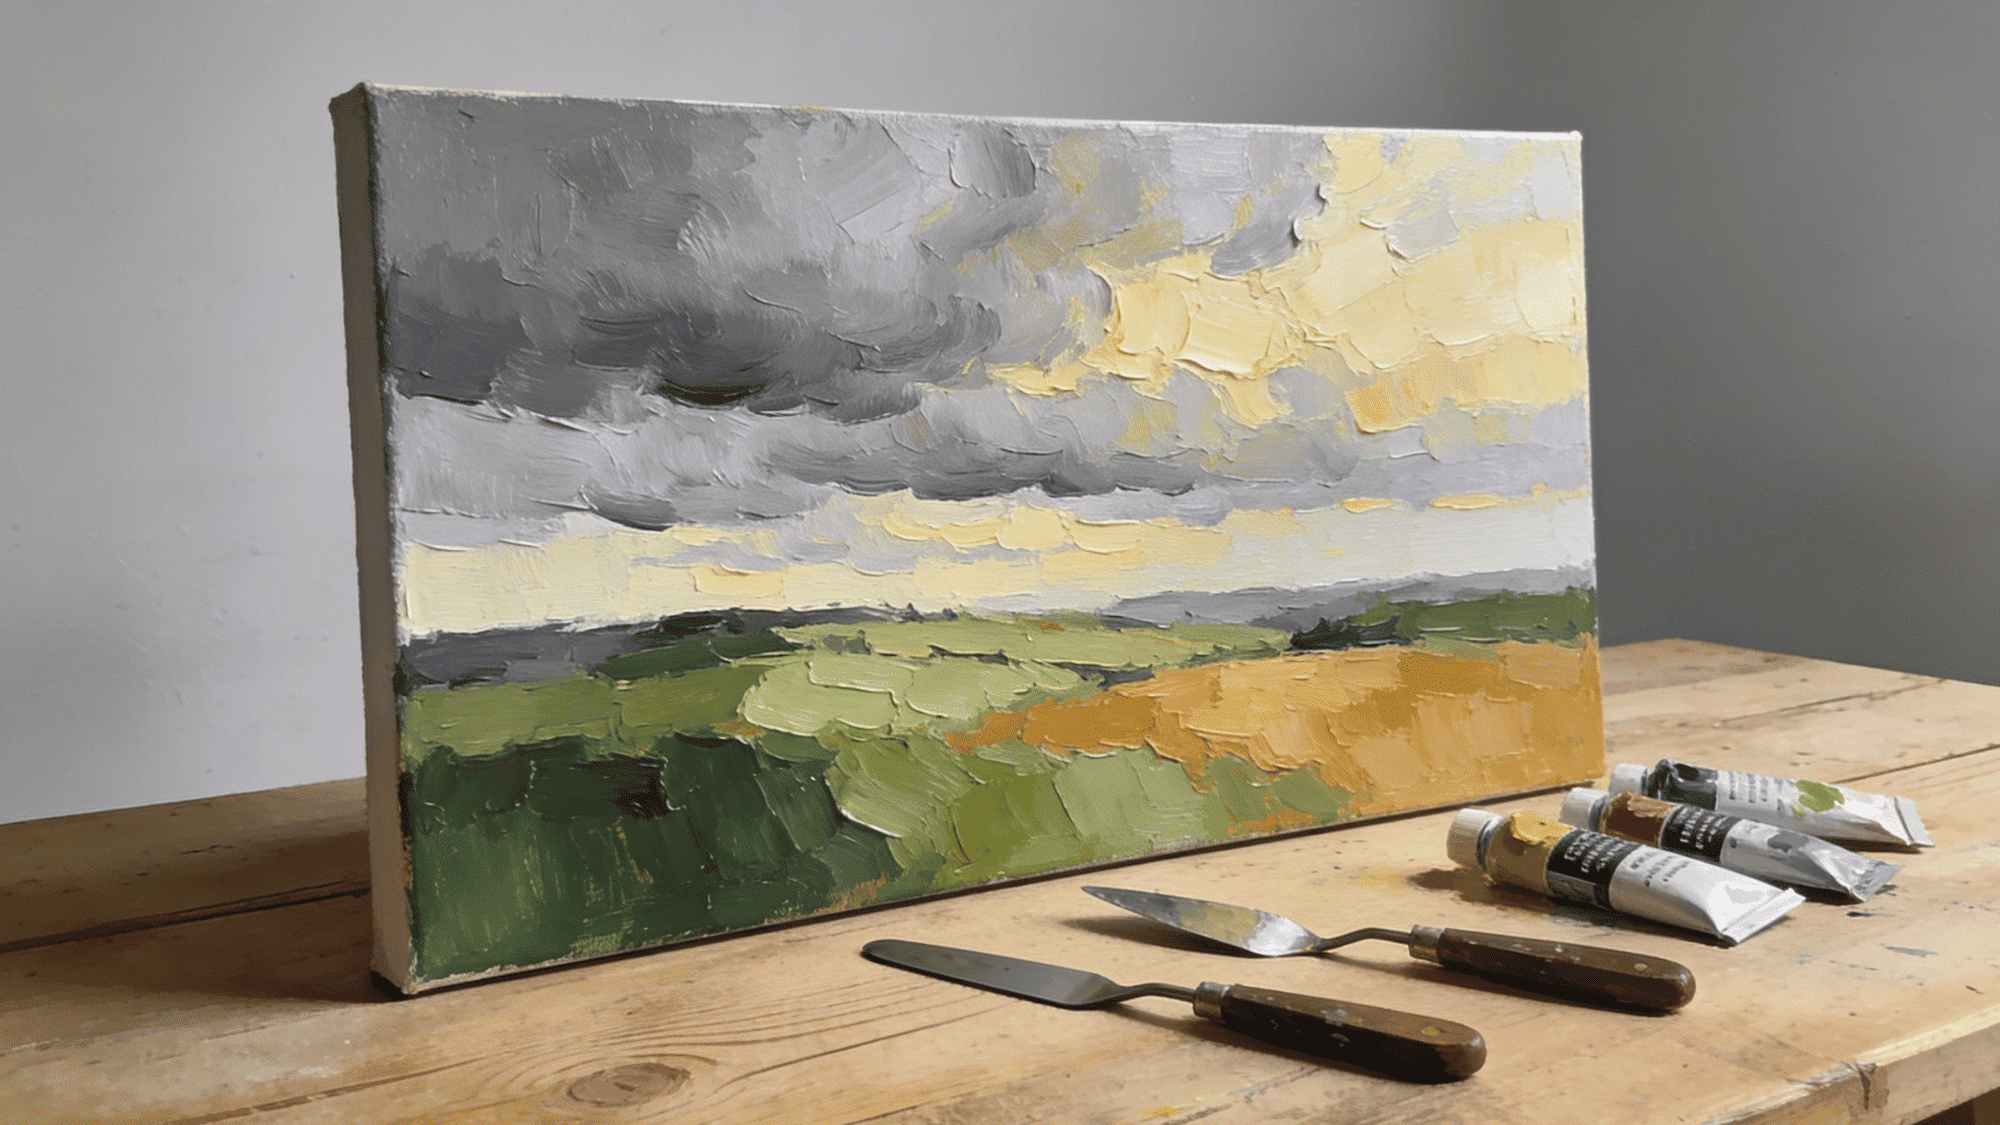
Palette knife work creates thick, chunky strokes that give this textured painting style a bold, almost three-dimensional look. It is also much more forgiving than brushwork since mistakes blend right in.
Materials Needed:
| Material | Type/Variant | Purpose |
|---|---|---|
| Palette knife | Straight and offset blade | Applying and shaping paint |
| Heavy body acrylic | Sky, earth, and foliage tones | Building landscape layers |
| Stretched canvas | Medium to large size | Sturdy base for thick paint |
| Impasto or gel medium | Optional extender | Adding extra body to paint |
| Paper towel or rag | Disposable | Wiping the knife between colors |
How to Make It:
- Undercoat canvas thinly with a mid-tone base
- Load the palette knife heavily and drag across for the sky
- Build ground and mid-ground layers next
- Add foreground last using the thickest paint
- Leave edges rough and unblended for a painterly feel
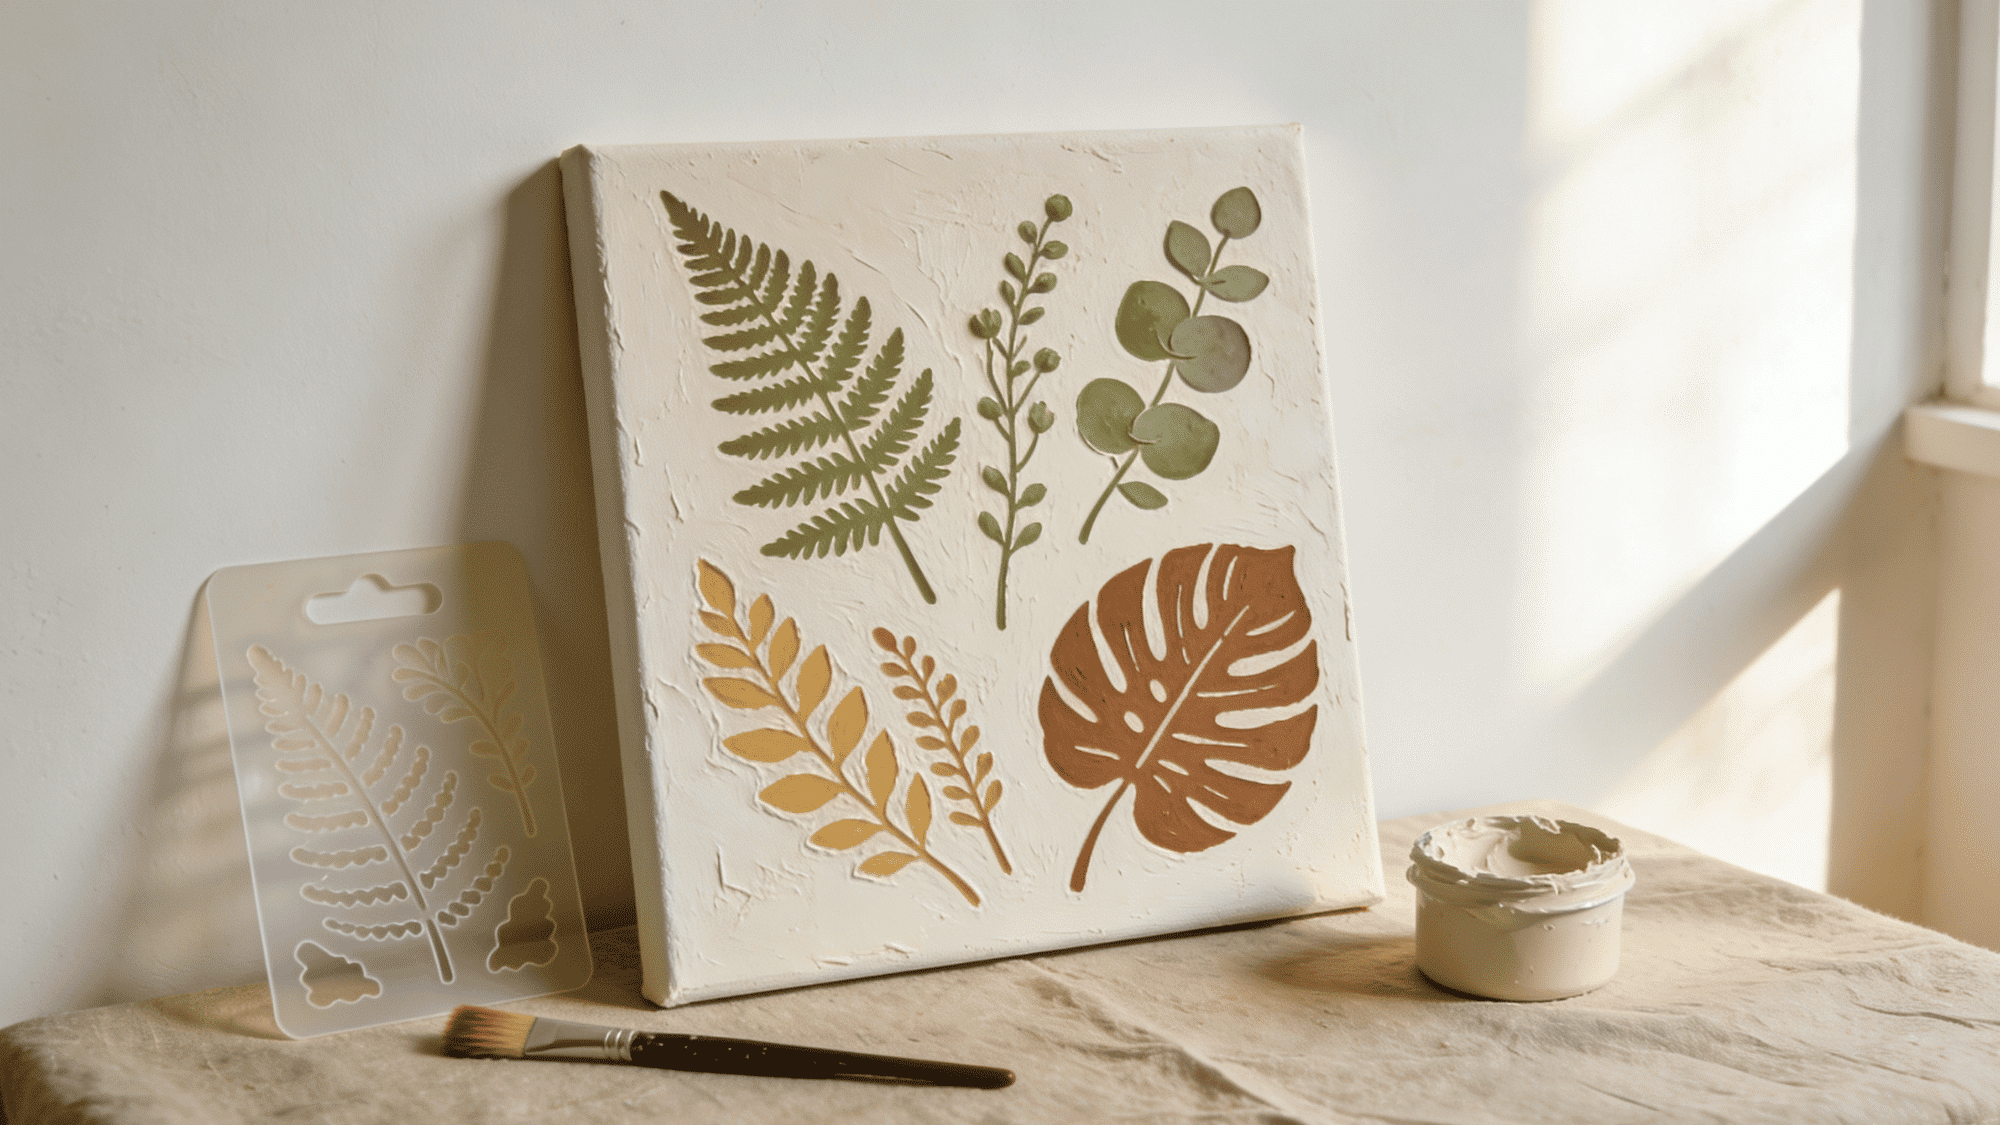
5. Leaf Impression Plaster Canvas
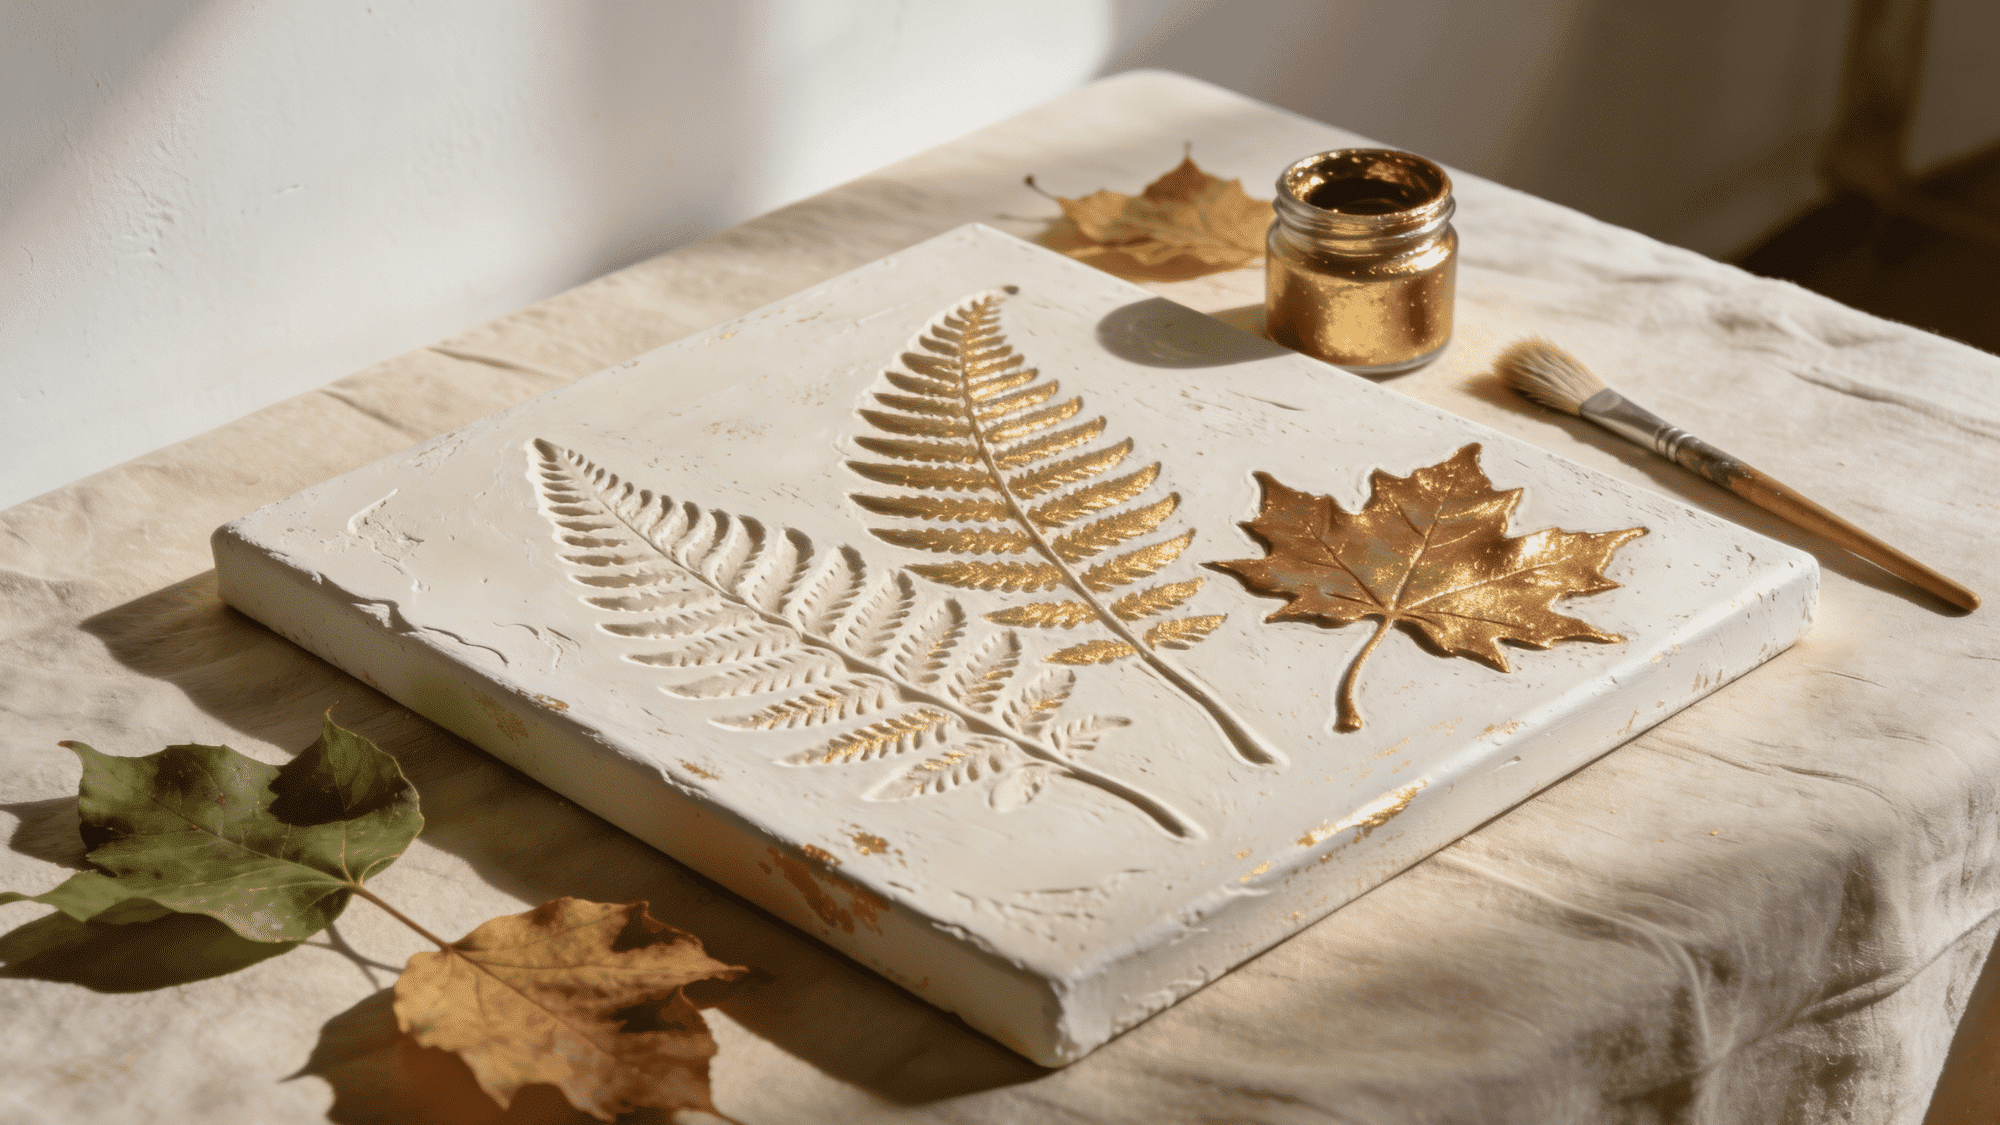
Pressing real leaves into wet plaster art on canvas leaves behind delicate negative imprints that look detailed and intentional. No stencil or steady hand required.
Materials Needed:
| Material | Type/Variant | Purpose |
|---|---|---|
| Air-dry plaster | Fine texture | Impression base |
| Fresh leaves | Various shapes and sizes | Creating imprints |
| Stretched canvas | Any size | Base surface |
| Metallic acrylic paint | Gold or copper | Highlighting impressions |
| Soft dry brush | Small flat brush | Applying metallic detail |
How to Make It:
- Apply an even plaster layer across the canvas
- Press fresh leaves firmly into wet plaster
- Peel the leaves away carefully after 5 minutes
- Let the plaster dry overnight before painting
- Dry brush metallic paint lightly to reveal impressions
6. String and Nail Canvas Art
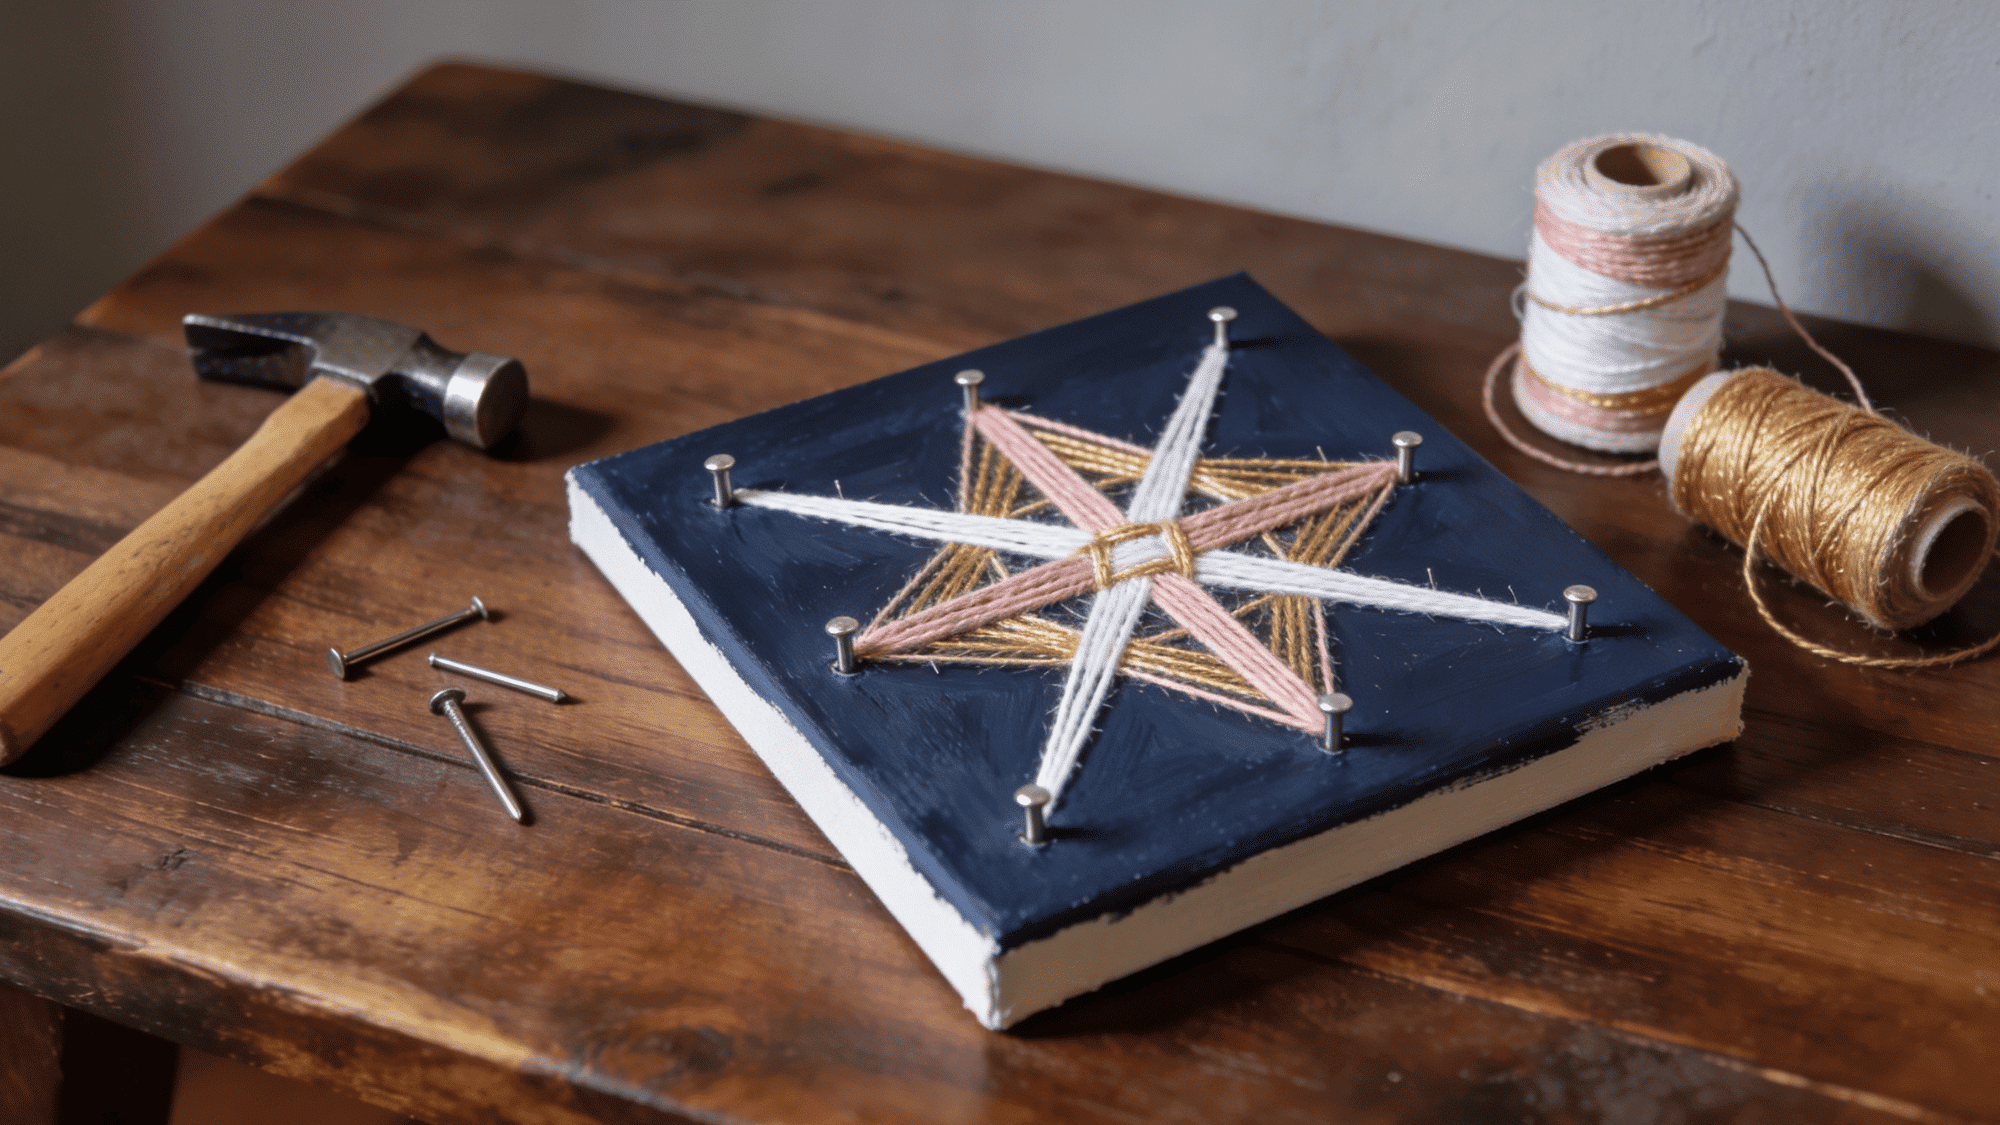
This diy canvas art idea works because the contrast between a painted background and wrapped thread creates real visual tension. It looks intricate, but the process is straightforward.
Materials Needed:
| Material | Type/Variant | Purpose |
|---|---|---|
| Cotton or nylon string | Thin, colorful | Wrapping pattern |
| Small flat-head nails | 1 inch | Anchoring string points |
| Hammer | Standard | Driving nails into a canvas frame |
| Acrylic paint | Any background color | Base layer |
| Diluted PVA glue | White glue and water | Sealing finished string |
How to Make It:
- Paint the canvas background and let it dry completely
- Hammer small nails into the canvas in the chosen shape
- Wrap the string tightly between the nail points
- Layer multiple thread colors for added depth
- Seal the string lightly with diluted PVA glue
7. Watercolor Wash with Ink Linework
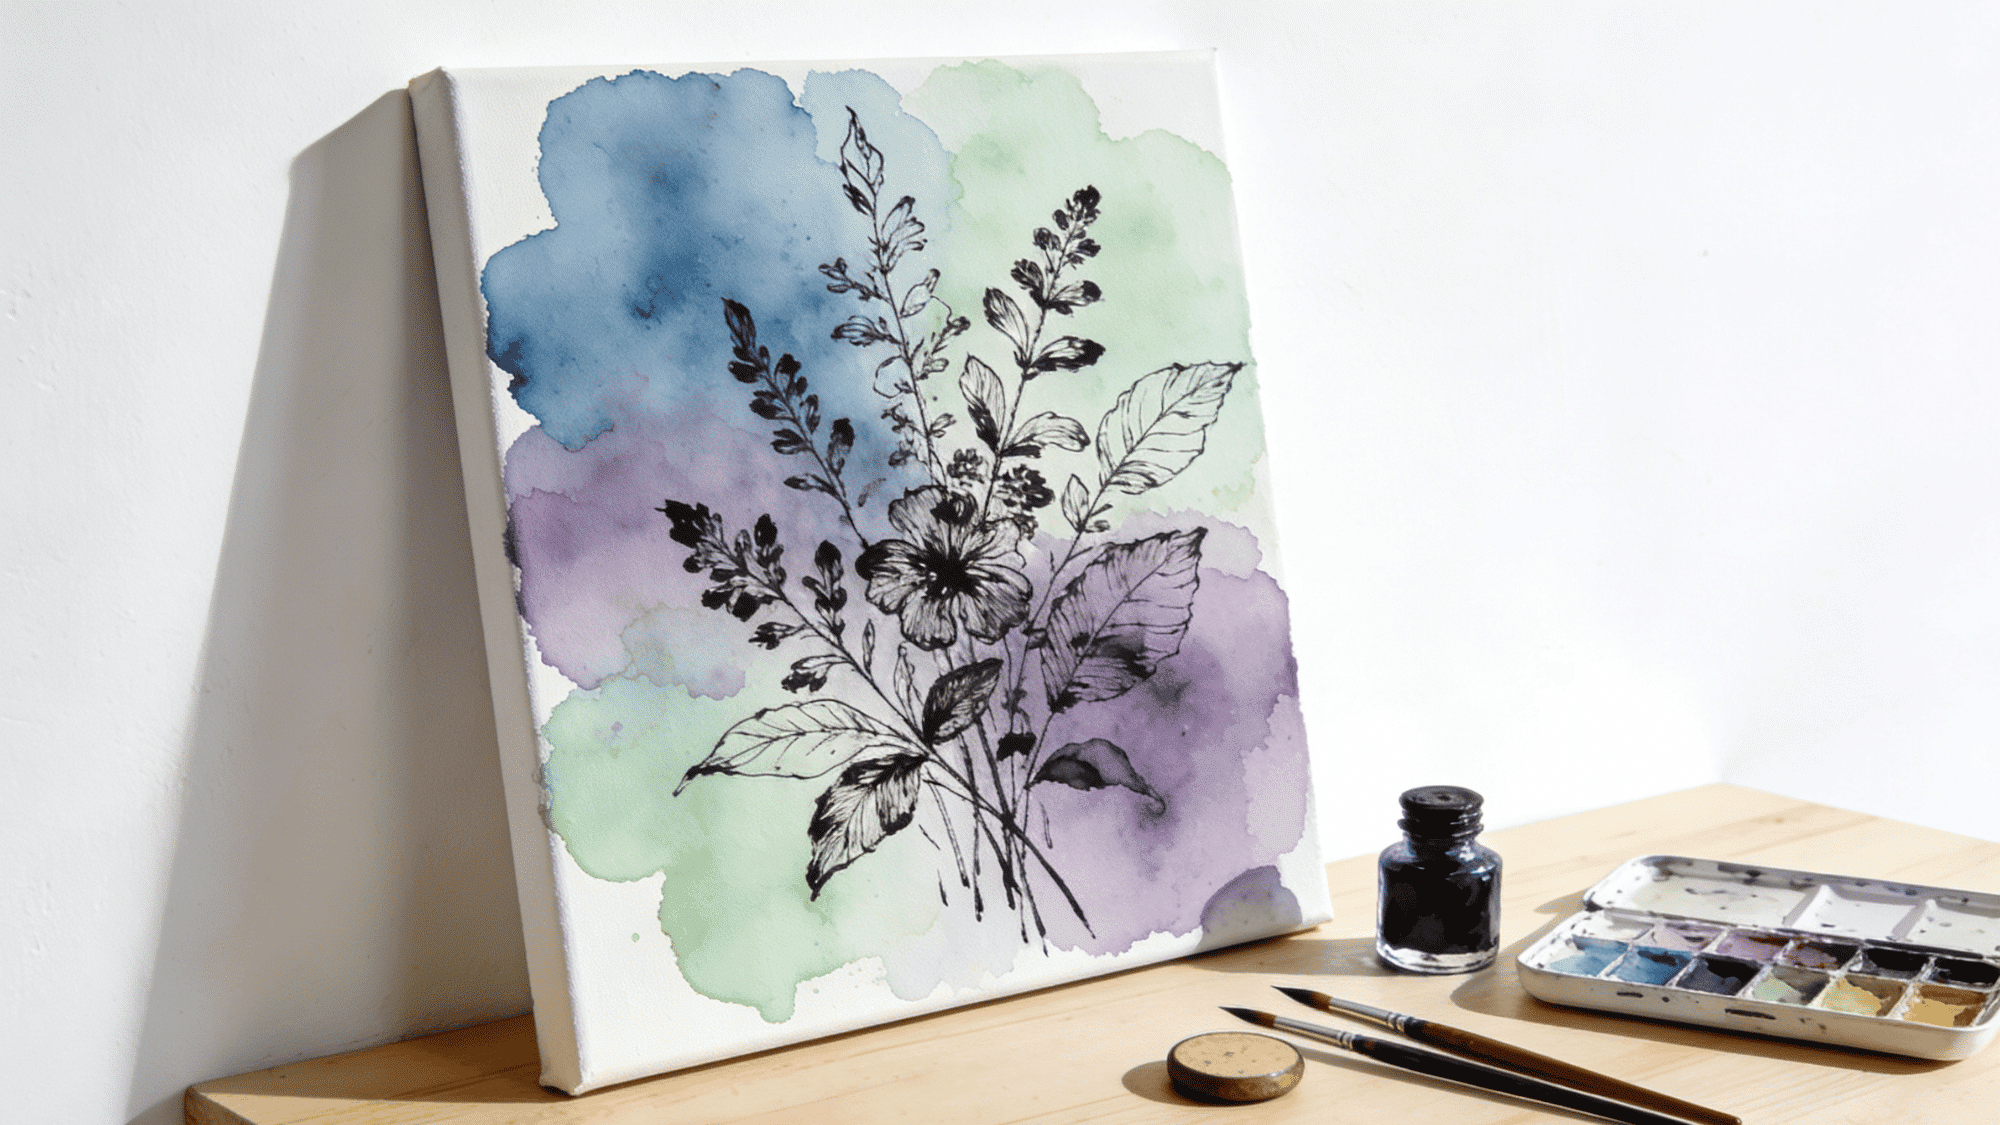
The soft edges of watercolor under sharp ink lines create a contrast that makes this diy canvas art idea look polished and intentional. It suits botanical, architectural, and abstract subjects equally well.
Materials Needed:
| Material | Type/Variant | Purpose |
|---|---|---|
| Watercolor paint | Pan or tube | Wash background |
| Black India ink | Pigment-based | Final linework |
| Watercolor canvas | Primed cotton | Holds water without warping |
| Round watercolor brushes | Sizes 4 and 8 | Applying washes |
| Fine nib pen or brush | Detail nib | Drawing ink lines |
How to Make It:
- Wet the canvas lightly before applying watercolor
- Drop colors and let them bleed freely
- Let dry completely before adding any linework
- Draw over dried wash with India ink
- Use both fine and thick lines for variation
8. Newspaper Collage Textured Painting
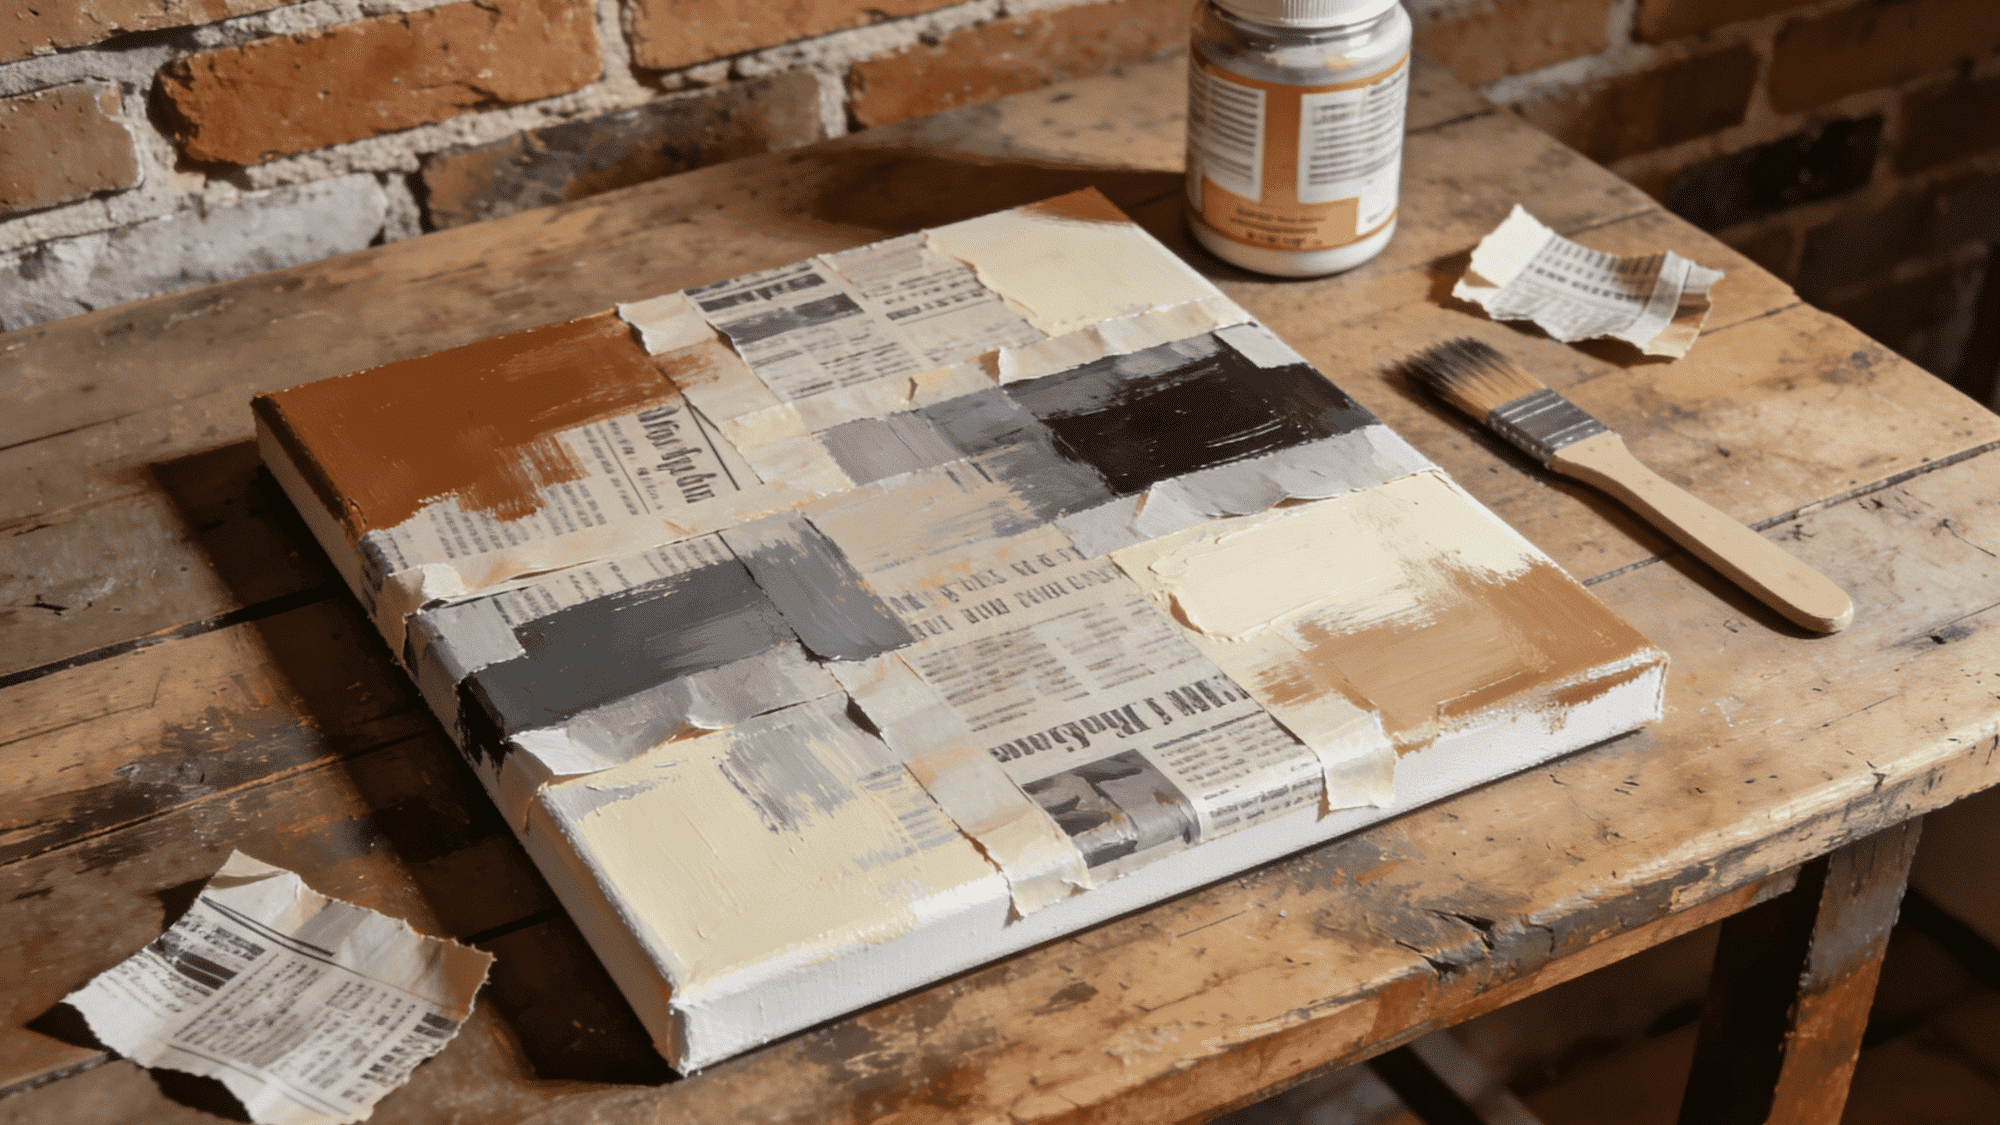
Layering torn newspaper under acrylic paint adds texture and visual interest, making this technique feel like real mixed-media wall decor. Old headlines and photographs also add a storytelling quality to the piece.
Materials Needed:
| Material | Type/Variant | Purpose |
|---|---|---|
| Old newspaper | Any print | Collage base layer |
| Mod Podge | Matte finish | Adhering paper to canvas |
| Stretched canvas | Any size | Base surface |
| Acrylic paint | Any colors | Top painting layer |
| Flat soft brush | 1 to 2 inches | Applying Mod Podge |
How to Make It:
- Tear the newspaper into rough, uneven pieces
- Adhere to canvas with Mod Podge in overlapping layers
- Let each layer dry before adding the next
- Paint over with thin acrylic washes
- Add final opaque details on top
9. Galaxy Sponge Canvas
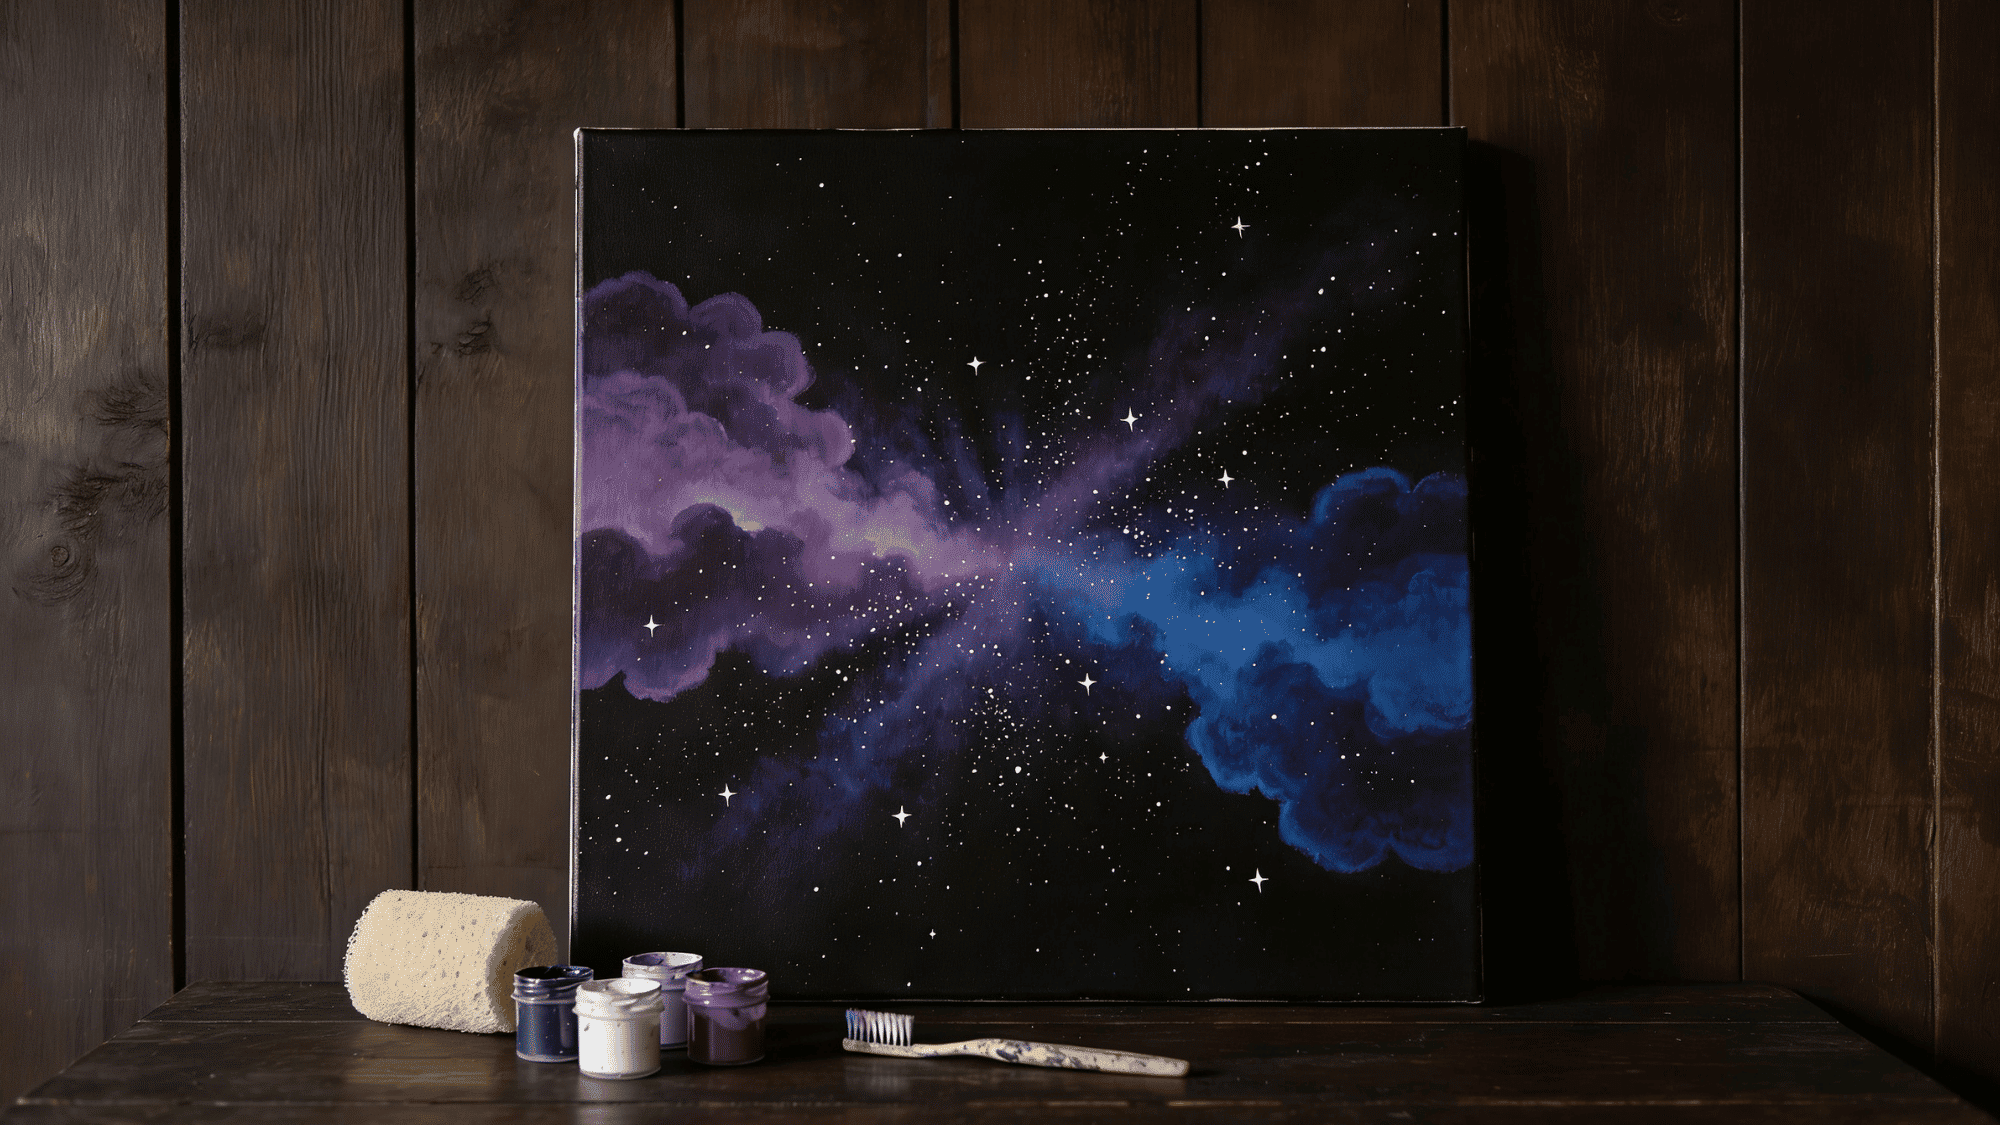
This diy canvas art idea proves that professional-looking results do not require any painting skills at all. A sea sponge and a few dark acrylics are all it takes to build a convincing galaxy effect.
Materials Needed:
| Material | Type/Variant | Purpose |
|---|---|---|
| Sea sponge | Natural or synthetic | Blending nebula clouds |
| Acrylic paint | Deep blues, purples, black | Galaxy color layers |
| Stretched canvas | Any size | Base surface |
| White acrylic paint | Titanium white | Star flicking and highlights |
| Old toothbrush | Stiff bristles | Flicking star dots |
How to Make It:
- Cover the canvas entirely in black paint first
- Dab the sponge lightly with purple and blue paint
- Build cloud layers gradually with repeated sponging
- Flick white paint off the toothbrush for stars
- Add concentrated bright dots with a fine brush
10. Crayon Wax Drip Canvas
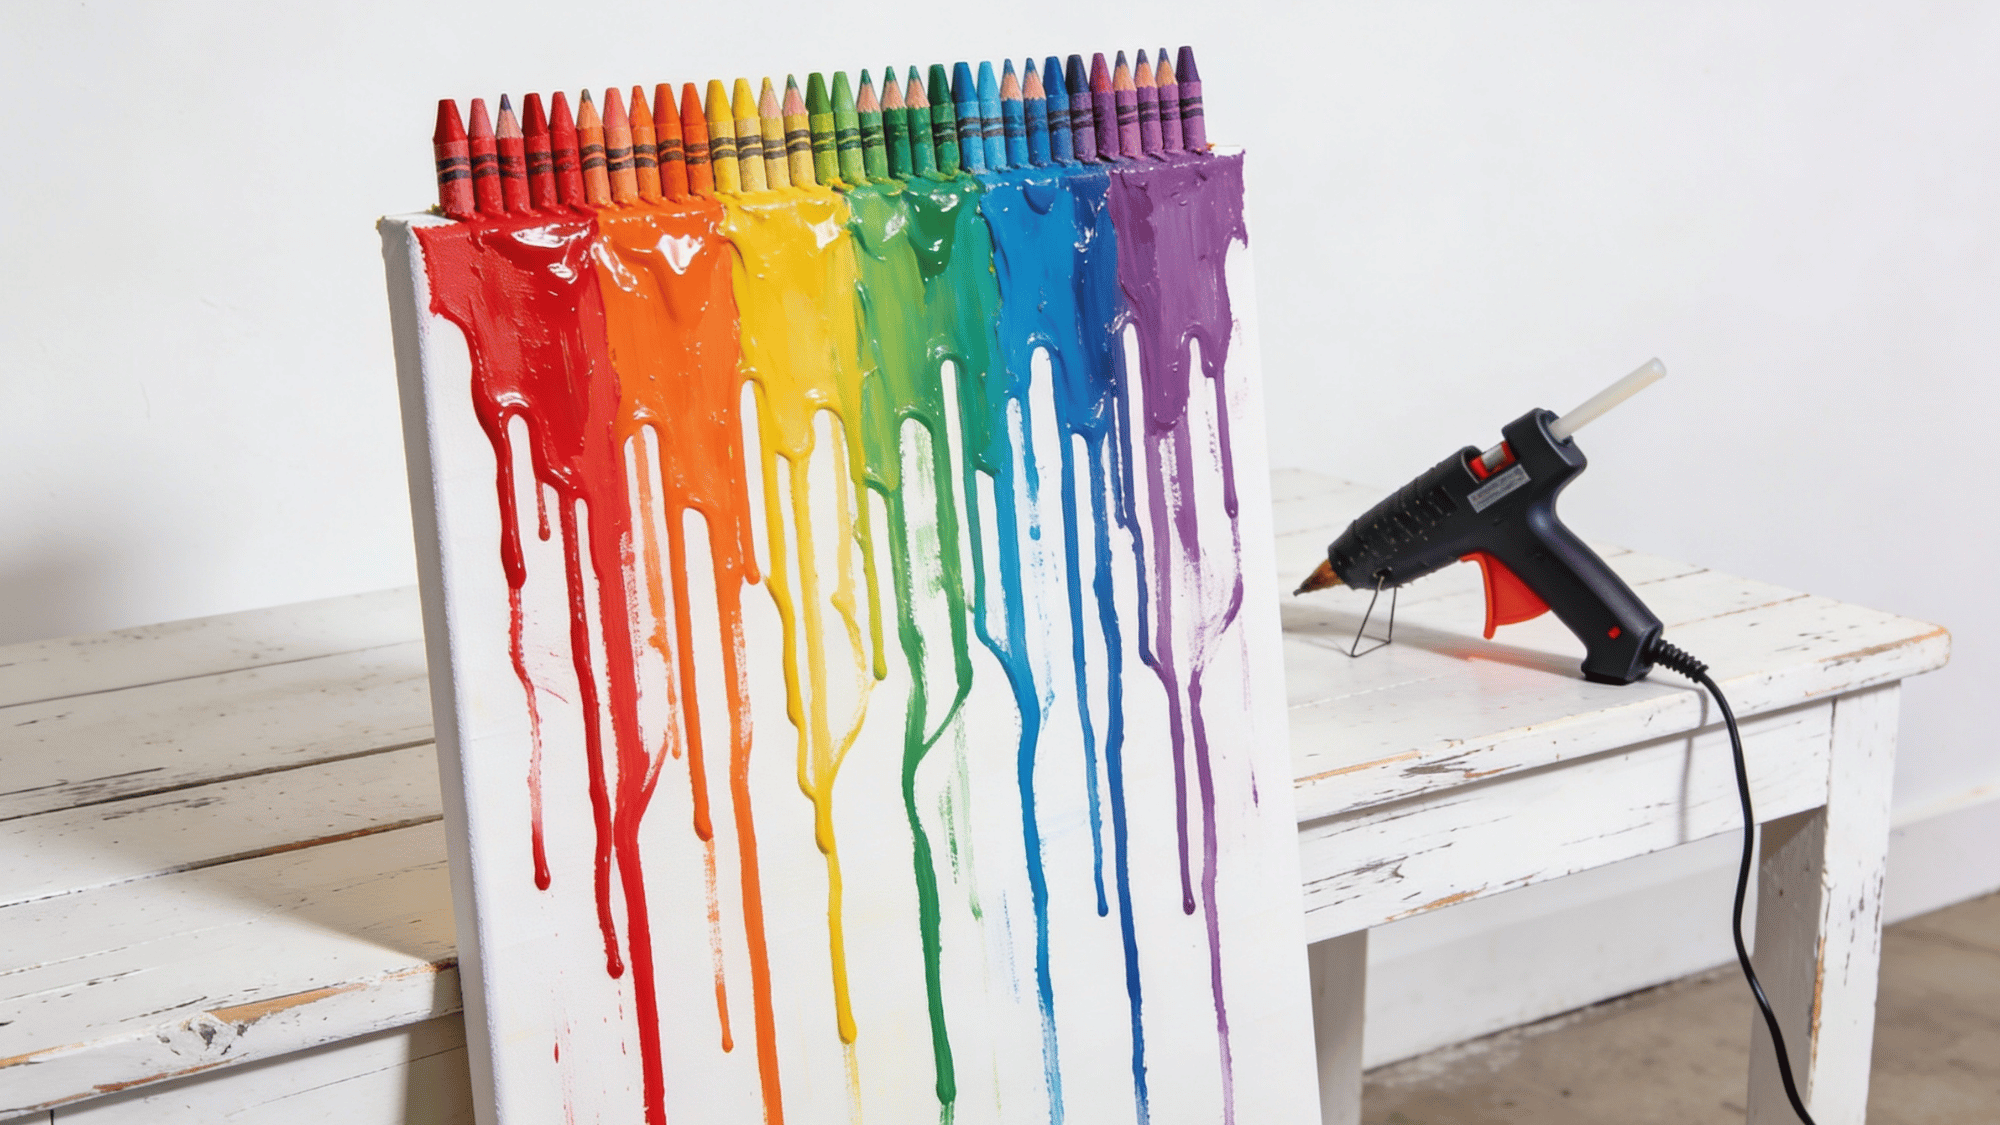
Melting crayon wax down a canvas with a heat gun creates a textured painting effect that looks dynamic and totally unpredictable. The drips, pools, and blended colors are impossible to fake with regular paint.
Materials Needed:
| Material | Type/Variant | Purpose |
|---|---|---|
| Old crayons | Various colors | Wax painting medium |
| Heat gun or hair dryer | High heat setting | Melting and directing wax |
| Stretched canvas | Standard cotton | Catching wax drips |
| Hot glue gun | Standard | Securing crayons to the canvas top |
| Clear acrylic spray | Sealant | Protecting the finished wax surface |
How to Make It:
- Glue crayons side by side along the top canvas edge
- Aim the heat gun at the crayon tips to begin melting
- Let wax drip naturally downward across the canvas
- Tilt the canvas for directional flow if needed
- Seal with clear acrylic spray once fully cooled
11. Resin Over Plaster Canvas
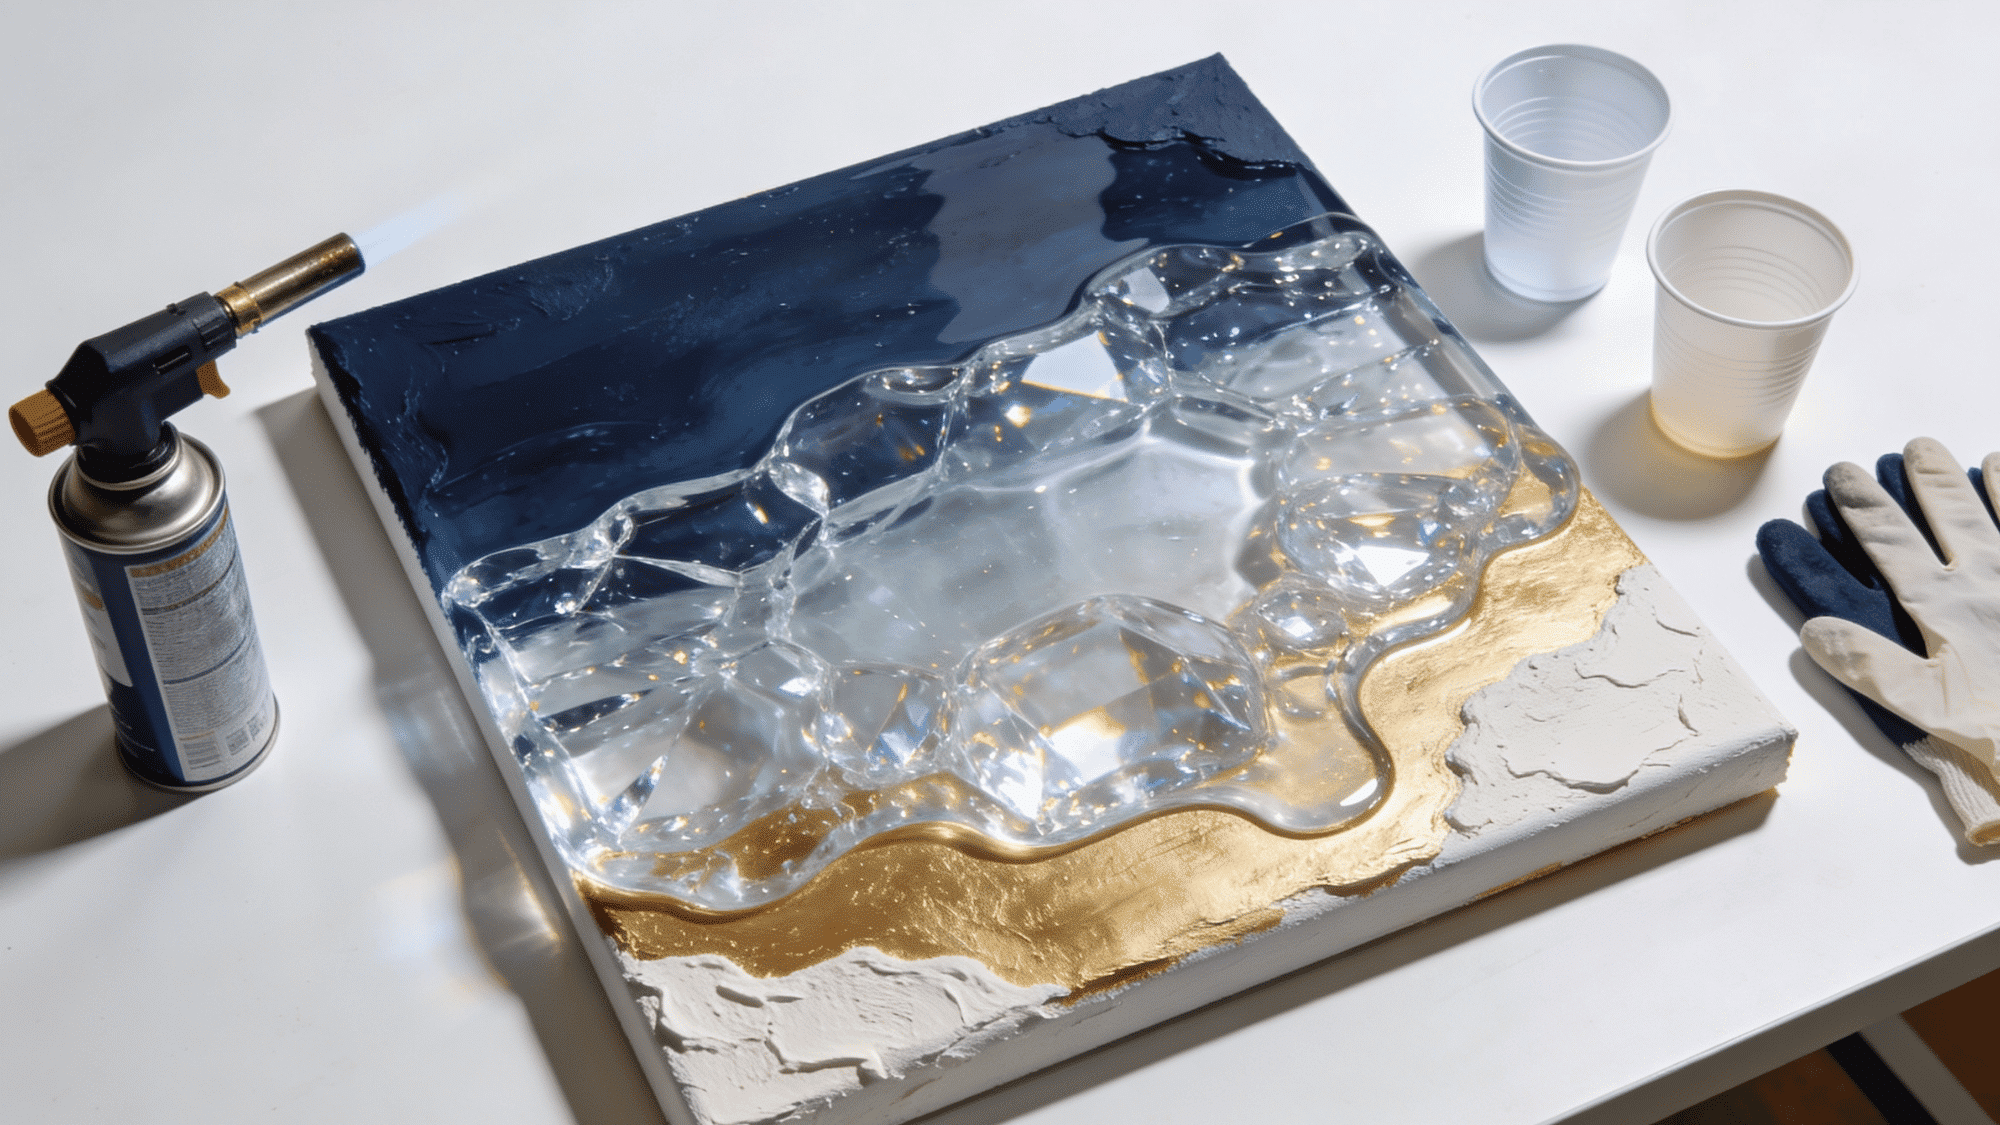
Pouring clear resin over plaster art on canvas seals in all the texture while adding a glass-like surface that makes every color underneath look more vivid. It takes patience, but the finish is hard to match with any other technique.
Materials Needed:
| Material | Type/Variant | Purpose |
|---|---|---|
| Two-part epoxy resin | Standard casting kit | Glossy protective topcoat |
| Mixing cups and sticks | Disposable plastic | Mixing resin parts evenly |
| Painted plaster canvas | Any completed design | Base artwork |
| Butane torch | Small handheld | Removing surface bubbles |
| Gloves and drop cloth | Protective gear | Keeping the workspace clean |
How to Make It:
- Complete and fully cure your plaster canvas first
- Mix resin parts together according to the package ratio
- Pour slowly over the center and spread to all edges
- Pop surface bubbles with a torch within 10 minutes
- Cure flat for a minimum of 24 hours
12. Ombre Gradient Canvas
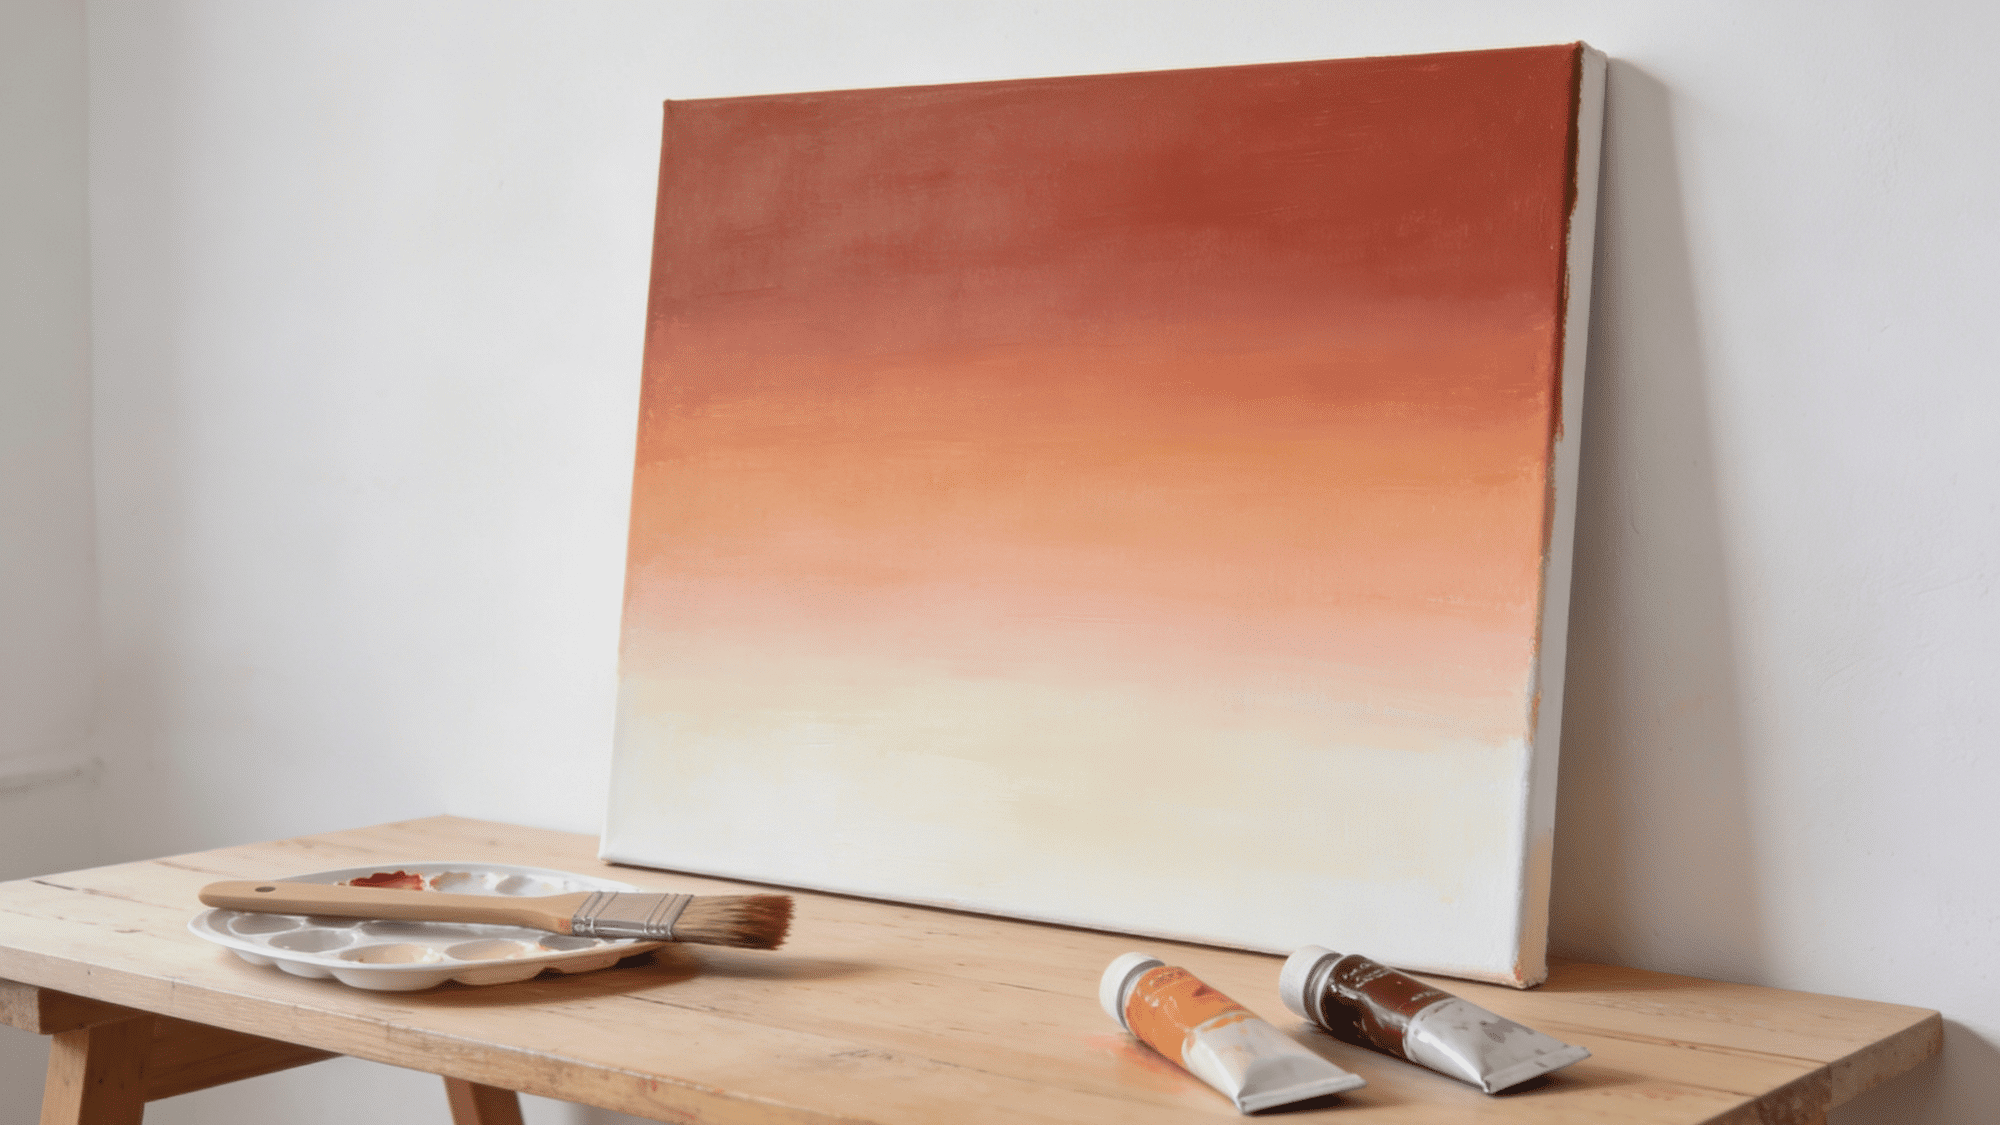
An ombre is one of the most satisfying diy canvas art projects because the blend happens fast and the result looks far more complex than it actually is. Two colors are all you need.
Materials Needed:
| Material | Type/Variant | Purpose |
|---|---|---|
| Two acrylic colors | Complementary or analogous | Creating the gradient |
| Wide flat brush | 2 to 3 inch synthetic | Smooth blending strokes |
| Canvas board | Primed, any size | Painting surface |
| White acrylic paint | Titanium white | Softening midpoint blend |
| Palette or mixing tray | Flat surface | Mixing transition tones |
How to Make It:
- Apply the first color across the top third of the canvas
- Apply the second color across the bottom third
- Blend center where both colors meet quickly
- Work in horizontal strokes and keep the brush damp
- Add white to the midpoint for a soft glowing center
13. Stenciled Botanical Canvas
Layering botanical stencils over a textured painting base creates a piece that looks like a pressed herbarium mounted directly on your wall. The texture underneath adds depth that stenciling alone never achieves.
Materials Needed:
| Material | Type/Variant | Purpose |
|---|---|---|
| Botanical stencils | Reusable plastic | Pattern template |
| Modeling paste | Thick texture medium | Raised textured base layer |
| Stretched canvas | Any size | Base surface |
| Acrylic paint | Greens, ochres, and browns | Natural color palette |
| Stencil brush or sponge | Flat dense brush | Stippling paint through stencil |
How to Make It:
- Apply a thin modeling paste layer to the full canvas
- Let it dry, then press the stencil firmly over the surface
- Stipple paint through the stencil using a dense brush
- Remove the stencil carefully and let it dry fully
- Add small hand-painted details for a realistic finish
14. Tape Resist Geometric Canvas
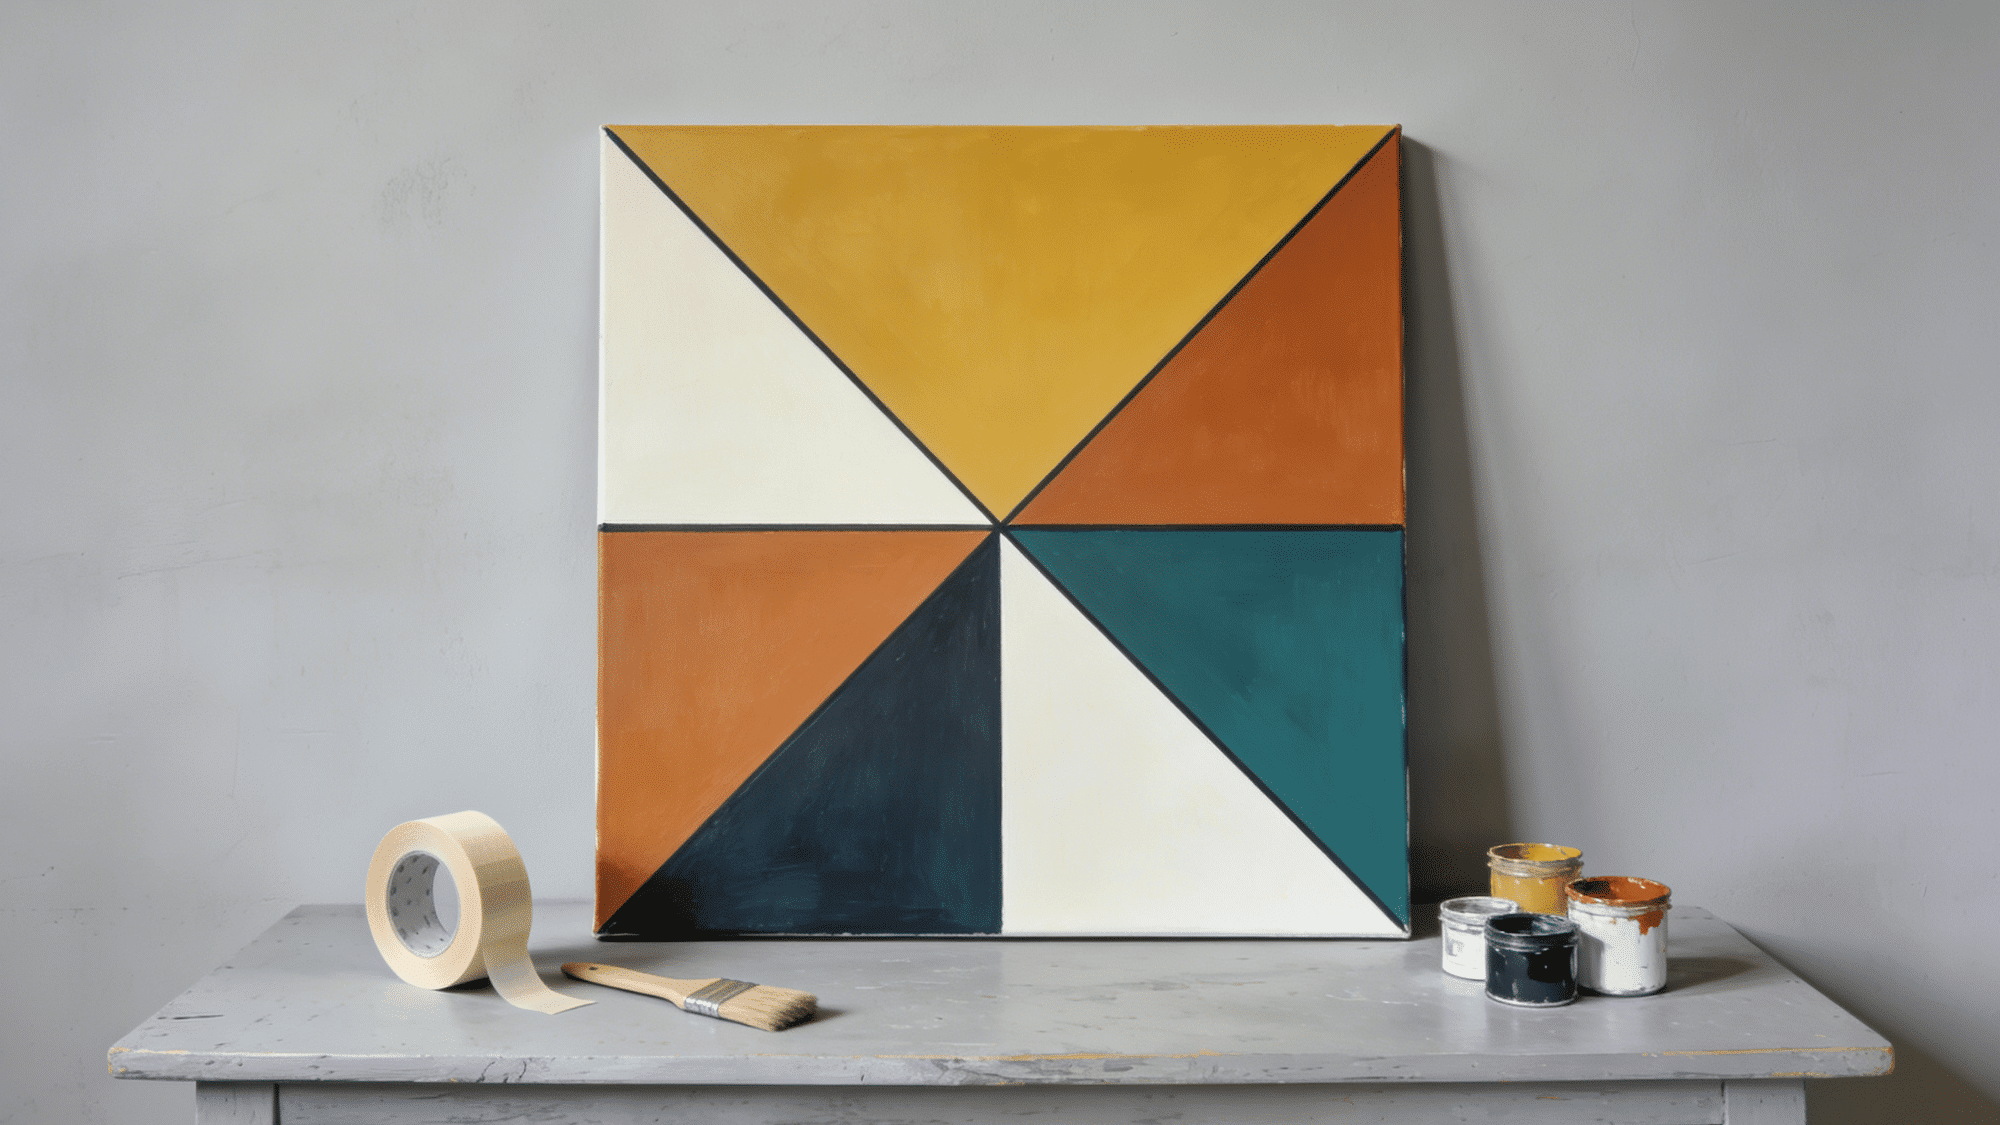
Painter’s tape makes clean, sharp lines that are nearly impossible to achieve freehand, which is exactly what makes this diy canvas art idea so satisfying to peel back and reveal.
Materials Needed:
| Material | Type/Variant | Purpose |
|---|---|---|
| Painter’s tape | Low-tack blue or white | Masking clean lines |
| Acrylic paint | Bold contrasting colors | Filling each section |
| Canvas panel or board | Any size | Base surface |
| Flat soft brush | 1 inch | Painting each taped section |
| Fine detail brush | Size 1 or 2 | Touching up edges after peeling |
How to Make It:
- Plan your design and apply tape firmly across the canvas
- Press all tape edges down to prevent paint bleeding
- Paint each section in a flat, even coat
- Let the paint dry fully before removing the tape slowly
- Touch up any edges with a fine brush
15. Fabric and Plaster Mixed Media Canvas
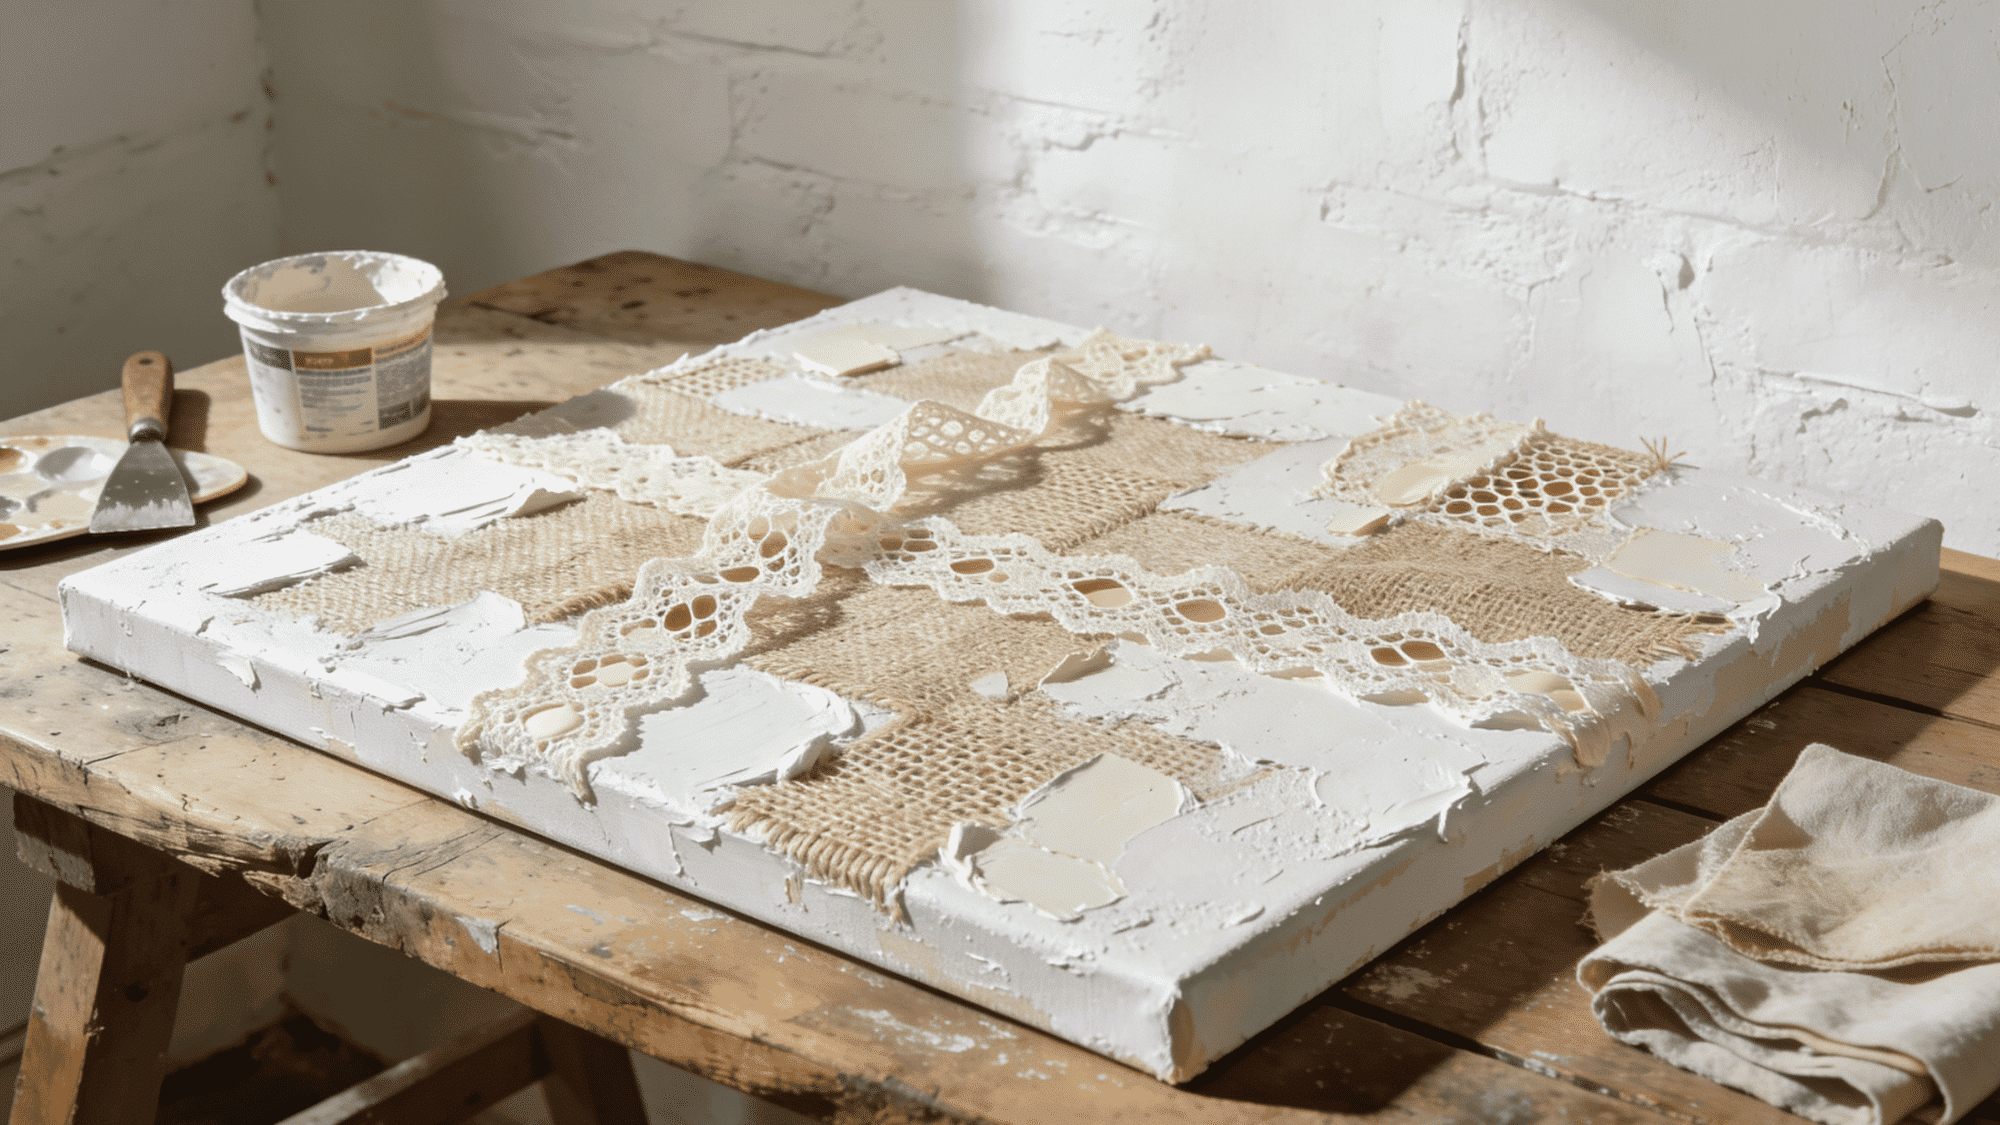
Pressing fabric scraps like lace or burlap into plaster art on canvas creates a layered, tactile surface that paint alone cannot produce. Each piece ends up genuinely one-of-a-kind because no two fabric textures ever embed exactly the same way.
Materials Needed:
| Material | Type/Variant | Purpose |
|---|---|---|
| Fabric scraps | Lace, burlap, or mesh | Embedded surface texture |
| Joint compound | Smooth or coarse finish | Encasing and binding fabric |
| Stretched canvas | Any size | Base surface |
| Acrylic or chalk paint | Matte finish | Unified surface color |
| Sandpaper | Fine grit (220) | Smoothing dried compound |
How to Make It:
- Apply a thick compound layer onto the canvas surface
- Press fabric pieces firmly into wet compound
- Spread a thin second coat over the fabric to seal
- Sand lightly once fully dried and hardened
- Paint over the entire surface for a cohesive finish
Final Thoughts
And just like that, a blank canvas doesn’t seem so intimidating anymore, does it? The hardest part was never the painting itself. It was just deciding to start.
Go full chaos with a wax drip canvas or keep it clean with tape-resist geometry; the only real rule is that you actually enjoy making it. Mess up, try again, and hang it on your wall anyway.
So pick the one that’s been sitting in the back of your head since you started scrolling, grab your supplies, and just go for it already.