
My first DIY mud kitchen was made from a wobbly old dresser, scrap wood, and a few forgotten pots, and somehow it worked.
A DIY mud kitchen is simply a child-sized outdoor play kitchen you build yourself for mixing mud, water, leaves, sticks, and other natural materials. Most setups include a countertop, pretend sink, back panel, and storage for bowls, spoons, and containers.
You do not need fancy materials or advanced woodworking skills either. Like many beginner wood projects, a mud kitchen can come together with a few basic supplies and patience with crooked corners.
What You Need to Build a DIY Mud Kitchen
|
Material |
Used For |
What to Choose |
|---|---|---|
|
Exterior-grade lumber |
Frame and legs |
Wood suitable for outdoor use |
|
Worktop boards |
Main play surface |
Firm, smooth boards |
|
Back panel boards |
Backsplash |
Straight, sound boards |
|
Exterior wood screws |
Joining the structure |
Rust-resistant screws |
|
2 metal or plastic bowls |
Pretend sinks |
Bowls with wide rims |
|
Exterior sealer or paint |
Protecting the wood |
Product suitable for outdoor use |
|
Sandpaper |
Smoothing surfaces |
Medium and fine grits |
|
Hooks or shelves |
Optional storage |
Pieces that attach securely |
A pallet mud kitchen can reduce the amount of new lumber you need. Check each pallet carefully before using it, as not all reclaimed wood is suitable for a kids’ project.
Let’s Build a DIY Mud Kitchen Step-by-Step
Building a mud kitchen feels much easier when the project follows a clear sequence. I find that working in order also makes the process feel less overwhelming.
Step 1: Measure and Cut the Wood
Getting the first stage right makes the rest of the build much easier to manage. Accuracy matters most here because small errors can carry into later parts of the project.
Start with the basic prep below before moving on to assembly:
- Measure the four legs to your chosen counter height.
- Mark the front, back, and side support rails for the frame.
- Measure and mark the boards for the countertop.
- Cut two longer rear uprights if you want a back panel.
- Cut each marked piece as squarely as possible.
- Label matching pieces to keep assembly simple.
Tip: Measure twice before cutting. Keep children away from the work area and follow the saw manufacturer’s safety instructions.
Step 2: Assemble the Frame and Back Panel
Build the supporting structure before adding the work surface. A square, stable frame supports the countertop and prevents the finished kitchen from rocking during play.
- Lay two legs on a flat surface and connect them with support rails.
- Repeat for the opposite side.
- Join both sides using the front and back rails.
- Check each corner with a carpenter’s square.
- Drill pilot holes and secure joints with exterior-rated screws.
- Extend the rear uprights above the frame.
- Attach boards or slats across them to create the back panel.
- Stand the frame upright and check for wobbling.
Tip: Correct any movement now. It becomes harder to square the frame after the countertop and other pieces are attached.
Step 3: Attach the Countertop
Next, create the main work area where most mixing, pouring, and pretend cooking happens. Leave enough clear surface around the sinks for pots, bowls, and utensils.
- Lay the countertop boards across the top of the frame.
- Check that each board has support underneath.
- Keep the front edge straight and evenly positioned.
- Drill pilot holes where needed.
- Secure the boards with exterior-rated screws.
- Make sure all screw heads sit flush with the surface.
Step 4: Cut and Fit the Sink Bowls
Removable bowls make simple pretend sinks without requiring plumbing. Cutting each opening carefully keeps the bowl supported while still allowing you to lift it out for cleaning.
- Place a bowl upside down where you want the sink.
- Trace around its outer rim with a pencil.
- Draw the cutting line slightly inside the traced outline.
- Drill a starter hole inside that line.
- Carefully cut around the opening with a jigsaw.
- Test-fit the bowl before making adjustments.
- Repeat for a second bowl if your design uses two sinks.
Tip: Measure each bowl separately. The opening must stay smaller than its outer rim, or the bowl may fall through the countertop.
Step 5: Sand and Finish the Wood
As with other outdoor wood projects, careful sanding and finishing matter before the mud kitchen is put into regular use. Pay extra attention to freshly cut areas, since these are more likely to have splinters or sharp edges.
- Sand the countertop edges and corners.
- Smooth the inside edges of each sink opening.
- Check the frame, legs, and back panel for splinters.
- Remove all sanding dust.
- Apply an exterior finish suitable for the wood and intended use.
- Follow the product instructions for coats, drying, and curing.
Tip: I do not rush the curing time. Wait until the finish is fully ready according to the manufacturer’s directions before letting children use the kitchen.
Step 6: Add Storage and Play Accessories
Once the finish is ready, complete the kitchen with a few practical play items. Start simple so children still have plenty of open space for messy outdoor play.
- Place the removable bowls into the sink openings.
- Securely attach a few hooks for utensils.
- Add a small shelf if your design includes one.
- Set out wooden spoons, measuring cups, and scoops.
- Add a few small pots or pans.
- Use sturdy containers for water and collected natural materials.
- Give the complete kitchen one final stability check.
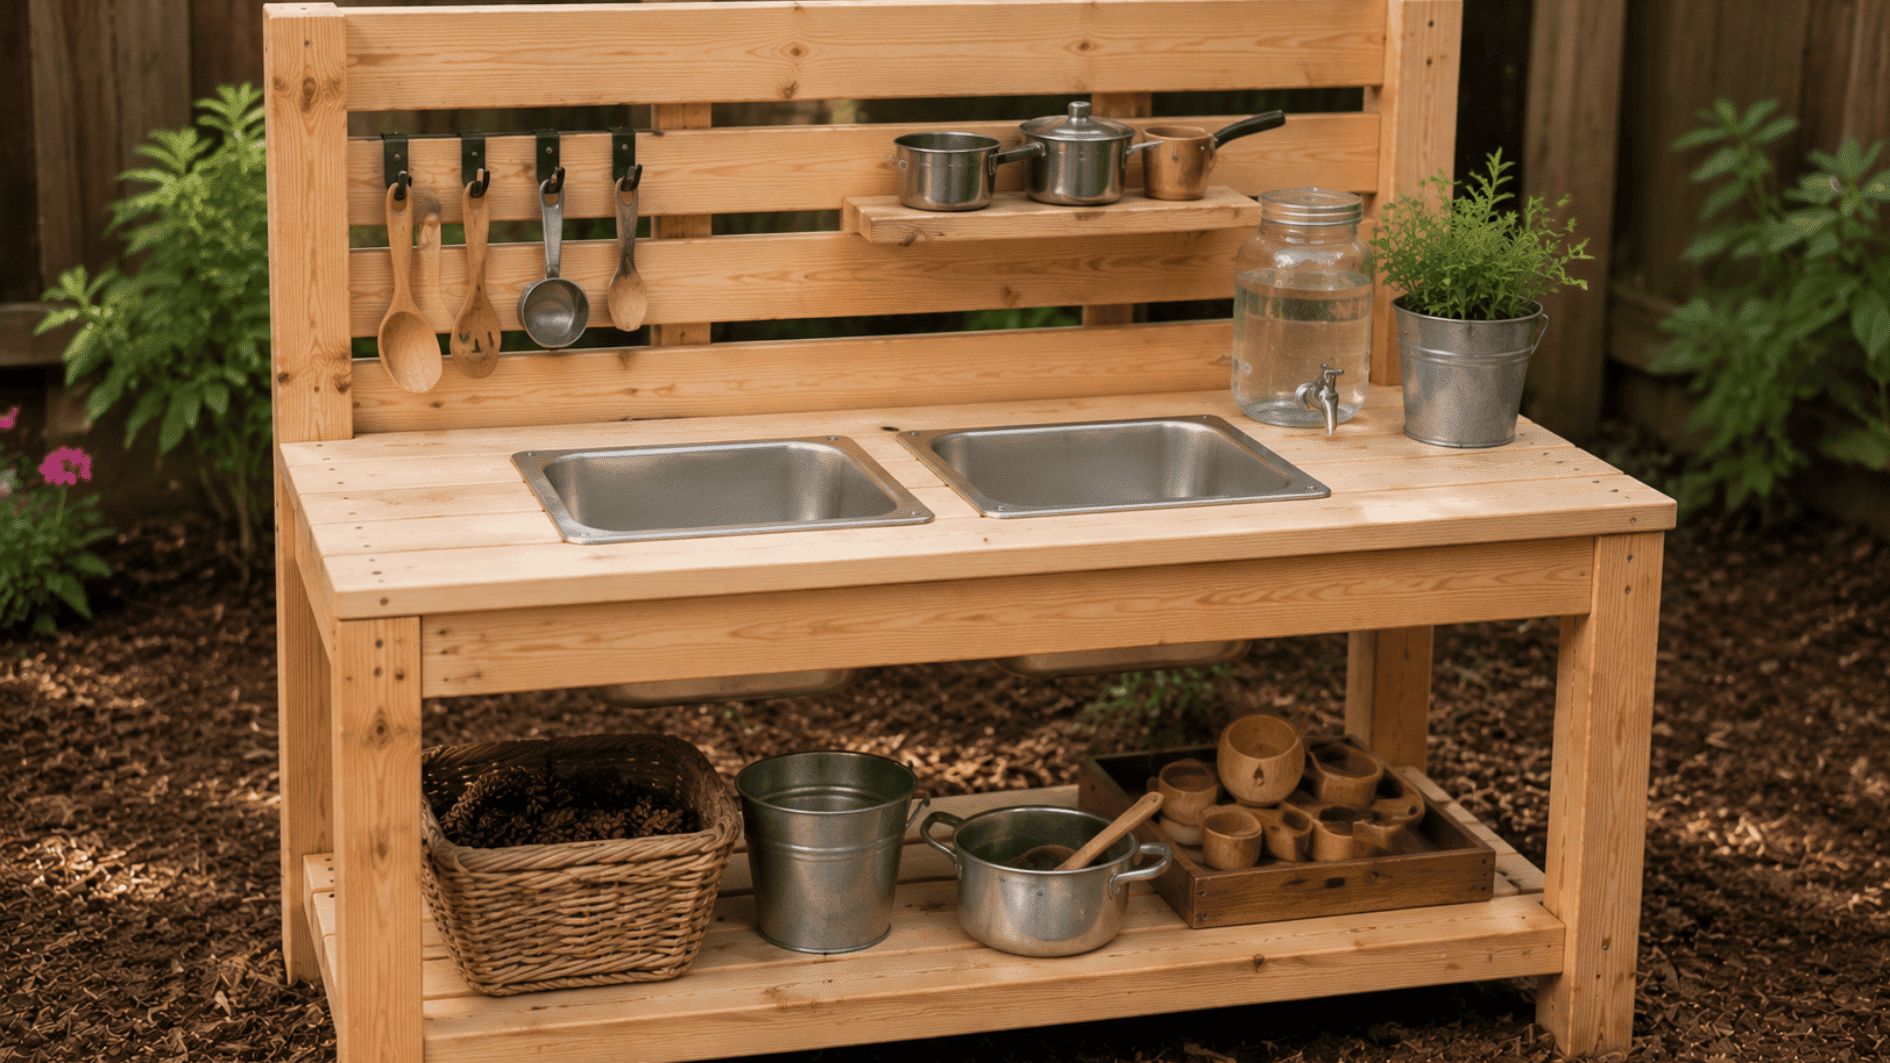
Here’s how my finished DIY mud kitchen turned out after putting all the pieces together:
Easy Add-Ons for More Mud Kitchen Play
A few thoughtful extras can make the setup feel more complete without overloading it. The goal is to add variety while still keeping the play area open and easy to use.
|
Feature |
Adds |
Easy Setup |
|---|---|---|
|
Chalkboard panel |
Drawing and pretend menus |
Mount a small outdoor board |
|
Pretend stovetop |
Extra pretend play |
Add simple burner circles |
|
Water dispenser |
Easy water access |
Use a secure spout jug |
|
Side counter |
More play space |
Add a narrow side ledge |
|
Peg rail |
Quick item storage |
Fix a short rail with pegs |
|
Ingredient bins |
Sorted natural materials |
Use removable containers |
|
Name sign |
Personal touch |
Add a weather-resistant plaque |
|
Canopy cover |
Extra shade |
Fix a simple fabric cover |
How to Build a Pallet Mud Kitchen?
A pallet mud kitchen uses dismantled shipping-pallet boards, offering an affordable way to create the frame, worktop, shelves, and back panel.
Choose clean, sturdy pallets marked HT, then avoid stained, moldy, contaminated, rotten, or damaged boards. Remove nails, sand thoroughly, and inspect every piece before construction.
To prepare suitable pallet boards:
- Carefully dismantle the pallet without splitting usable boards.
- Remove every nail and staple before cutting or sanding.
- Check each board for cracks, rot, stains, and hidden metal.
- Sand all faces and edges until they feel smooth.
- Cut the boards to size for the frame, worktop, or back panel.
- Build as usual using the same basic construction sequence above.
Tip: A pallet mud kitchen can reduce the amount of new lumber you need. Check each pallet carefully before using it, as not all reclaimed wood is suitable for a kids’ project.
Safety Checks for a Kid-Friendly Mud Kitchen
A mud kitchen should feel sturdy, comfortable, and easy for children to use during everyday play. Small details can make a big difference once the setup is finished.
|
Safety Area |
Check For |
Best Approach |
|---|---|---|
|
Corners |
Sharp edges |
Round and smooth them |
|
Wood surfaces |
Splinters or rough spots |
Sand thoroughly |
|
Screws |
Raised or exposed heads |
Keep them flush |
|
Frame |
Wobbling or movement |
Reinforce loose joints |
|
Shelves |
Heavy items stored high |
Keep weight lower |
|
Small parts |
Loose pieces |
Avoid for younger kids |
|
Ground |
Uneven placement |
Use a stable surface |
|
Accessories |
Cracks or sharp damage |
Remove damaged items |
|
Overall setup |
Shifting during use |
Recheck stability often |
Mud Kitchen Maintenance Tips that Keep It Lasting
Outdoor play stations take regular wear, so a little upkeep helps them stay usable for longer. Changes in weather and frequent handling can slowly affect the setup over time.
- Wipe down surfaces: Remove dried mud and residue regularly.
- Dry wet areas: Let damp sections air out fully after use.
- Tighten hardware: Recheck loose screws, hooks, and fittings.
- Check the wood: Look for cracks, splinters, or soft spots.
- Refresh the finish: Reapply outdoor coating when protection starts wearing off.
- Inspect accessories: Replace cracked bowls, containers, or utensils.
- Check stability: Make sure the frame, shelves, and legs stay firm.
- Clear debris: Remove trapped leaves, soil, and dirt.
- Protect from weather: Cover or move it during harsh conditions.
- Do seasonal checks: Inspect the full setup after winter or heavy use.
Wrapping It Up
Your DIY mud kitchen does not need to look perfect to become a backyard favorite. A sturdy build and a few simple play tools are plenty.
I’d start with the basic setup and watch how a child uses it. Their play will quickly show you which little additions are actually worth making.
So grab your measurements, choose your wood, and get building. Before long, that empty backyard spot could become the messiest and busiest little “kitchen” around.
Frequently Asked Questions
What Age is a Mud Kitchen Best For?
Mud kitchens work well for preschool and elementary-age kids with age-appropriate supervision.
What Kind of Dirt Should You Use In a Mud Kitchen?
Use clean soil free from chemicals, animal waste, and sharp debris.
Can You Use Real Kitchen Utensils In a Mud Kitchen?
Yes. Choose sturdy, non-sharp utensils like wooden spoons, scoops, and metal bowls.
Does a Mud Kitchen Need Running Water?
No. A watering can or small water container works well.
What Can Kids Make in a Mud Kitchen Besides Mud Pies?
Kids can make pretend soups, cakes, potions, and nature recipes.