

Your child is bored, the screen time limit has been hit, and you have no idea what to do next. Most parents want something fun and meaningful, but setting up a big art activity feels like too much effort.
Where do you start? What supplies do you need? Will it take forever to clean up? These are real concerns that stop many families from making art a regular part of their day.
You do not need a craft room, a big budget, or hours of free time to make it happen.
All you need are a few basic supplies you likely already own and one good idea to get started. This blog gives you easy art projects for kids that are simple to set up, fun to make, and easy to clean up.
What is Process Art?
Process art is all about the path, not the final result.
Unlike traditional art projects where kids follow strict steps to create a specific outcome, process art encourages children to explore, experiment, and express themselves freely.
There are no rules, no right or wrong, and no pressure to make something “perfect.”It sparks creativity and develops fine motor skills, all while having fun.
That’s exactly why the easy and creative art projects in this list are perfect for kids at home. Each idea cherishes the process art philosophy: simple to set up, open-ended, and focused on creativity over perfection.
Fun and Easy Art Projects for Kids to Try!
All you need is a little space, a few basic materials, and the willingness to let them create freely. These art projects for kids are designed to be simple enough for beginners yet fun enough to keep kids engaged from start to finish.
This structured list is especially perfect for holidays, summer break, or any vacation, giving your child the chance to learn, grow, and develop a creative mindset while having fun.
1. Handprint Canvas Art

Handprint art is one of the most treasured projects for kids. It is a way to capture a moment in childhood that parents will cherish for years, and many families turn these into annual traditions, comparing handprint sizes as children grow.
Steps:
- Pour a small amount of washable tempera paint onto a paper plate and have your child press their hand firmly into it.
- Press the painted hand onto a canvas board, hold still for a few seconds, then lift straight up.
- Let it dry completely, then add the child’s name and date with a thin brush for a keepsake touch.
2. Watercolor Resist Butterflies
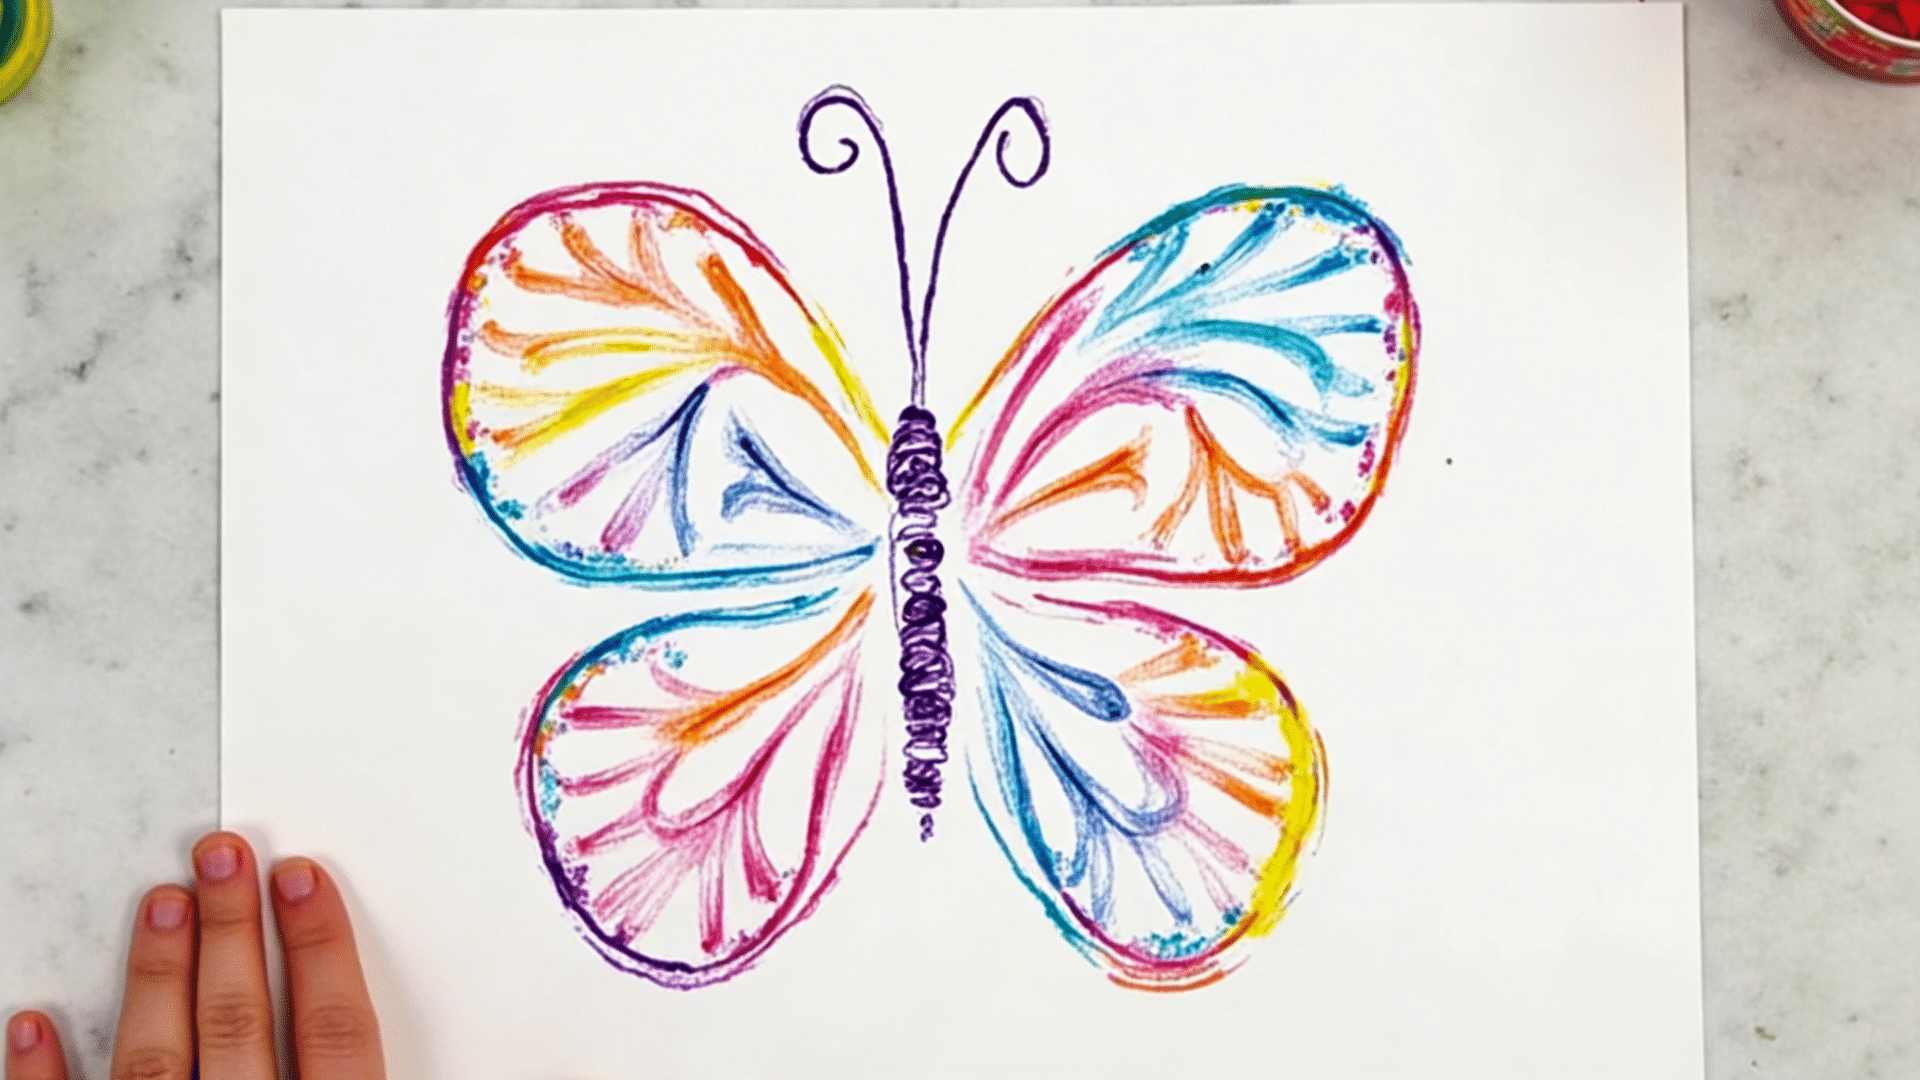
The wax crayon resist technique feels almost like a science experiment as the paint pushes away from the crayon lines.
Kids are always amazed watching the hidden design appear the moment the brush hits the paper.
Steps:
- Draw a butterfly outline on watercolor paper using a white crayon, pressing firmly, then add patterns inside the wings.
- Paint over the entire surface with bright watercolors and watch the resist effect appear.
- Let it dry flat, then cut out the butterfly and display it on a sunny window.
3. Salt Painting

Salt painting is a sensory-rich activity that combines the fun of squeezing glue with the wonder of watching color travel through crystals. It works beautifully as a calm, focused activity for kids who love texture.
Steps:
- Draw a design on cardstock using white school glue applied directly from the bottle, then immediately pour table salt over it and tap off the excess.
- Dip a dropper in liquid watercolor or diluted food coloring and touch it to the salted lines, then watch the color spread.
- Allow the piece to dry overnight before displaying, without touching it.
4. Bubble Wrap Printing
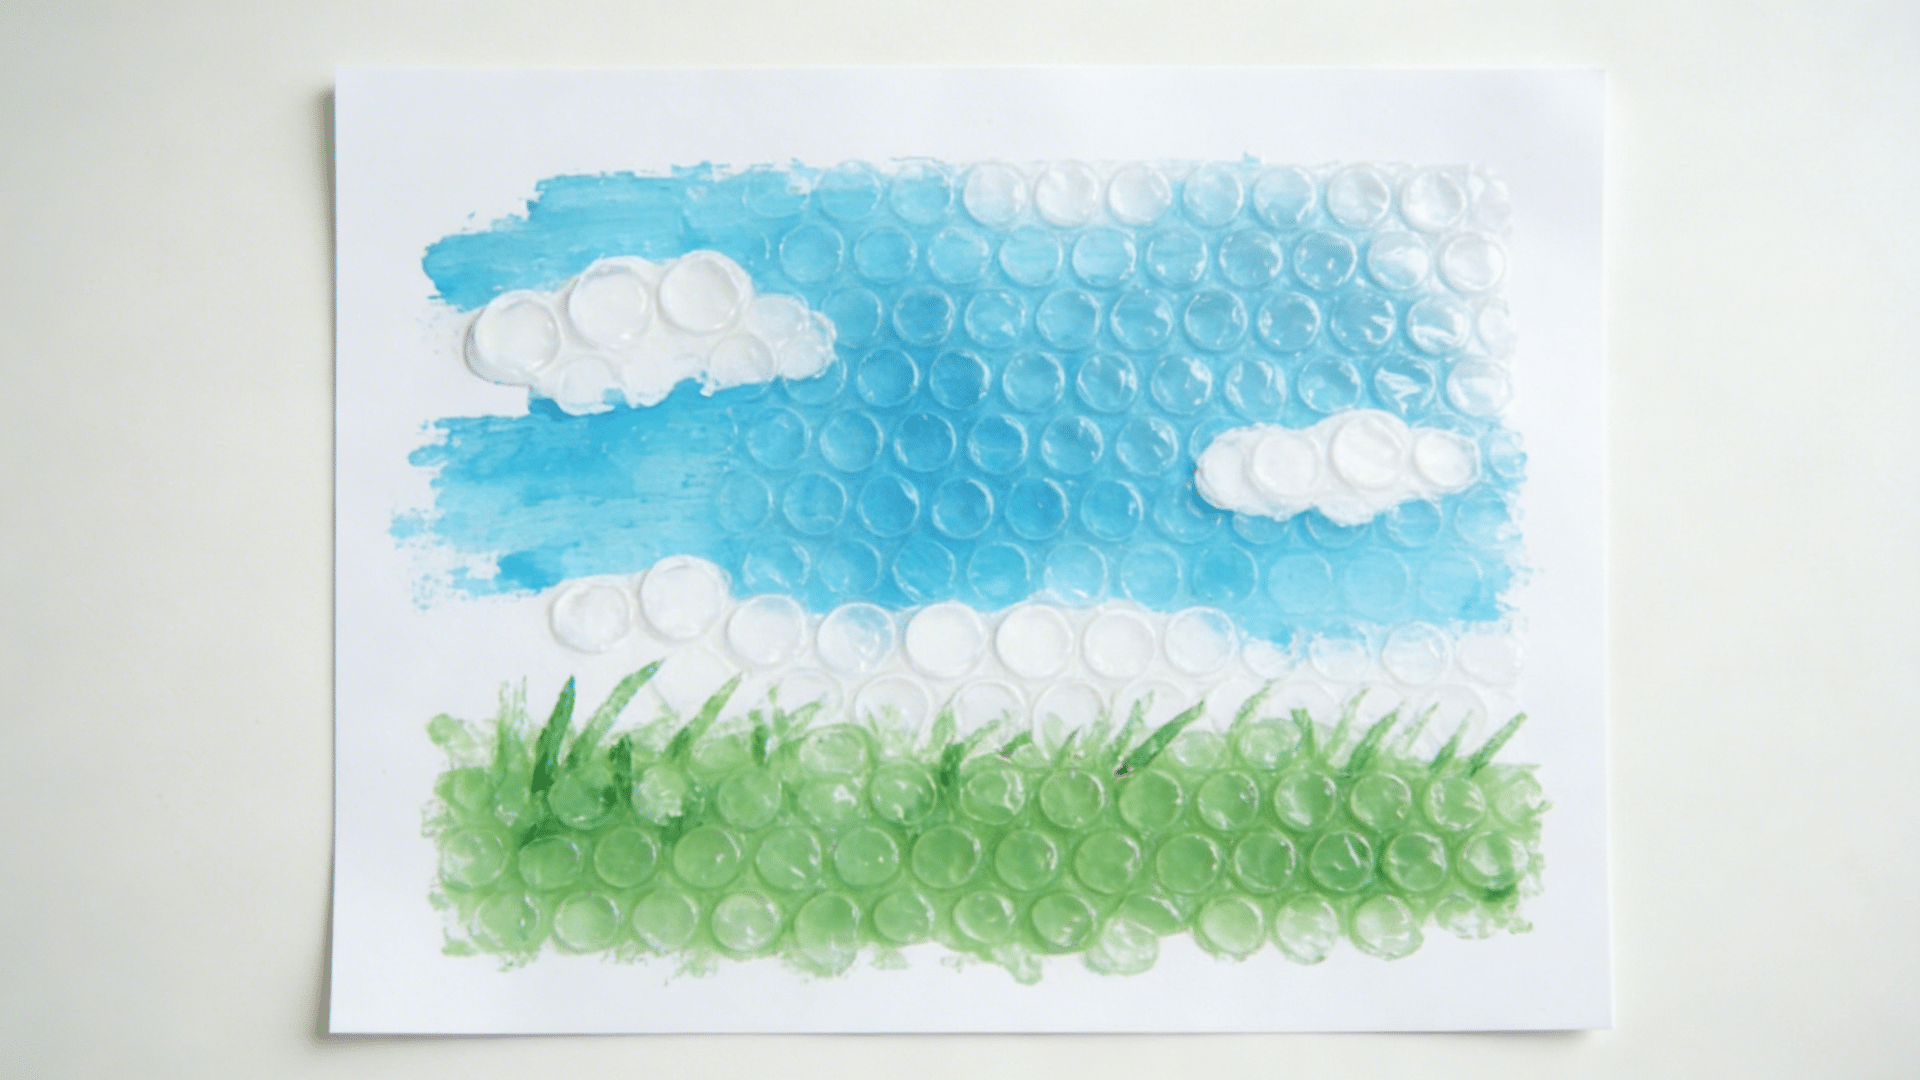
Bubble wrap is one of those everyday household items that transforms into an incredible art tool. Kids love the tactile sensation of pressing it into paint, and the circular patterns it creates look surprisingly calm.
Steps:
- Brush a thin layer of tempera paint across the bumpy side of a sheet of bubble wrap.
- Press the white cardstock firmly onto the painted surface, smooth it down, then carefully peel it away.
- Once dry, use markers to add details, turning the bubble pattern into animals, flowers, or abstract shapes.
5. Coffee Filter Tie-Dye
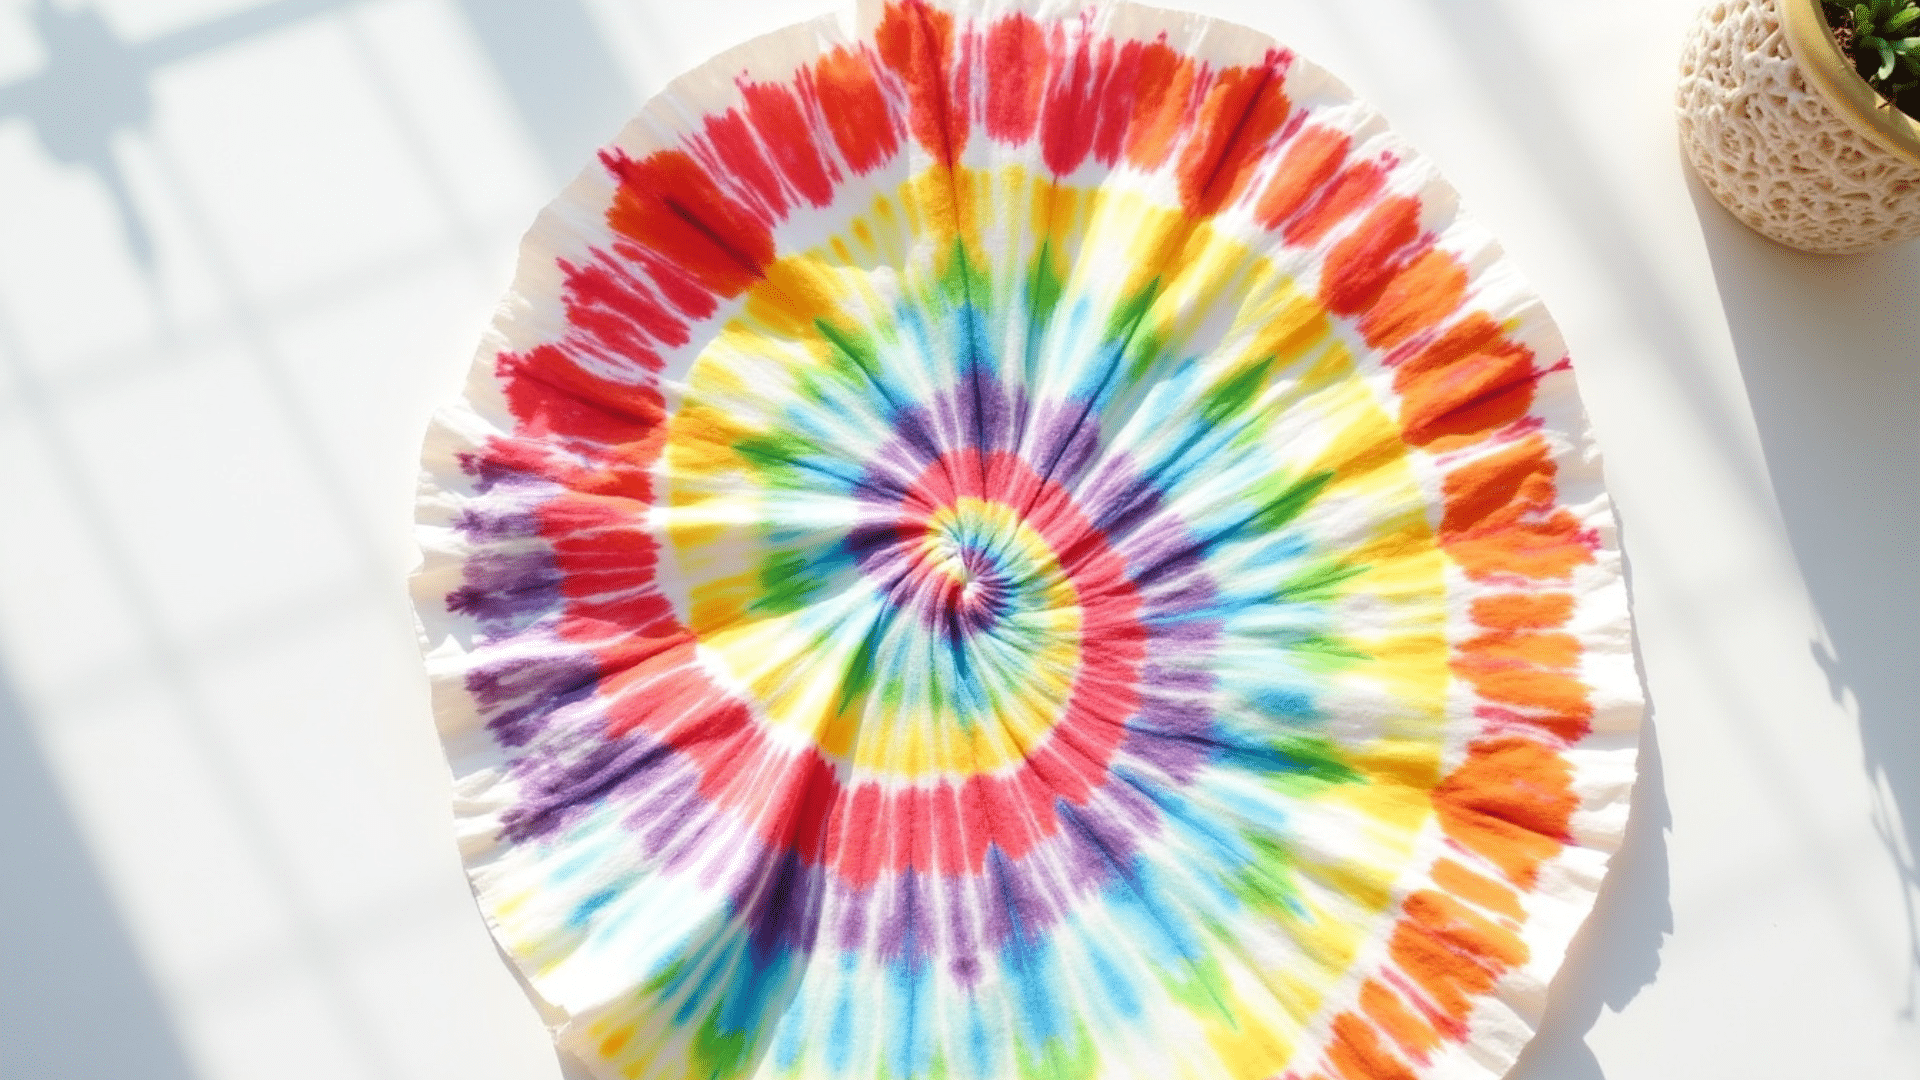
Coffee filter tie-dye is one of the quickest and most satisfying projects you can do with kids. It requires almost no prep, the results are always lively and unique, and cleanup is a breeze since the filters are disposable.
Steps:
- Fold or scrunch a white coffee filter into any shape, then color sections all over it with washable markers.
- Lightly mist the filter with water from a spray bottle and watch the colors bleed and blend together.
- Open the filter flat to dry, then use it as a butterfly wing, flower, or decorative paper.
6. Leaf Print Art
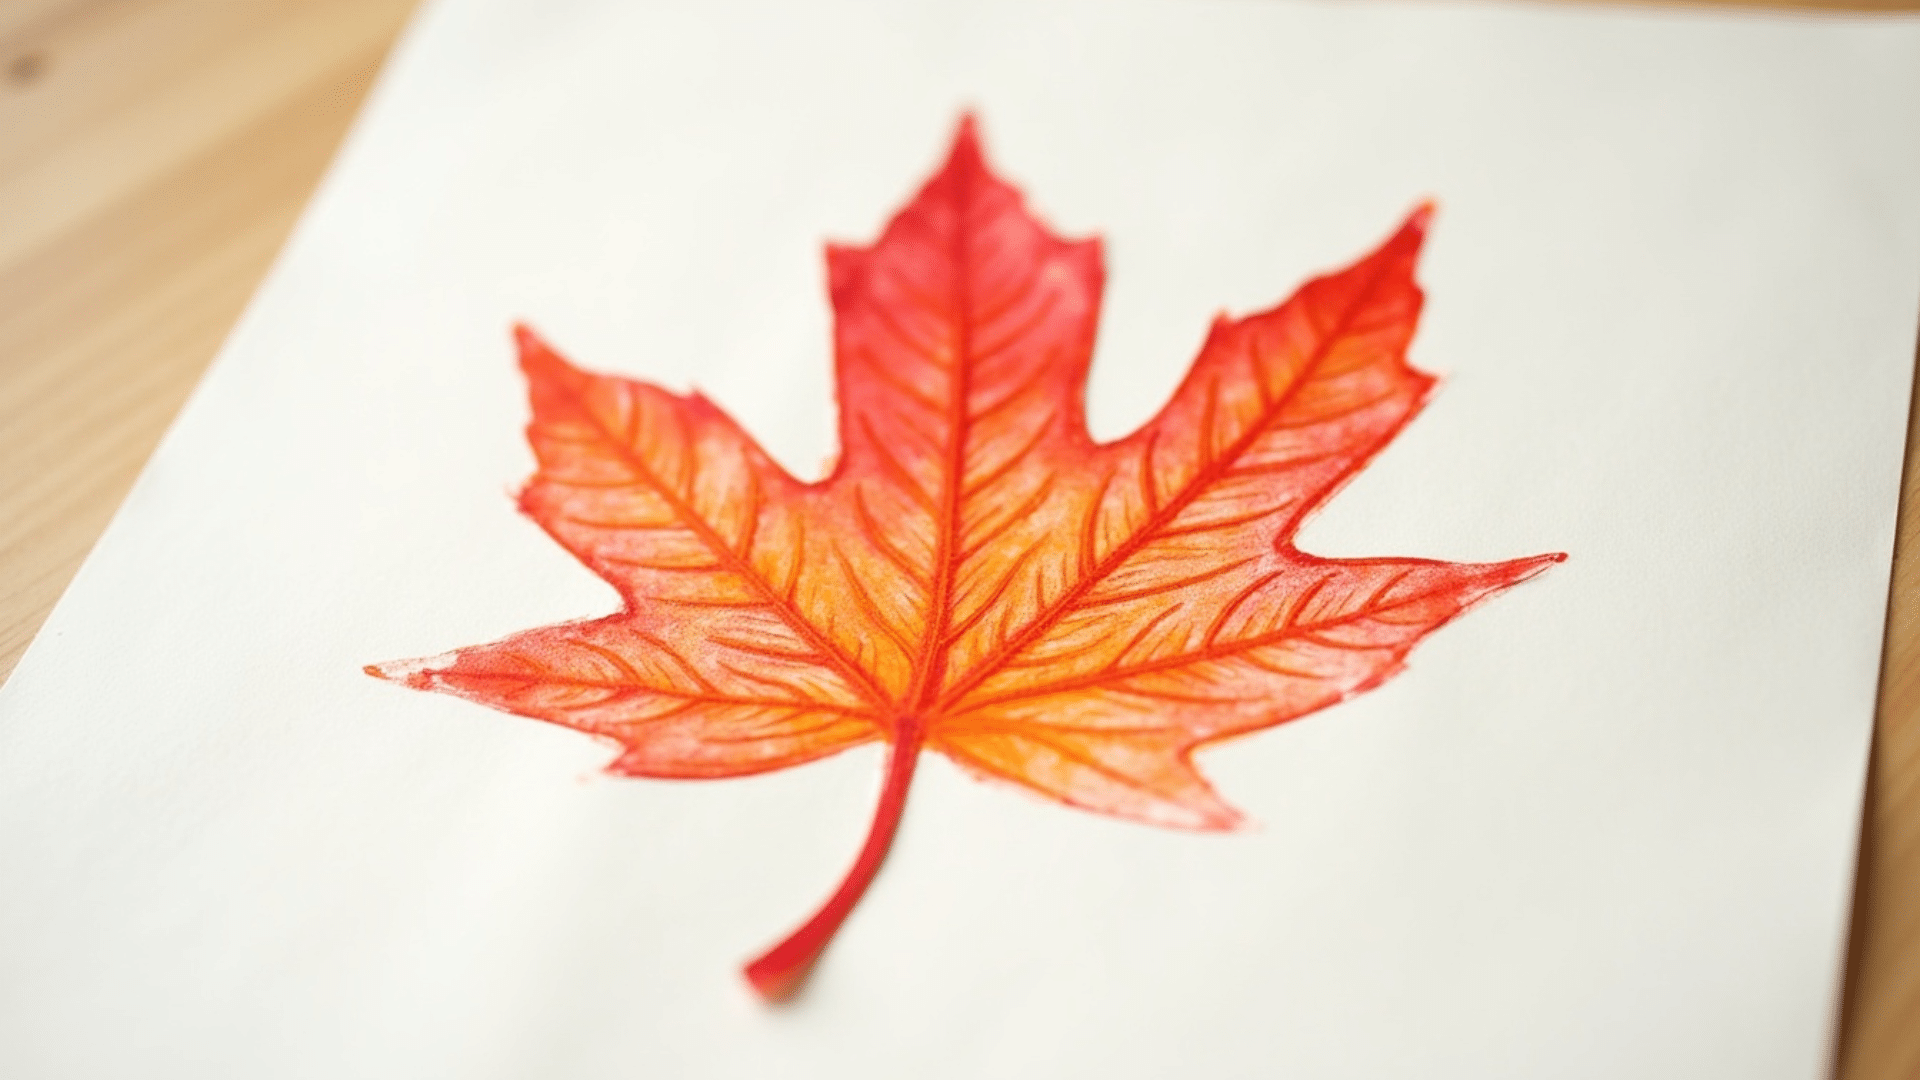
Leaf printing is a beautiful way to connect art with nature. A walk around the yard to collect leaves becomes part of the creative process, making this a full sensory experience from start to finish.
Steps:
- Lay collected leaves vein-side up and coat each one with a thin layer of tempera paint using a foam brush.
- Press each leaf firmly onto white paper, hold for a few seconds, then lift straight up.
- Repeat with different leaves and colors, then let everything dry before, if desired, labeling each leaf type.
7. Paper Plate Sun Catcher
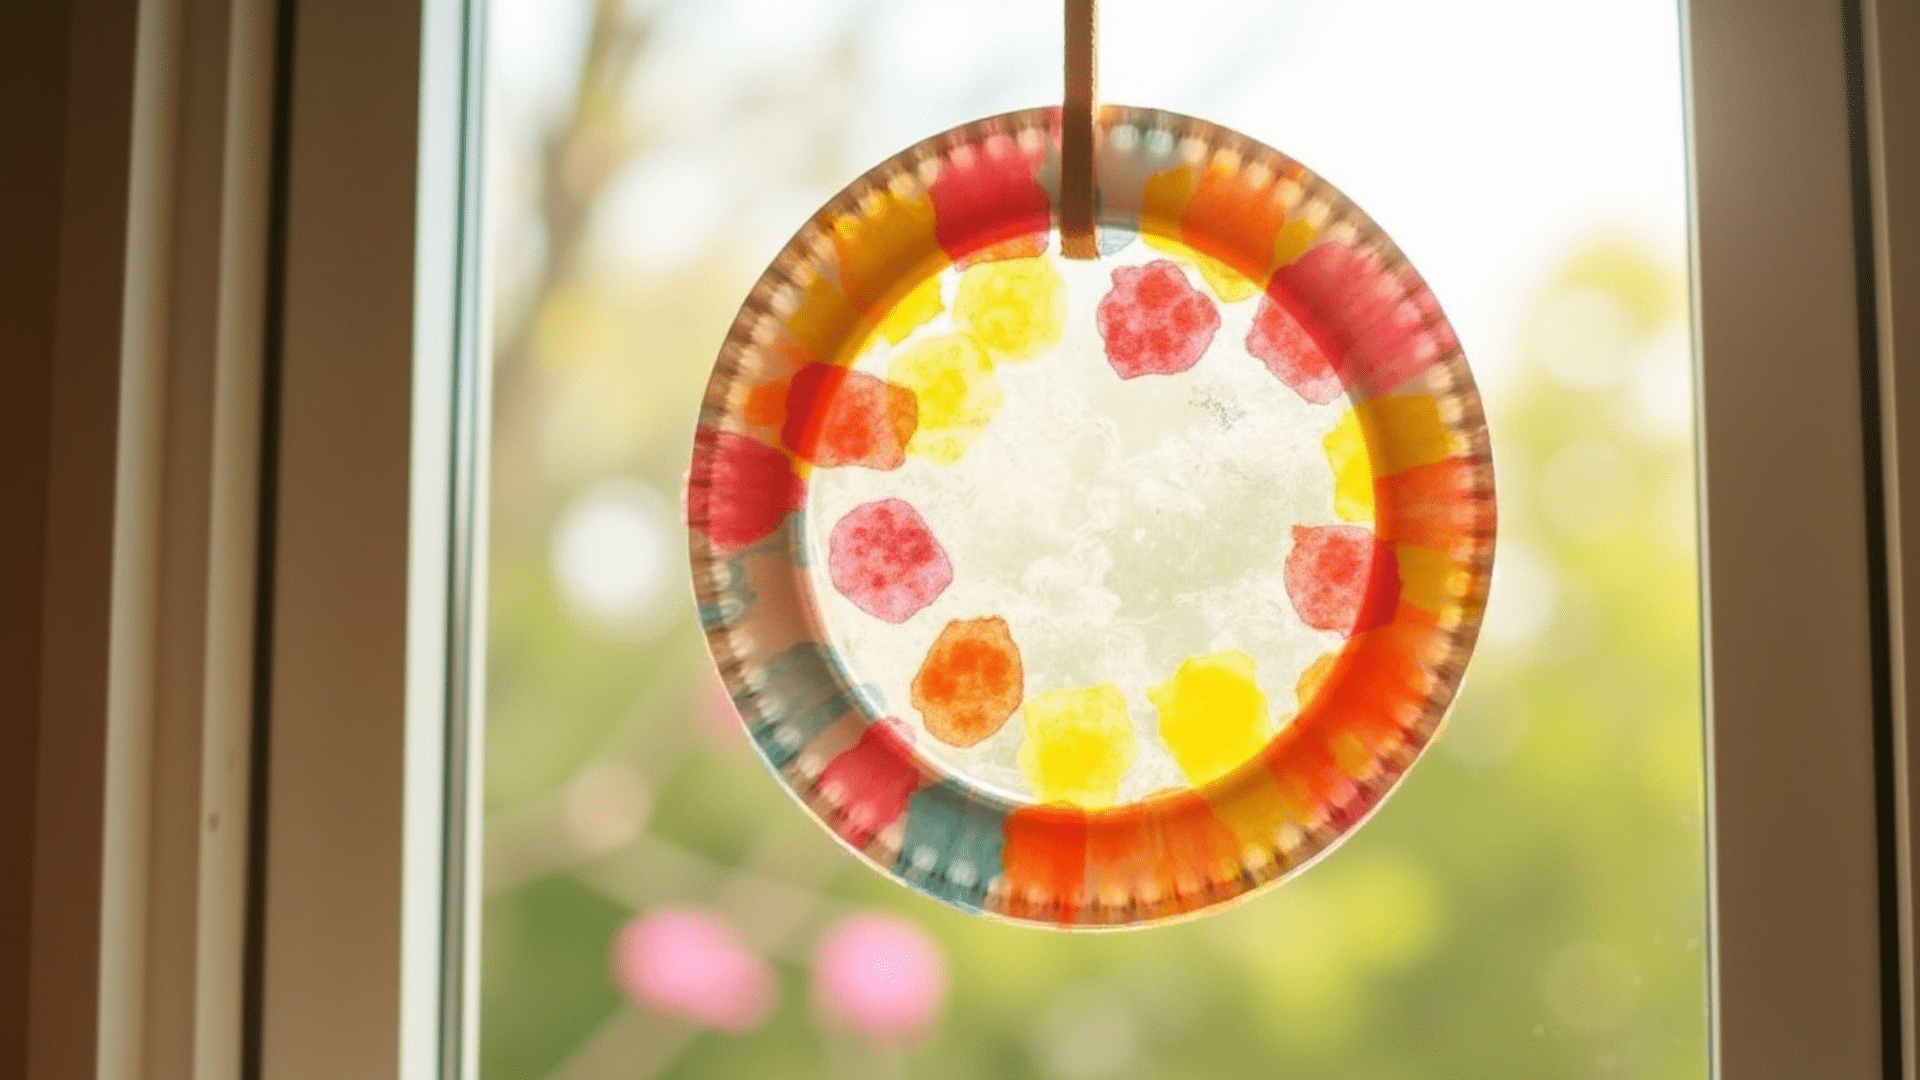
Paper plate sun catchers brighten up any window and teach kids about color transparency in a hands-on way. This is a project for preschool-age children since it requires only basic cutting and sticking skills.
Steps:
- Cut out the center of a paper plate, leaving just the rim as a frame, then stretch clear contact paper over the opening and secure the edges.
- Have your child press small torn pieces of tissue paper onto the sticky surface in overlapping layers of color.
- Hang the finished sun catcher in a sunny window and enjoy the glow.
8. Straw Blown Art
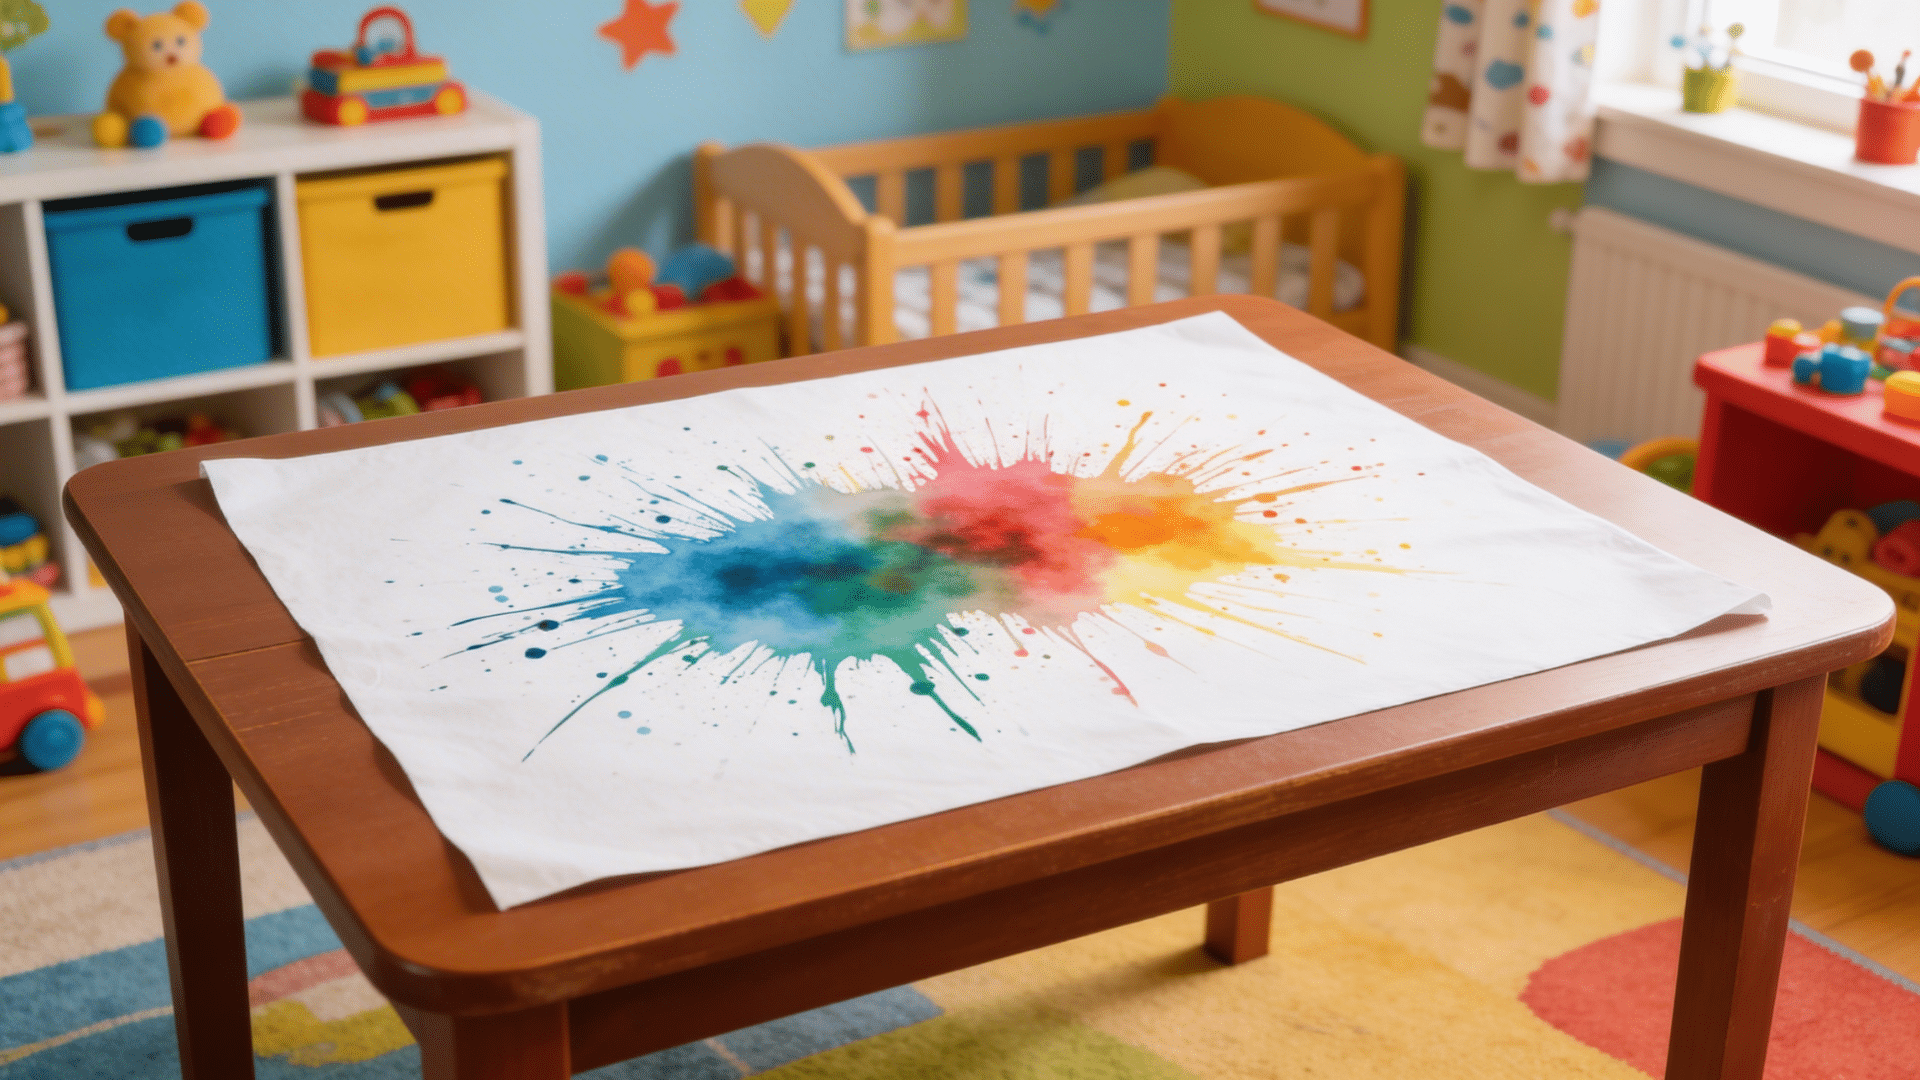
Straw blown art is endlessly unpredictable, and that is exactly what makes it so exciting. Watching paint race across the paper with each puff of air feels like controlling something wild and alive.
Steps:
- Spoon several small puddles of liquid watercolor onto white cardstock near the center of the page.
- Give your child a straw and have them blow the paint outward from different angles, spreading color across the paper.
- Add more colors, let them overlap, then set the piece flat to dry and display as abstract art.
9. Egg Carton Caterpillar
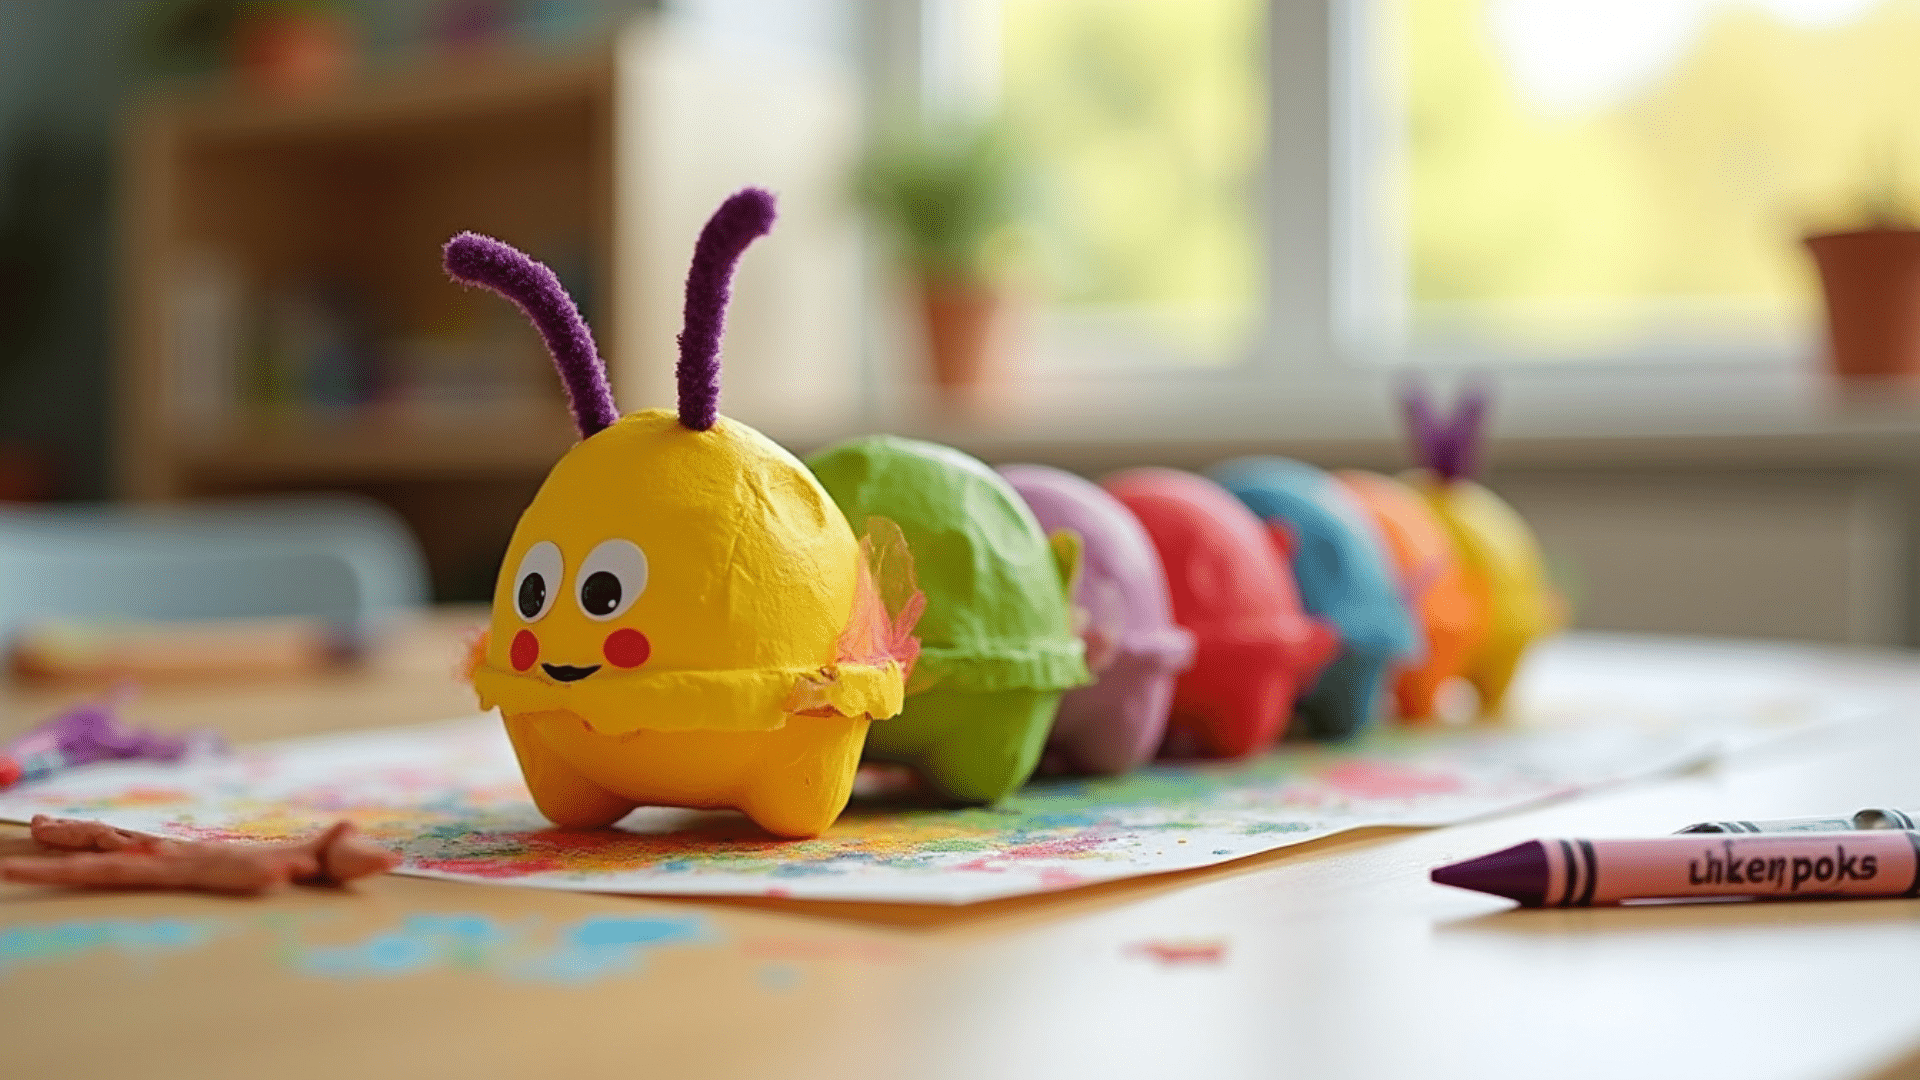
Egg carton caterpillars are a classic recycled craft that kids never seem to tire of. They are three-dimensional, colorful, and fun to play with long after the painting is done.
Steps:
- Cut a cardboard egg carton into a row of connected cups, then paint each cup a different color and let it dry.
- Poke two holes in the front cup and thread pipe cleaners through them for antennae, then curl the ends.
- Glue on googly eyes and draw a smile with a marker to finish the caterpillar’s face.
10. Torn Paper Mosaic
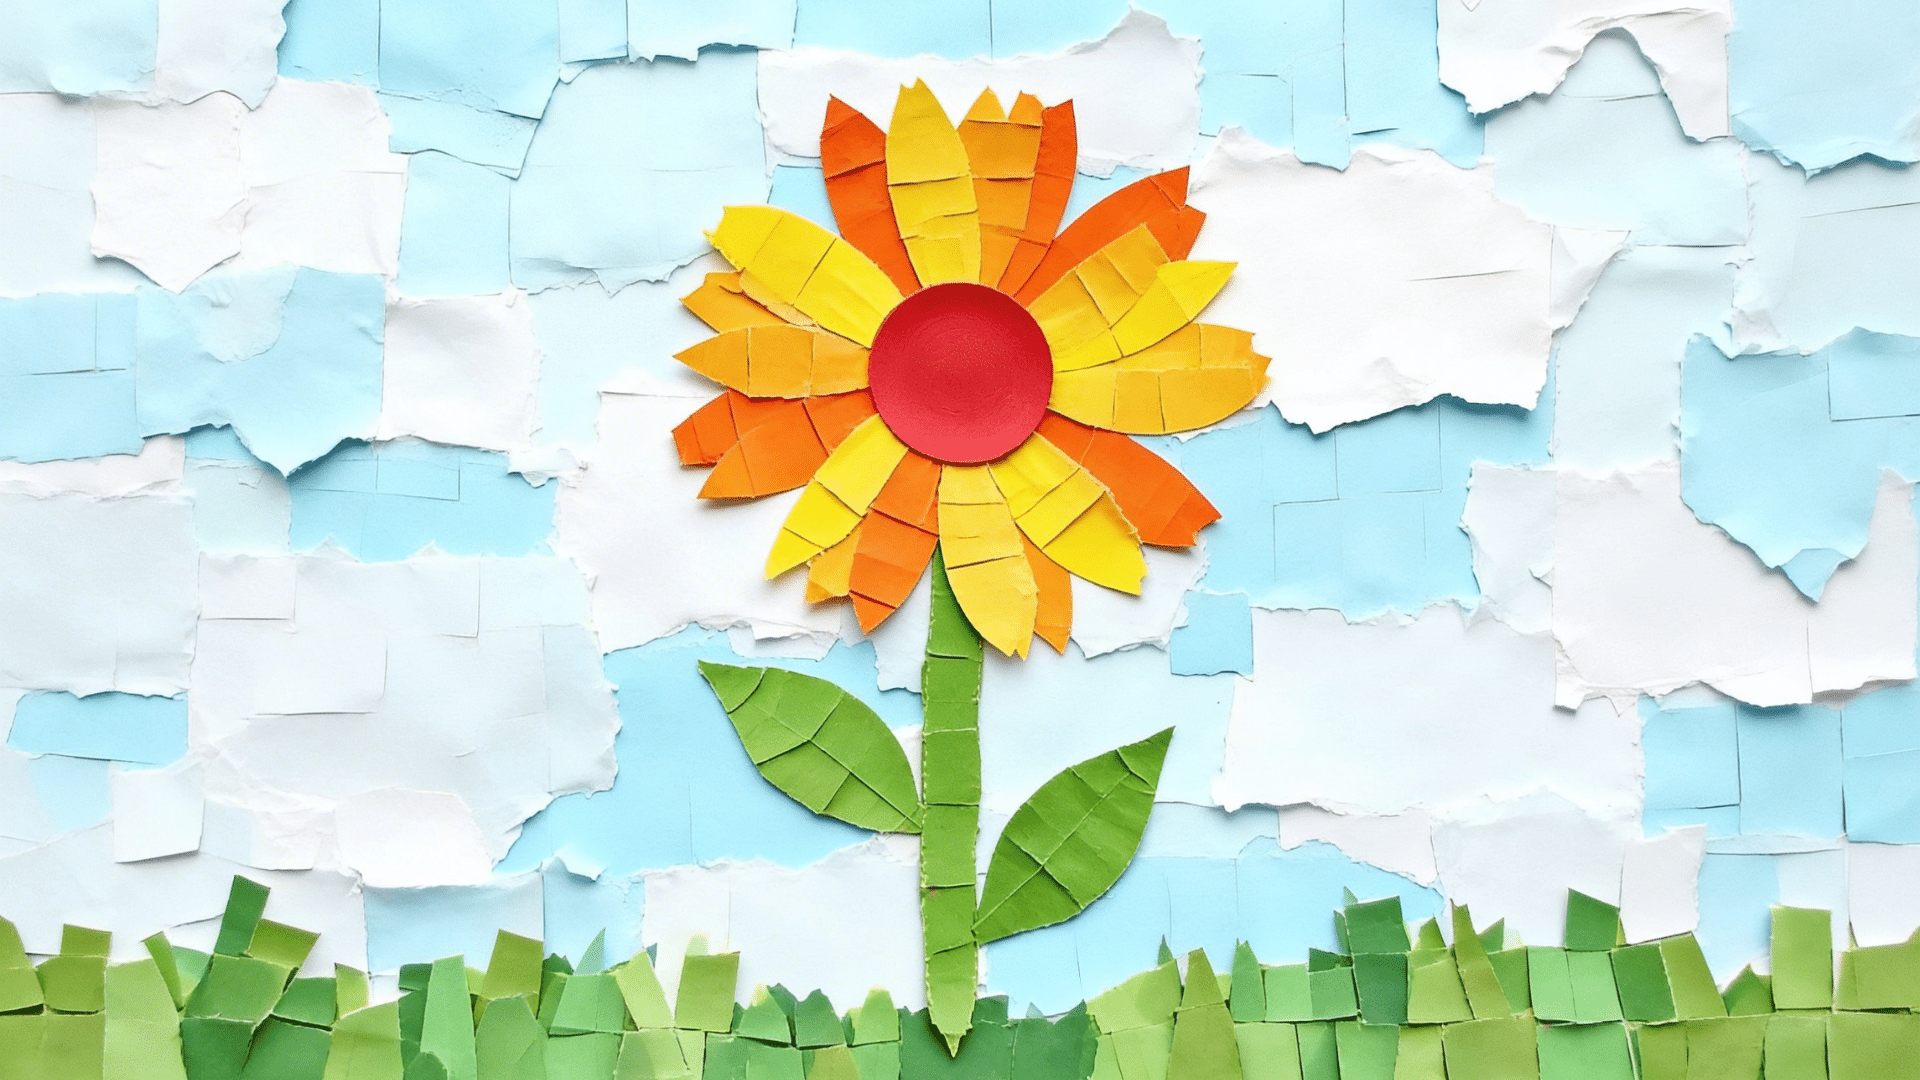
Torn paper mosaics build patience and fine motor skills while producing stunning results. The irregular edges of hand-torn paper give the finished piece a texture and character that cut paper cannot match.
Steps:
- Lightly sketch a simple image onto white cardstock, then tear colored construction paper or magazine pages into small, irregular pieces.
- Glue the pieces inside each section of the sketch, leaving small gaps between them to mimic grout lines.
- Let the glue dry fully, then frame or pin the finished mosaic for display.
11. Footprint Animal Art
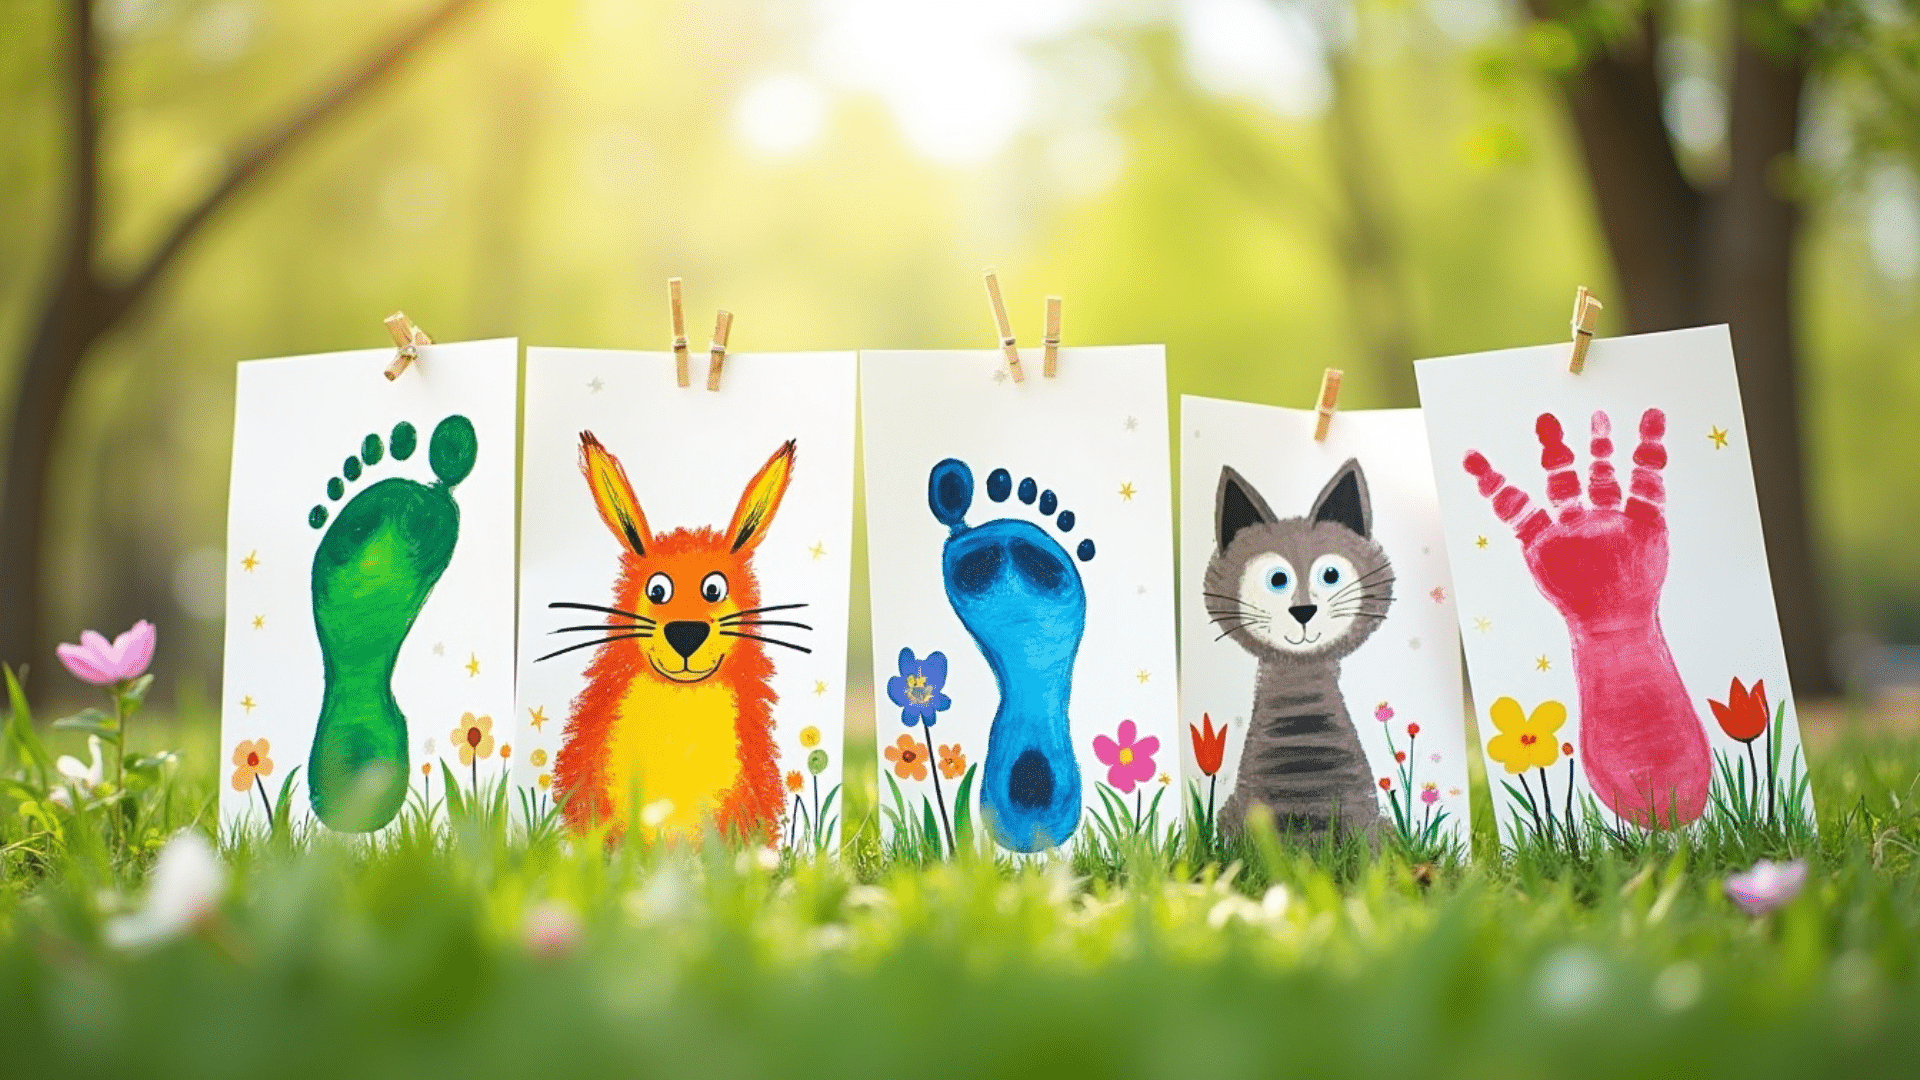
A simple footprint can become a fox, a duck, a penguin, or almost any animal with just a few brushstrokes added afterward. These make wonderful keepsakes just like handprint art.
Steps:
- Coat the bottom of your child’s foot with washable tempera paint and press it firmly onto white cardstock.
- Repeat with other colors if building a scene, then allow all prints to dry completely.
- Add eyes, beaks, ears, and tails with markers to turn the footprints into recognizable animals.
12. Marble Painting
Marble painting feels like a game, which is exactly why kids love it so much. Rolling paint-covered marbles around a box creates patterns that look complex and intentional despite requiring very little technique.
Steps:
- Line a shoebox with white paper, then drop paint-coated marbles inside one at a time using a spoon.
- Tilt and roll the box back and forth, letting the marbles trail paint across the paper in intersecting lines.
- Remove the marbles, lift out the paper, and let it dry flat before using it as gift wrap or framed art.
13. Dot Art with Q-Tips
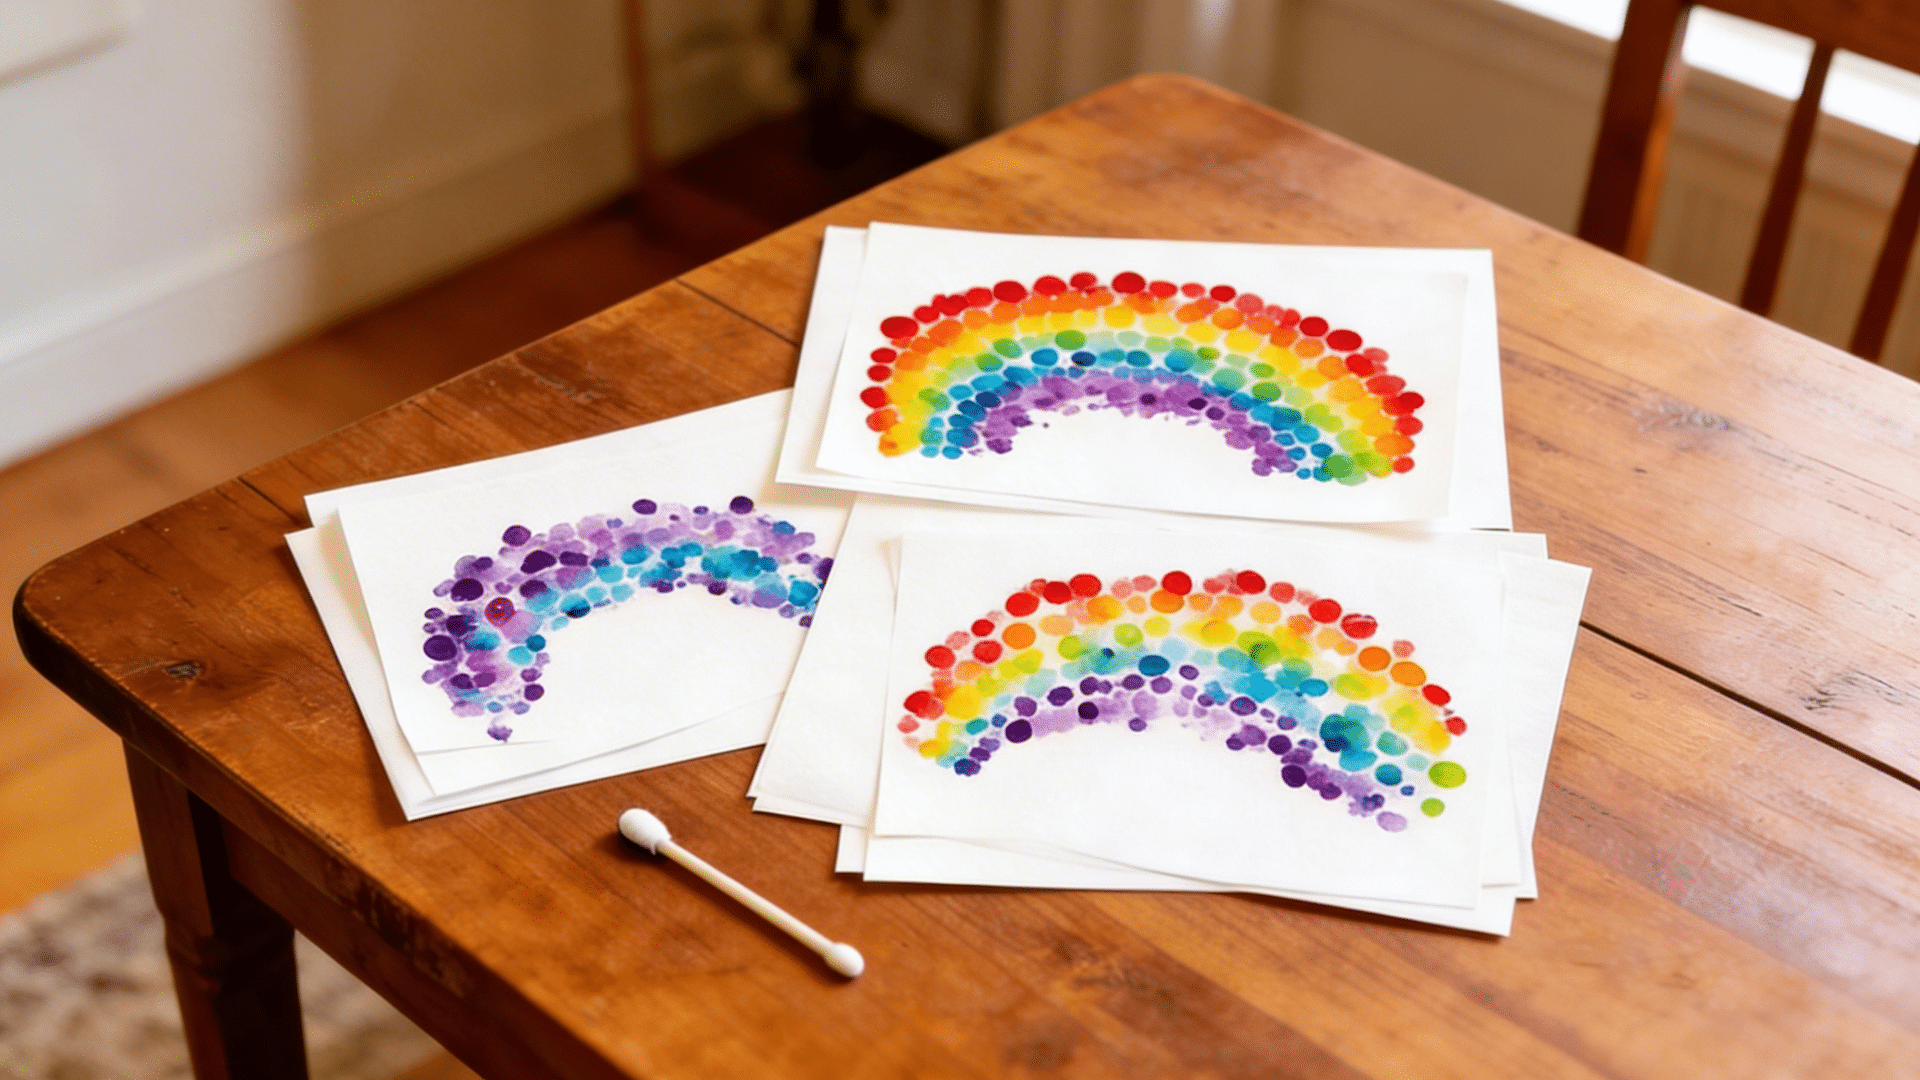
Q-tip dot art is inspired by the pointillist technique and teaches kids that a picture can be built entirely from tiny dots of color, which is both a fascinating concept and a great exercise in patience.
Steps:
- Lightly sketch a simple outline onto cardstock, then pour small amounts of tempera paint in several colors onto a plate.
- Dip the end of a Q-tip into one color and fill in each section of the drawing with a dotting motion.
- Use a fresh Q-tip for each new color, then let the finished piece dry completely before displaying.
14. Resist Painting with Tape
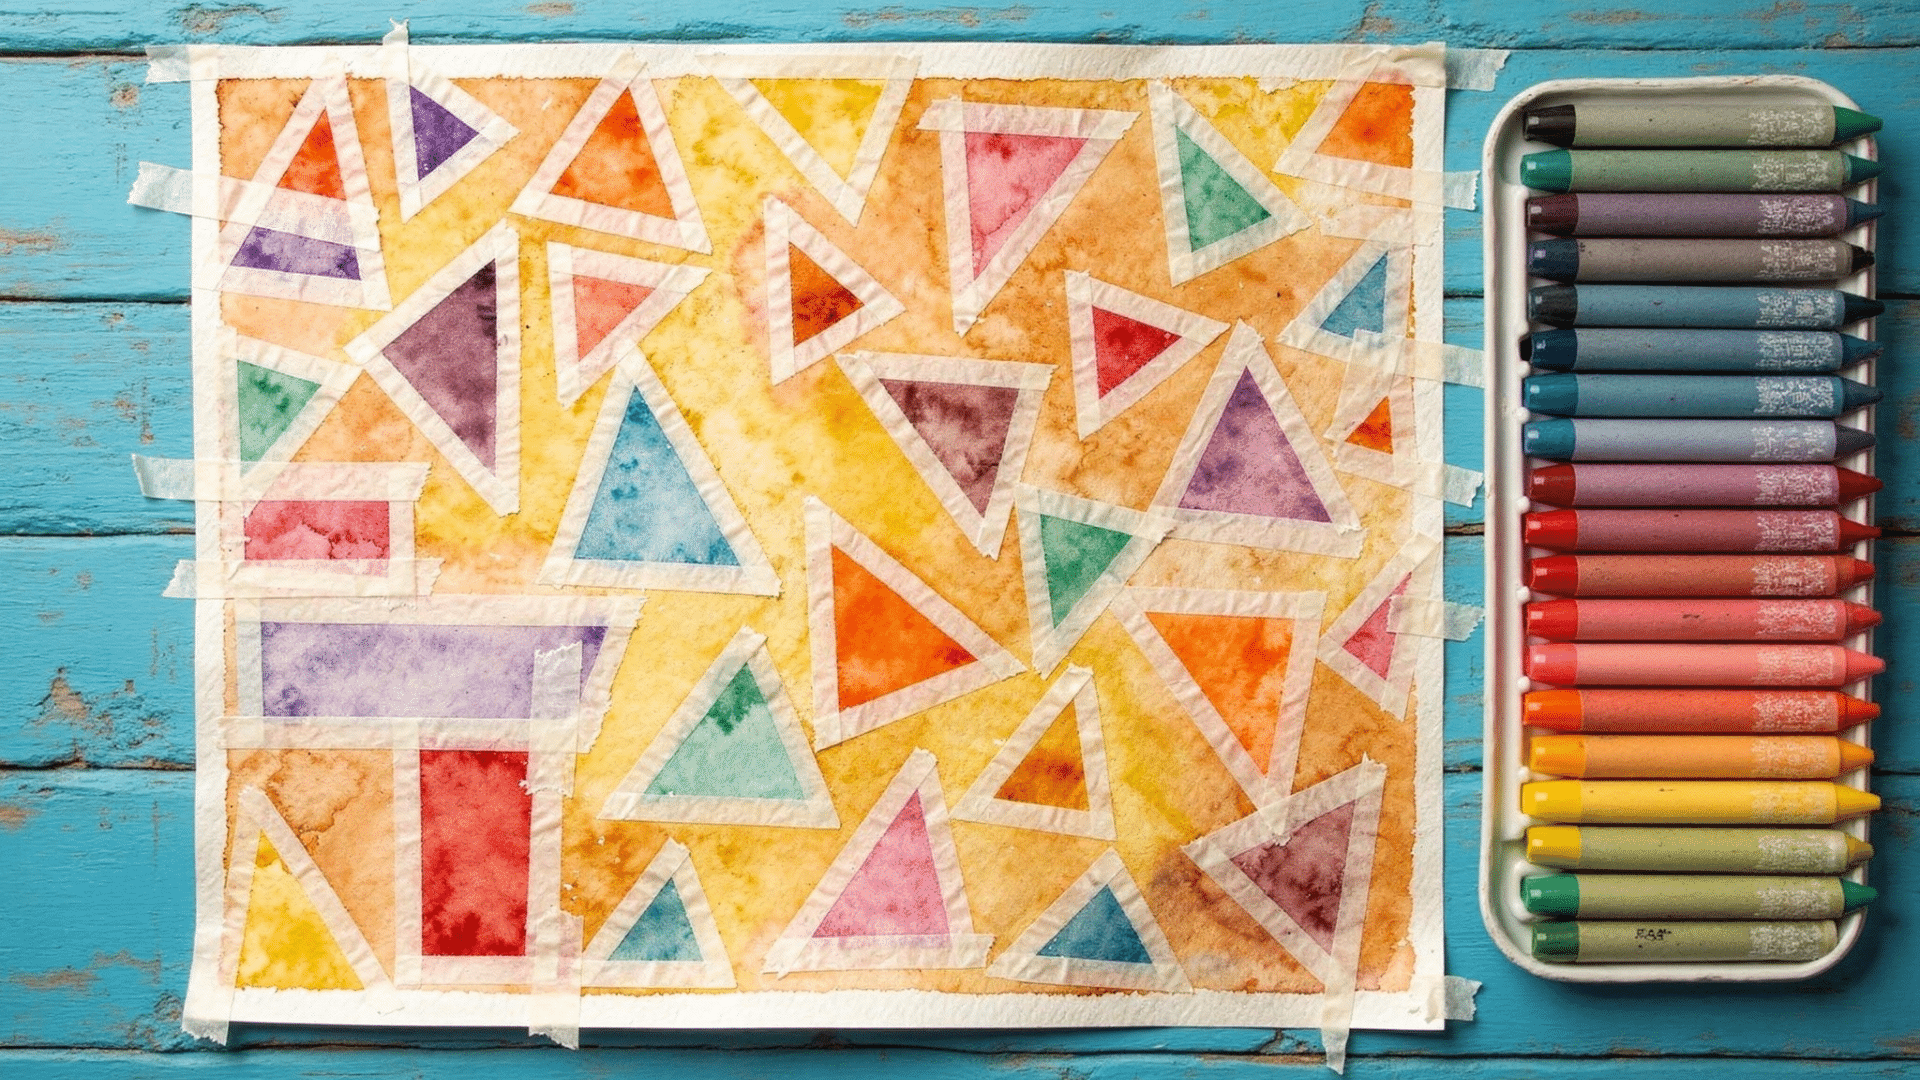
Painter’s tape resist art is satisfying because the big reveal at the end feels like unwrapping a gift. Kids love peeling back the tape to find the crisp white lines hidden underneath the paint.
Steps:
- Apply strips of painter’s tape to cardstock in any pattern you like, pressing the edges down firmly.
- Paint over the entire surface using watercolors or diluted tempera in one or more colors.
- Once completely dry, peel the tape back slowly at a low angle to reveal the clean design underneath.
15. Pasta Necklace and Jewelry
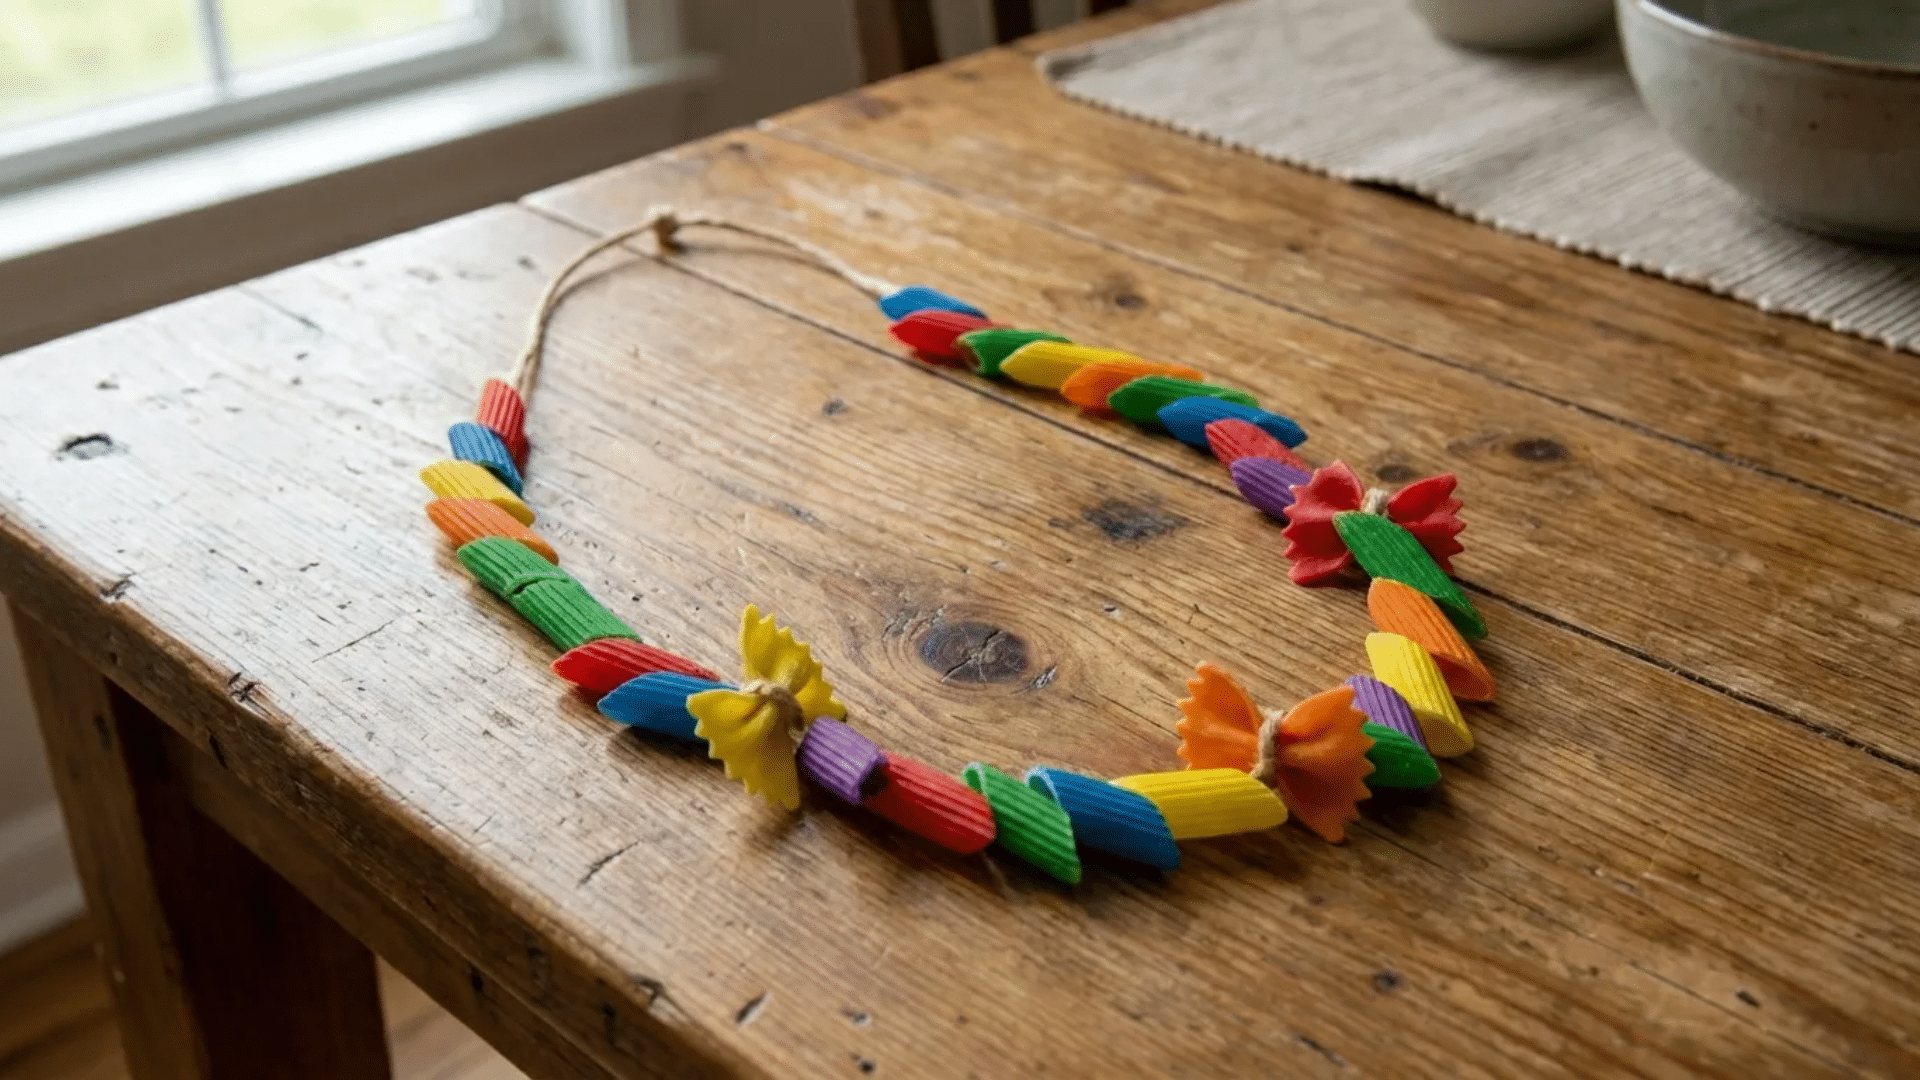
Making pasta jewelry is a classic activity that builds fine motor skills and color recognition at the same time. The result is wearable art that kids are incredibly proud to show off and give as gifts.
Steps:
- Paint uncooked pasta pieces with holes, such as penne or ziti, in a variety of colors and allow them to dry on wax paper.
- Thread the dried pasta onto yarn or elastic cord in any color pattern your child chooses.
- Tie off the ends securely to create a necklace or bracelet ready to wear.
16. Paper Bag Puppets
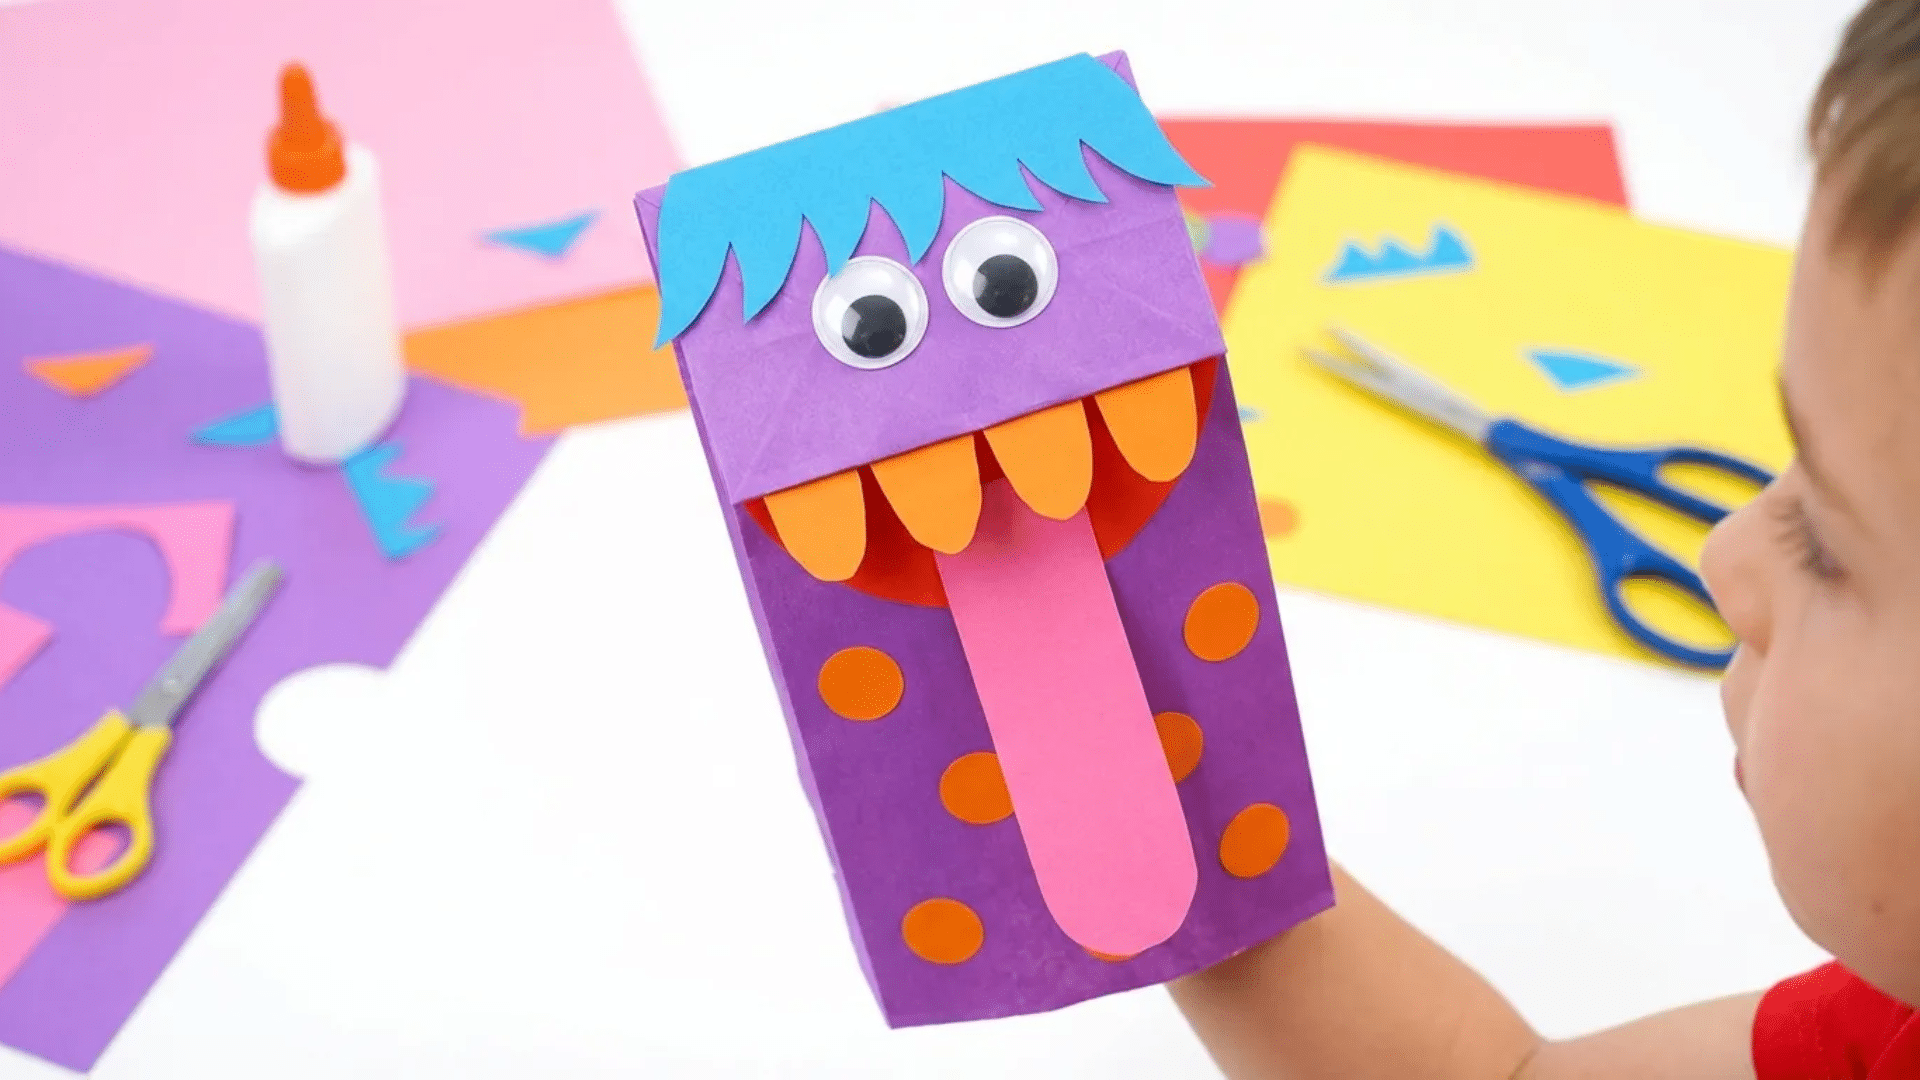
Paper bag puppets spark imaginative play the moment they are finished, making this a two-in-one activity covering both art and storytelling. Kids can spend the afternoon making a full cast of characters and putting on a puppet show.
Steps:
- Fold the bottom flap of a paper lunch bag down to form the mouth, then draw or glue on eyes, a nose, and facial features.
- Add yarn, paper strips, or fringe cut from construction paper for hair, gluing it securely to the top.
- Slide your hand inside to operate the mouth flap and perform a puppet show scene.
17. Painted Rock Pets
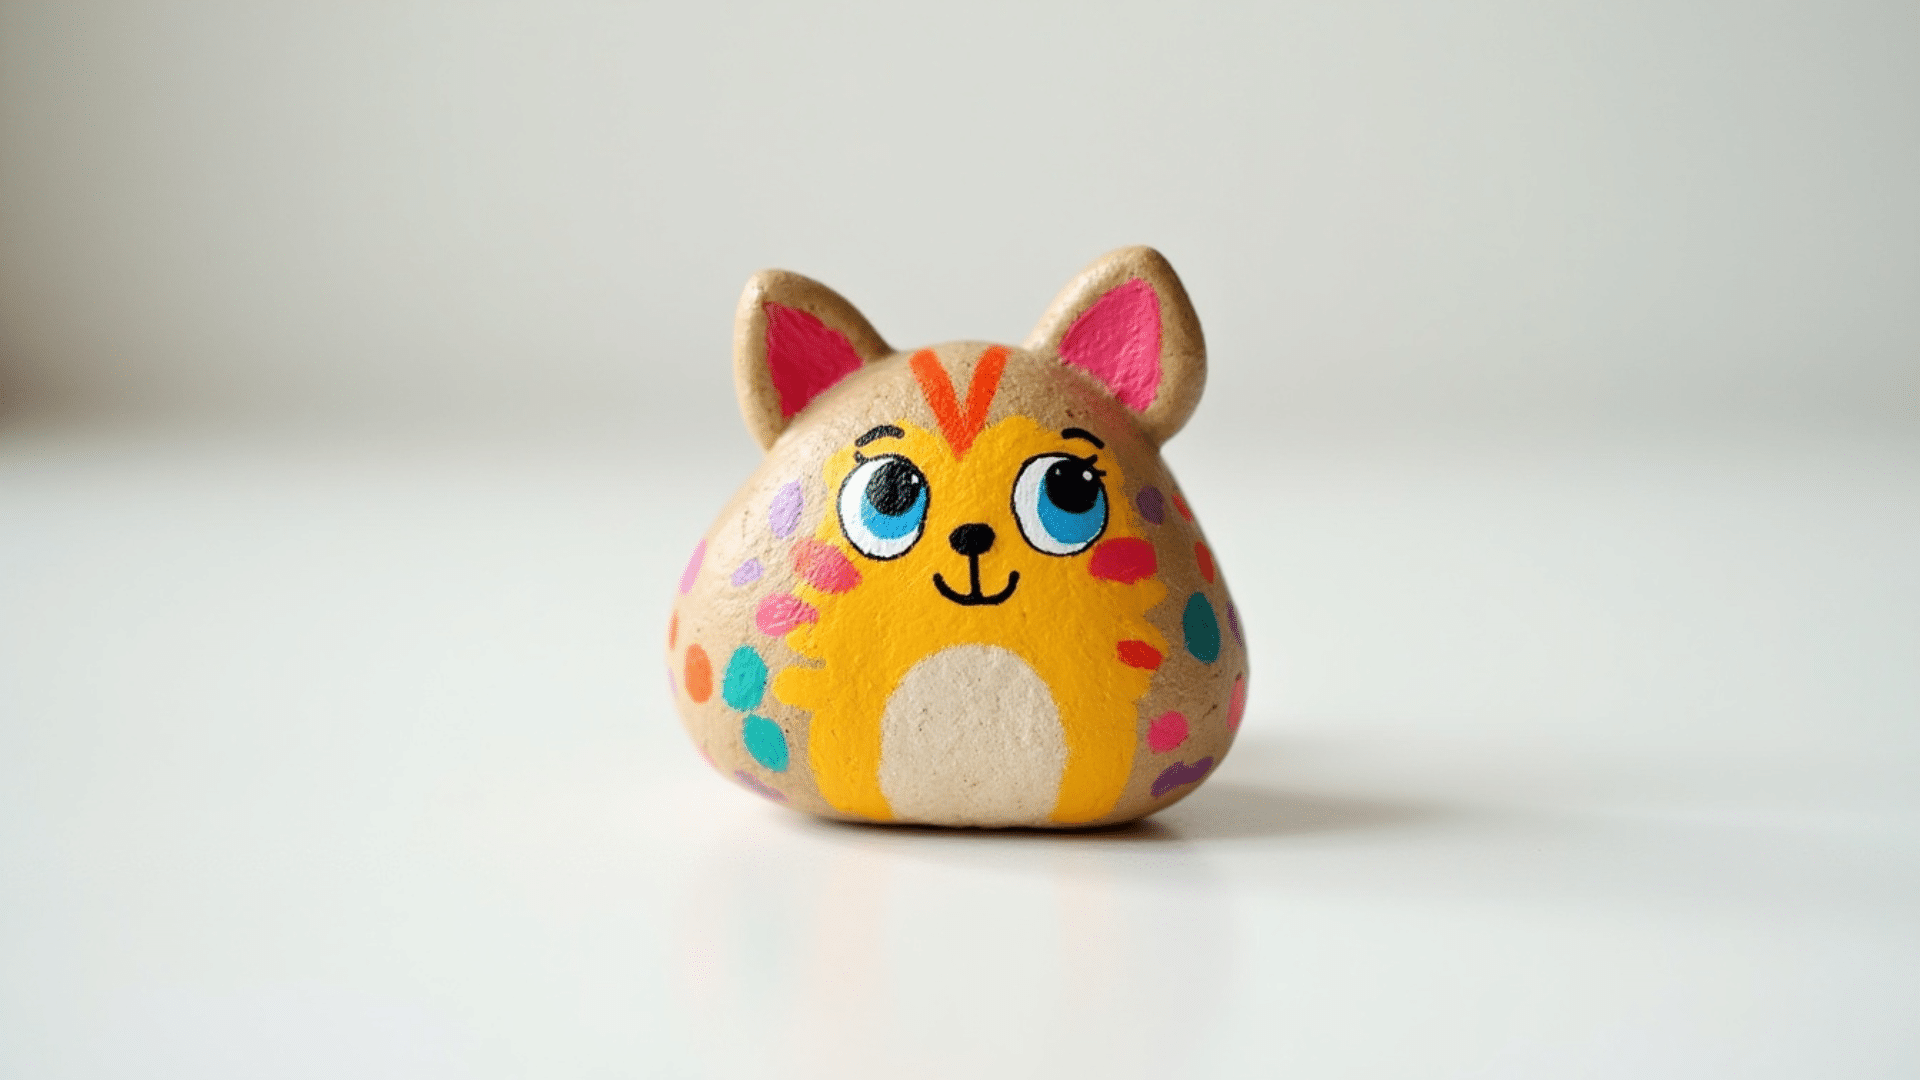
Turning a plain rock into a pet or character feels genuinely magical to kids. Painted rocks have also become a beloved community activity, with families hiding and finding them in parks and public spaces.
Steps:
- Wash and dry smooth rocks thoroughly, then apply a base coat of white acrylic paint and let it dry.
- Paint your chosen animal or character design using acrylic paint, building up details in layers.
- Once fully dry, seal the rock with clear varnish or Mod Podge to protect the design from chipping.
18. Newspaper Collage Portrait

Tearing and layering printed text and images to build a face simultaneously teaches composition, color, and creative problem-solving. This is an excellent introduction to mixed-media art for older kids.
Steps:
- Lightly sketch a simple face onto large cardstock, then tear newspaper or magazine pages into small pieces and sort them by tone.
- Brush diluted glue onto sections of the face and layer torn paper pieces over it, working from the center outward.
- Seal the surface with a final layer of diluted glue and allow it to dry flat before displaying.
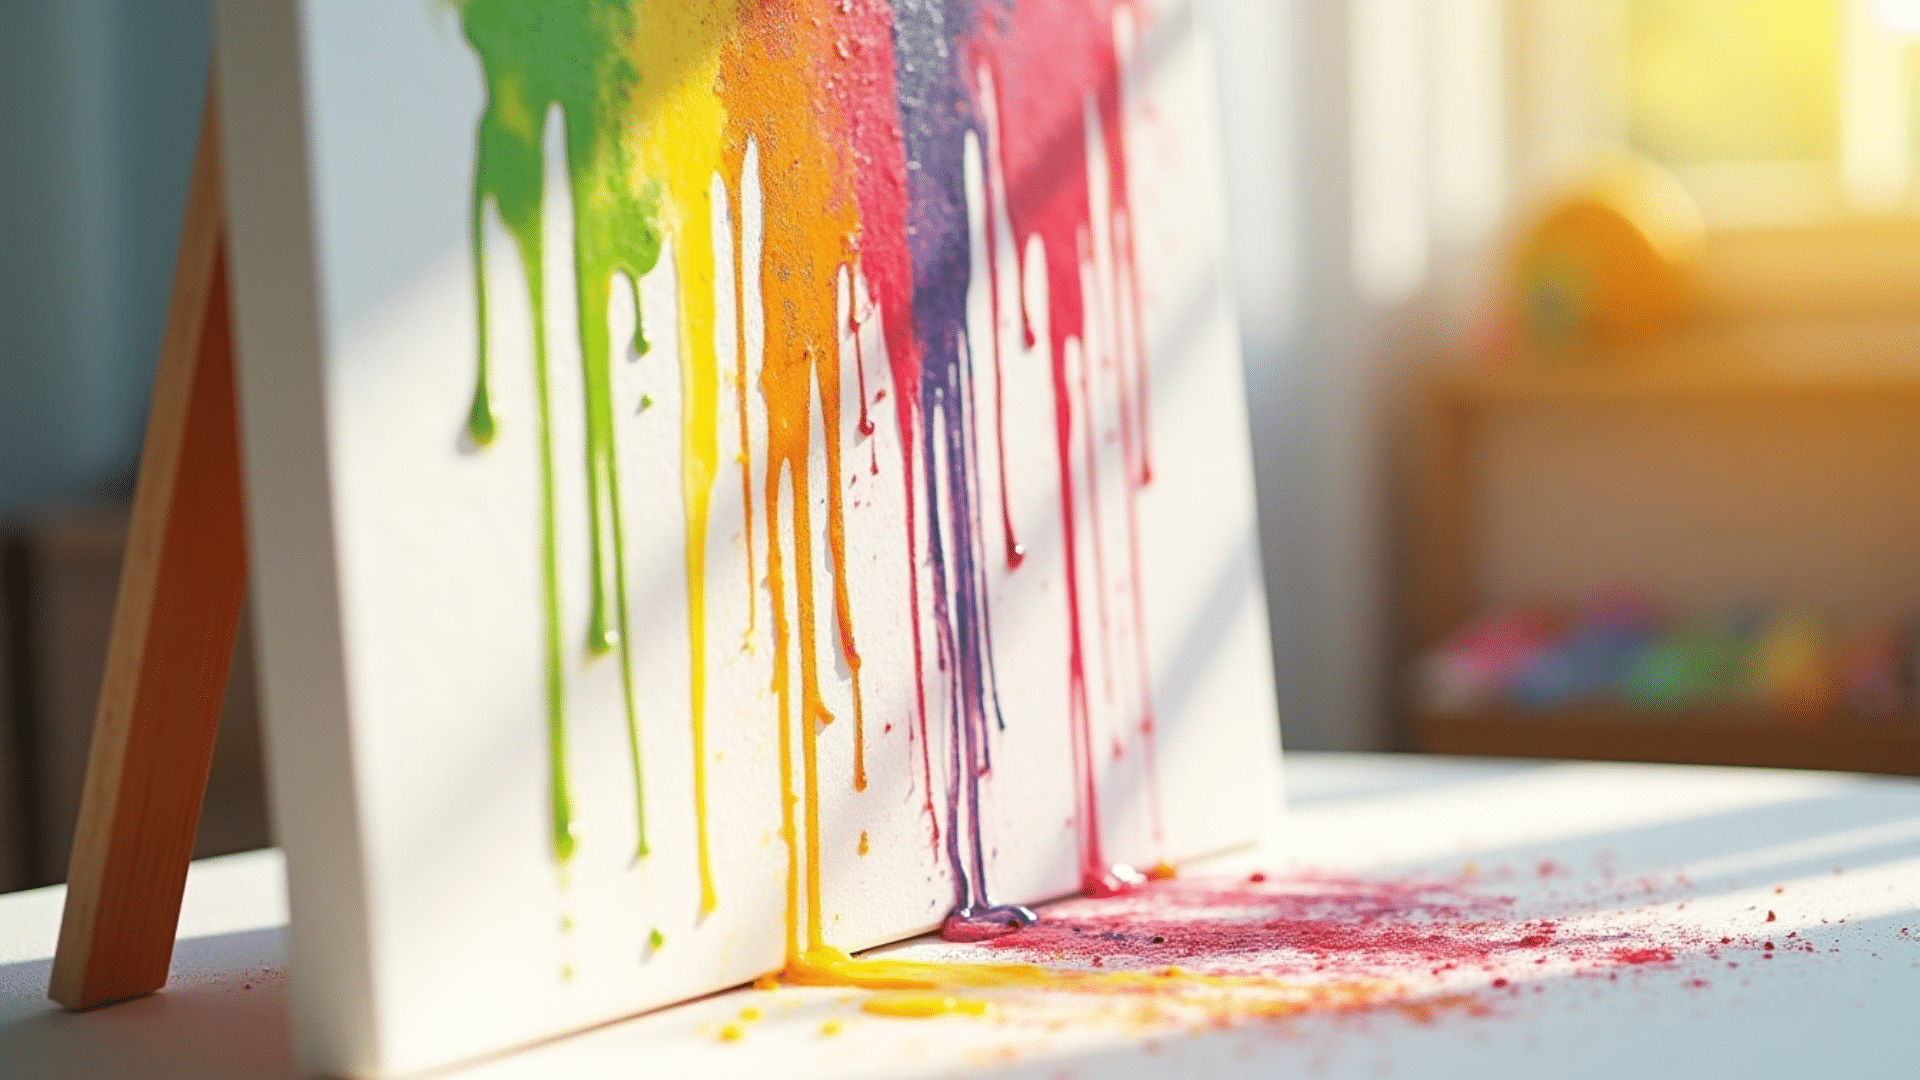
19. Splatter Paint Canvas
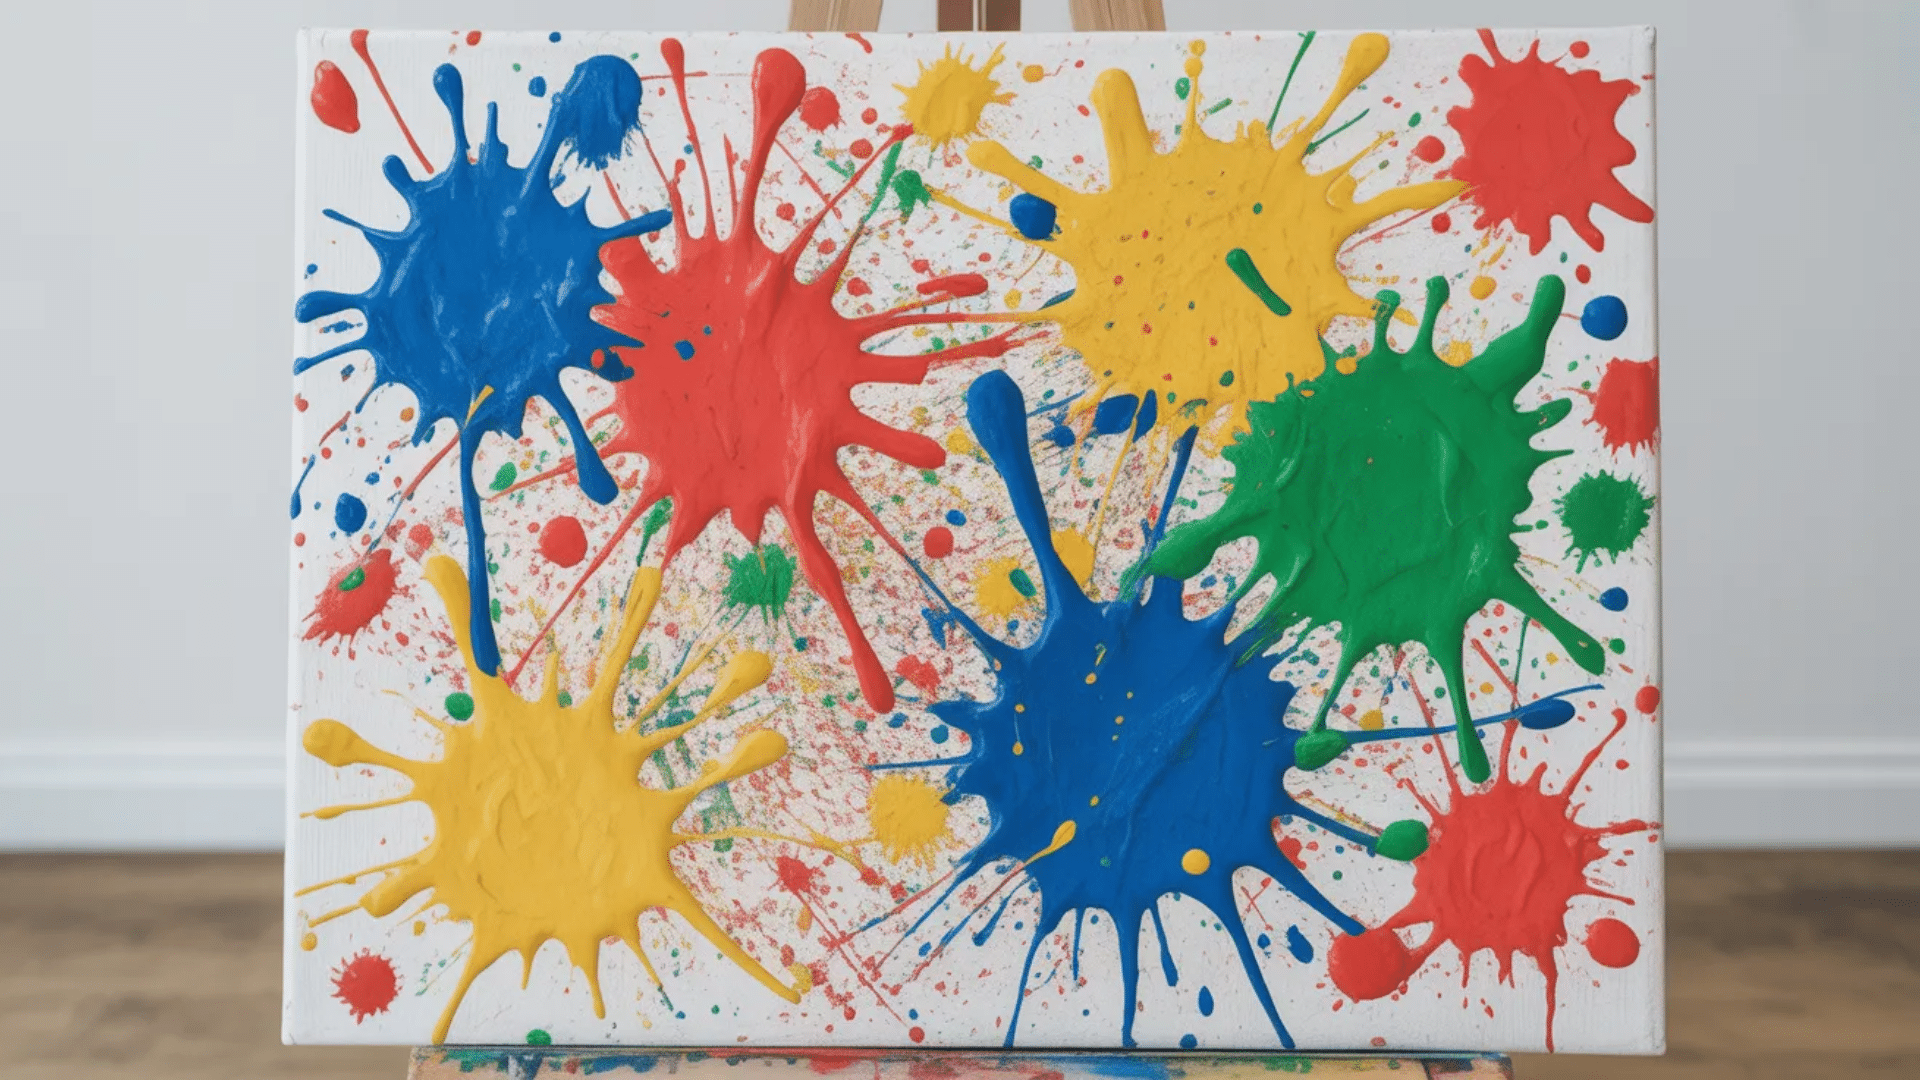
Jackson Pollock-style splatter painting is the ultimate permission-slip activity for kids who love big, bold, uninhibited expression. Set this one up outdoors and prepare for some serious joy.
Steps:
- Lay a canvas flat on the ground surrounded by a drop cloth, then pour diluted tempera into separate cups.
- Have your child flick, drip, and splatter paint across the canvas from different heights and angles using a loaded brush.
- Repeat with multiple colors, then allow the canvas to dry completely flat before hanging.
20. Finger Painting on Foil
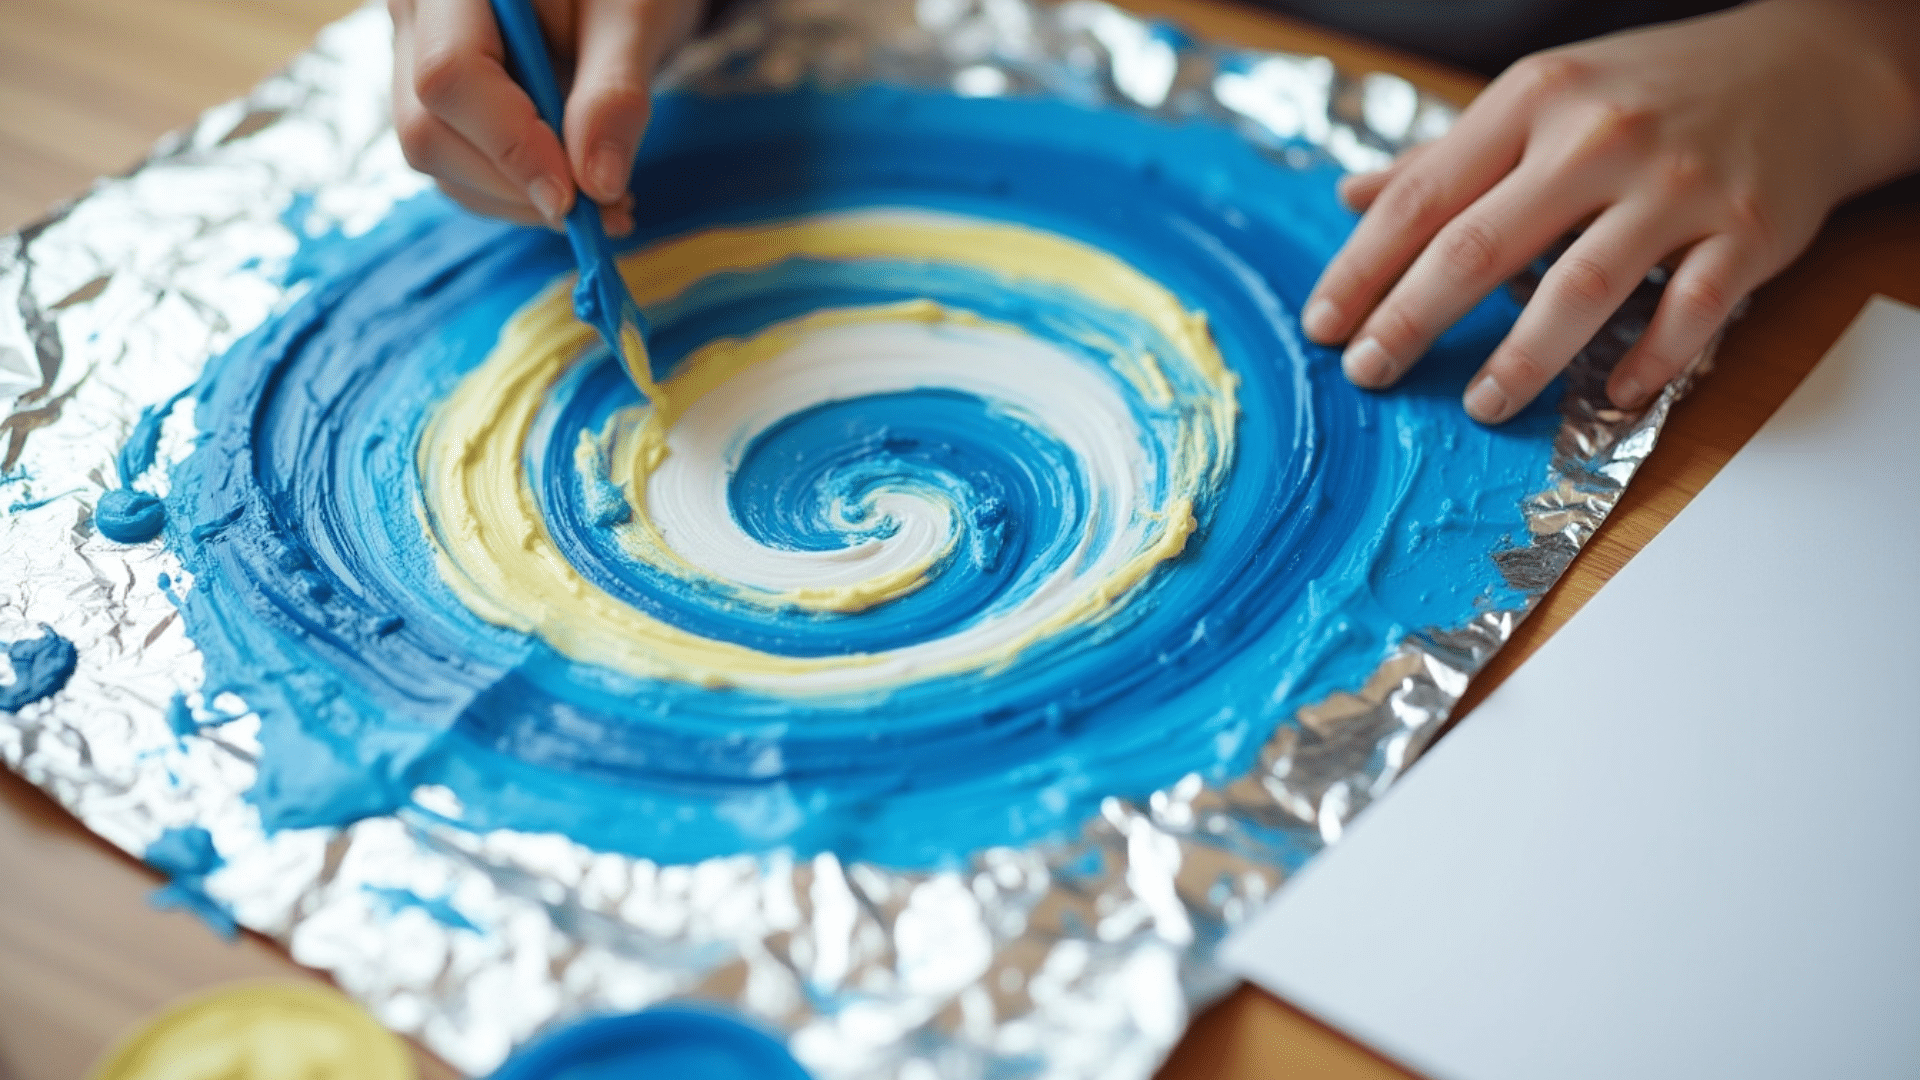
Painting on aluminum foil offers a completely different sensory experience from paper. The smooth surface and metallic shine peeking through the paint make for genuinely striking finished pieces.
Steps:
- Tape a sheet of heavy-duty foil flat onto a table, then squeeze several colors of tempera paint directly onto the surface.
- Use fingers, hands, or tools like a fork or sponge to blend and swirl the paint across the foil.
- Press the white paper firmly onto the wet paint, then peel it back slowly for a beautiful monoprint transfer.
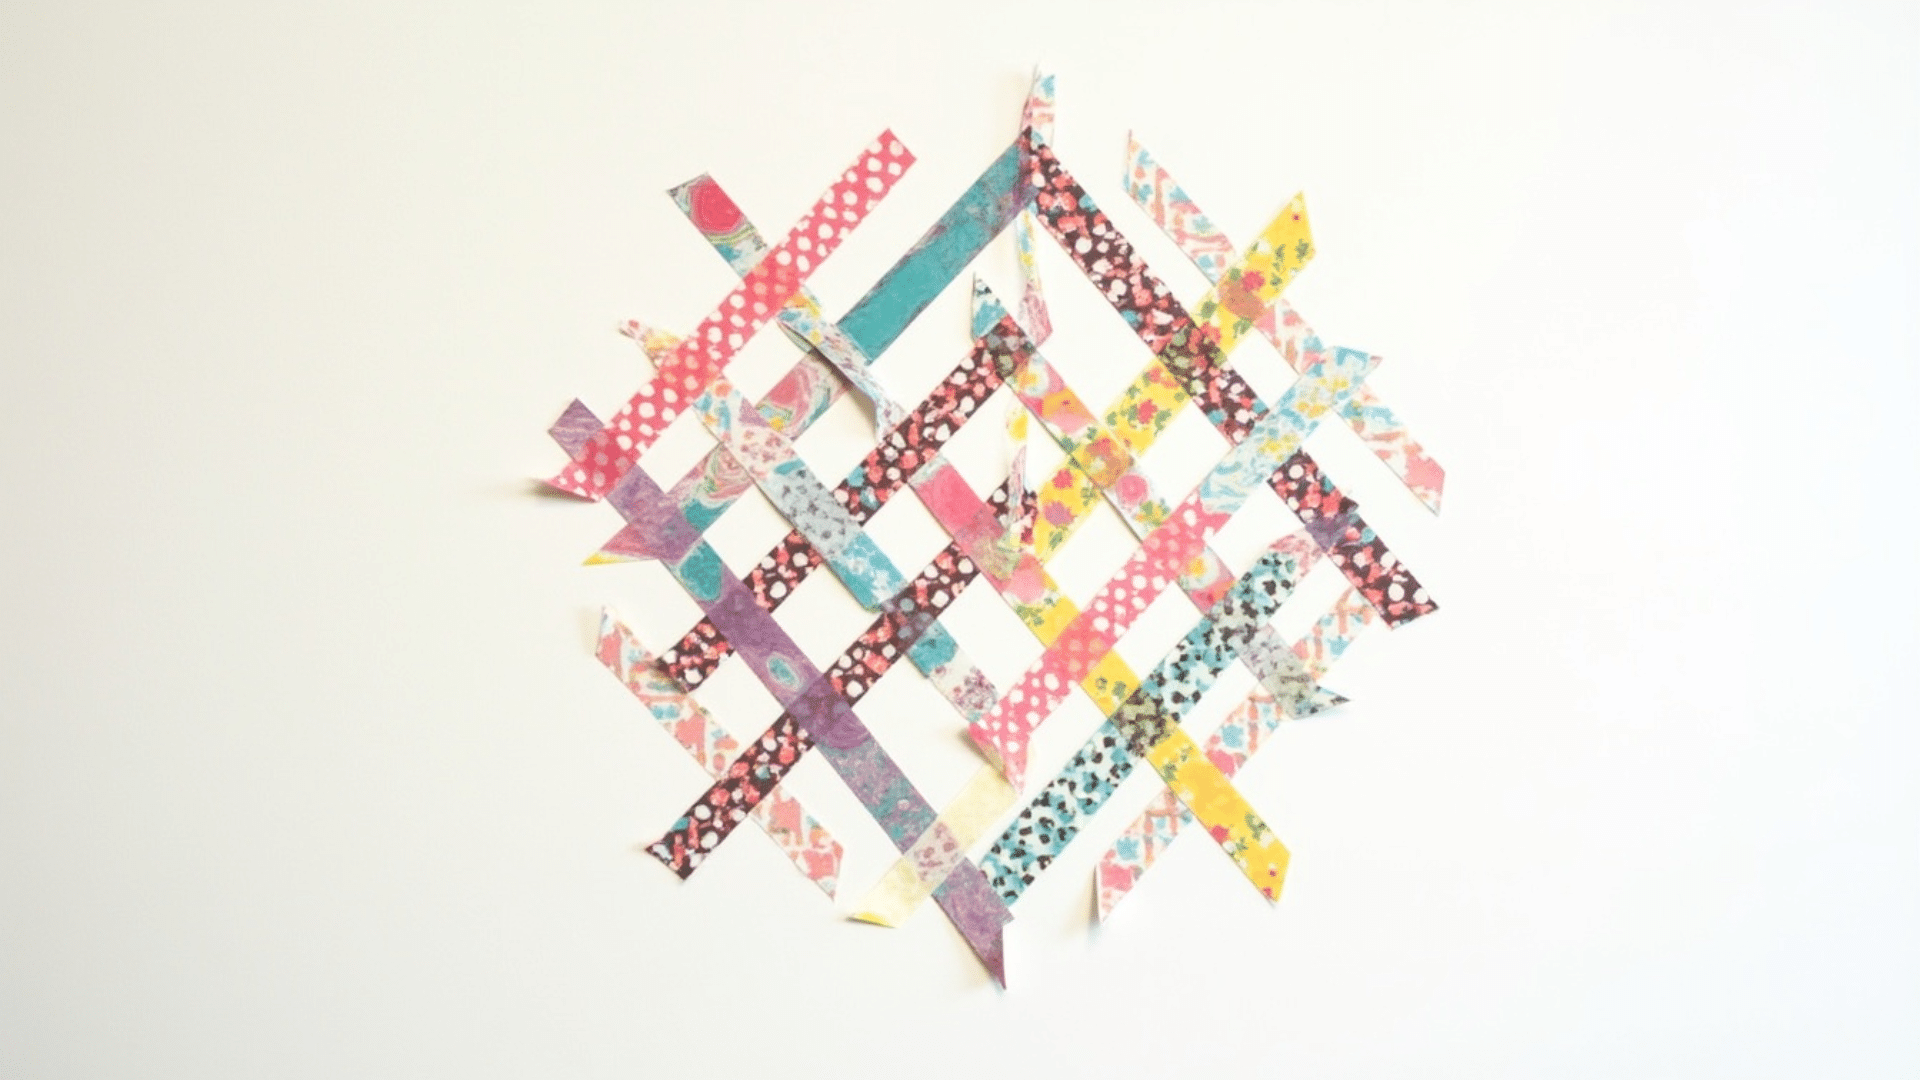
21. Paper Weaving
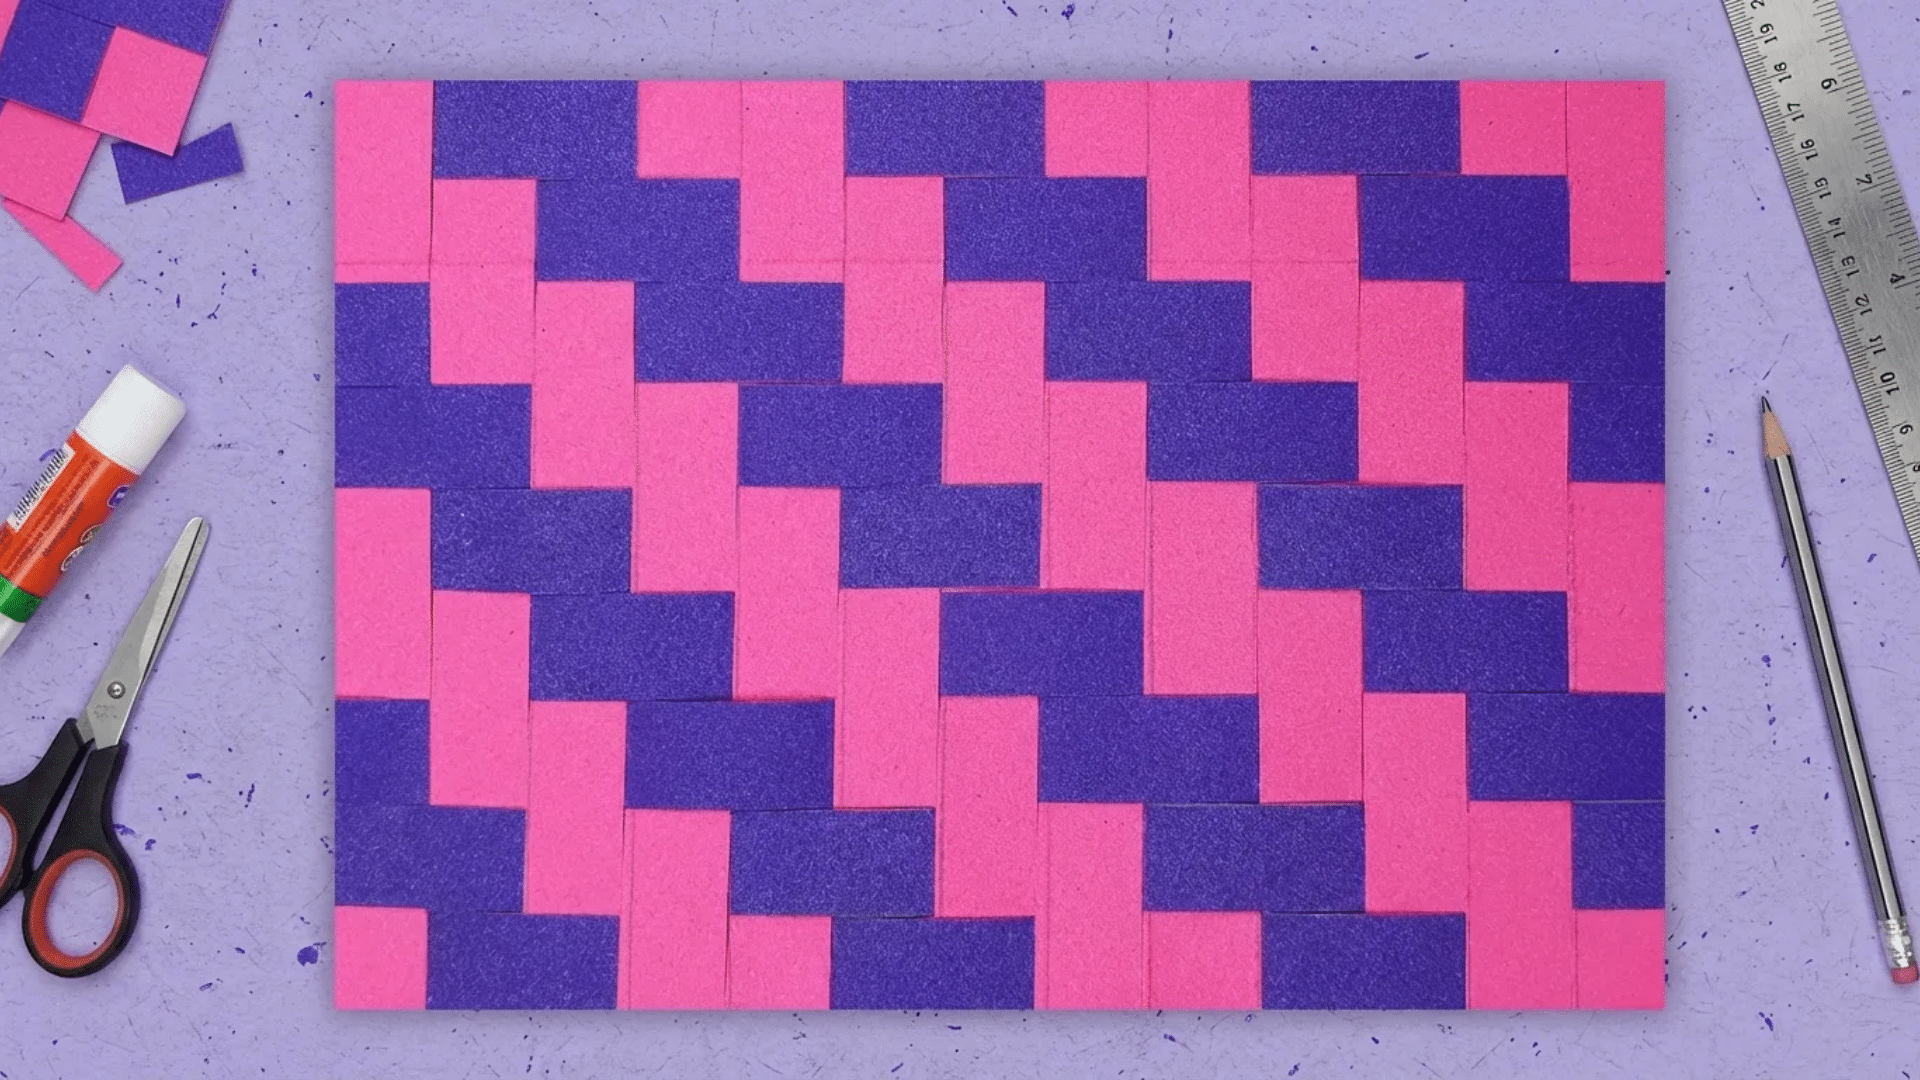
Paper weaving teaches children the over-under pattern in a hands-on way and builds focus, precision, and a wonderful sense of accomplishment when the woven mat comes together.
Steps:
- Fold a sheet of construction paper in half and cut evenly spaced vertical slits from the fold toward the open edge, stopping an inch from the edge to keep the frame intact.
- Open the paper flat and weave horizontal strips of a contrasting color through the slits in an over-under pattern.
- Glue or tape down the ends of each strip, then trim any excess before displaying the finished piece.
22. Ice Cube Painting
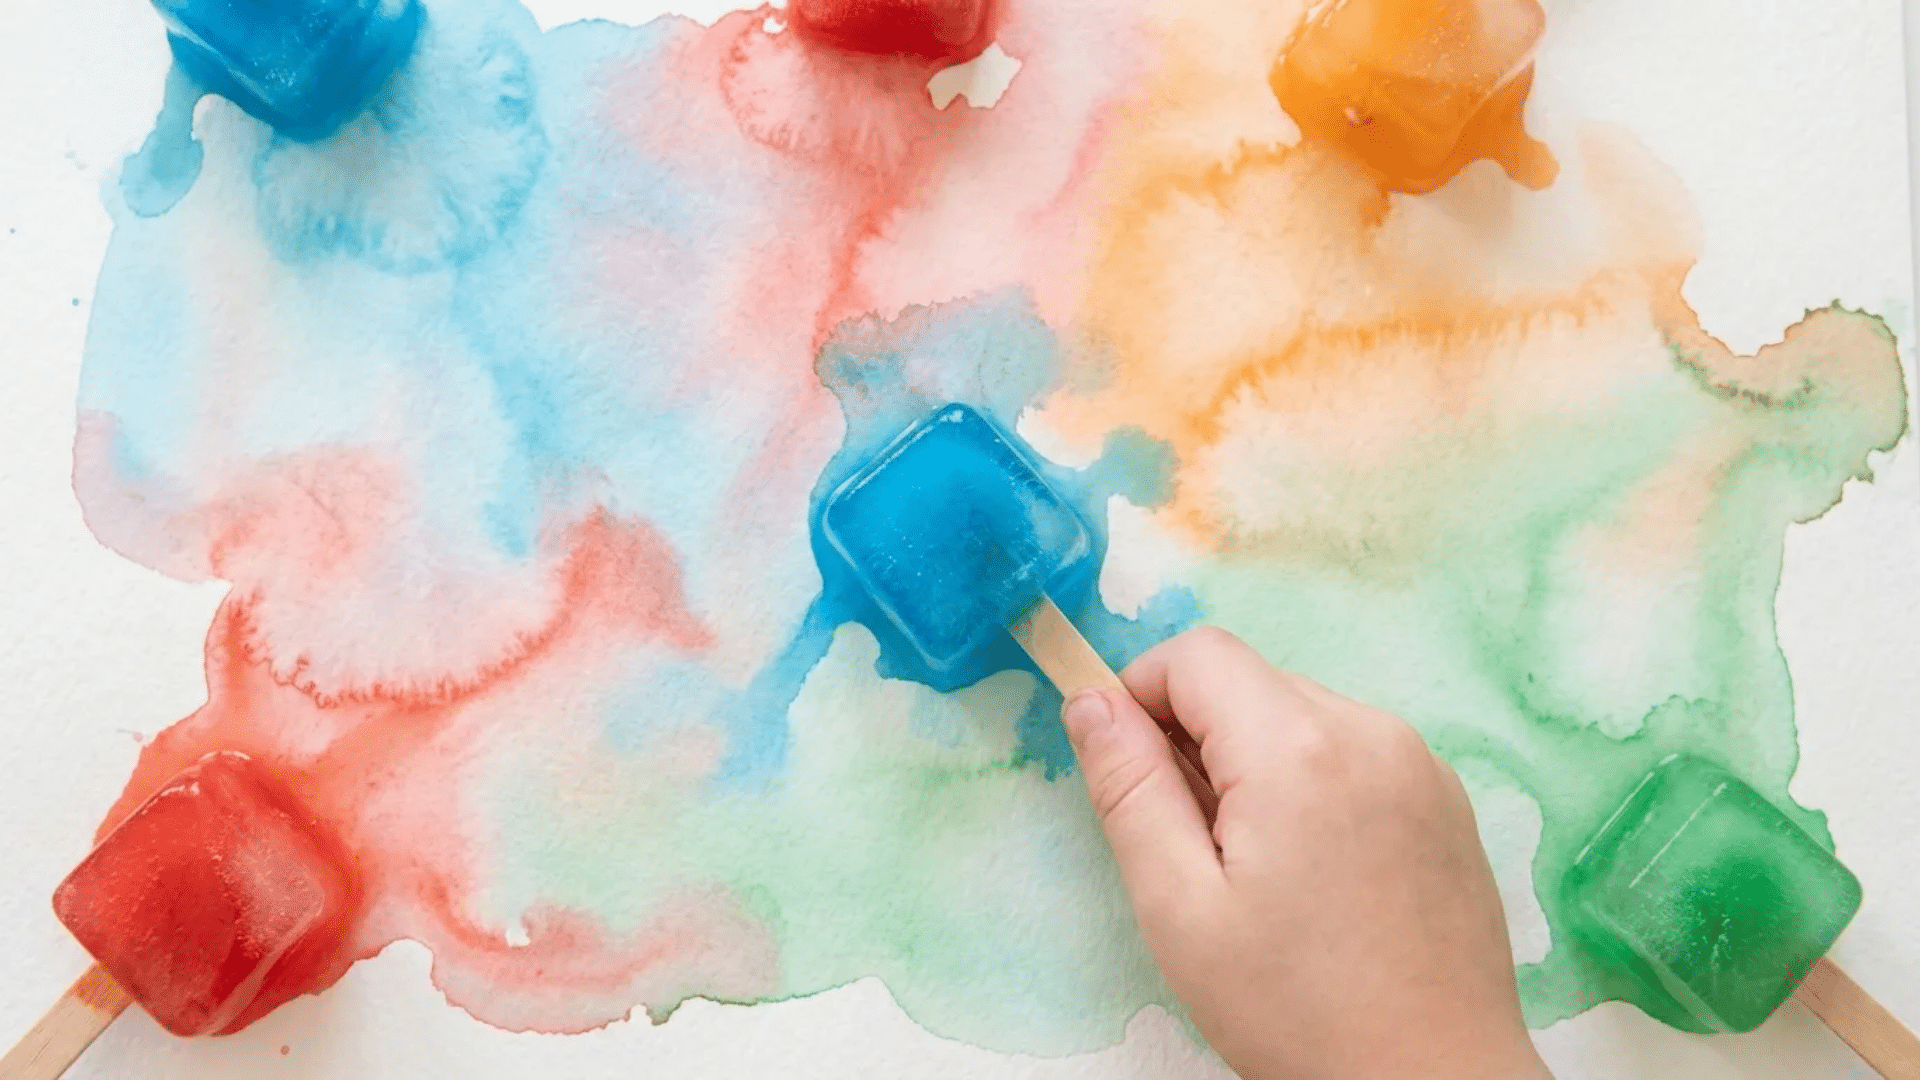
Ice cube painting is a wonderful sensory activity for hot days and a fascinating exploration of how paint behaves as ice melts. The results are soft, fluid, and beautifully unpredictable.
Steps:
- The day before, pour diluted liquid watercolor into an ice cube tray, insert craft stick handles, and freeze overnight.
- Lay thick watercolor paper in a shallow tray, then give your child a frozen paint cube to drag and swirl across the surface.
- Use multiple colors, let them overlap, then set the paper aside to dry flat once the ice has fully melted.
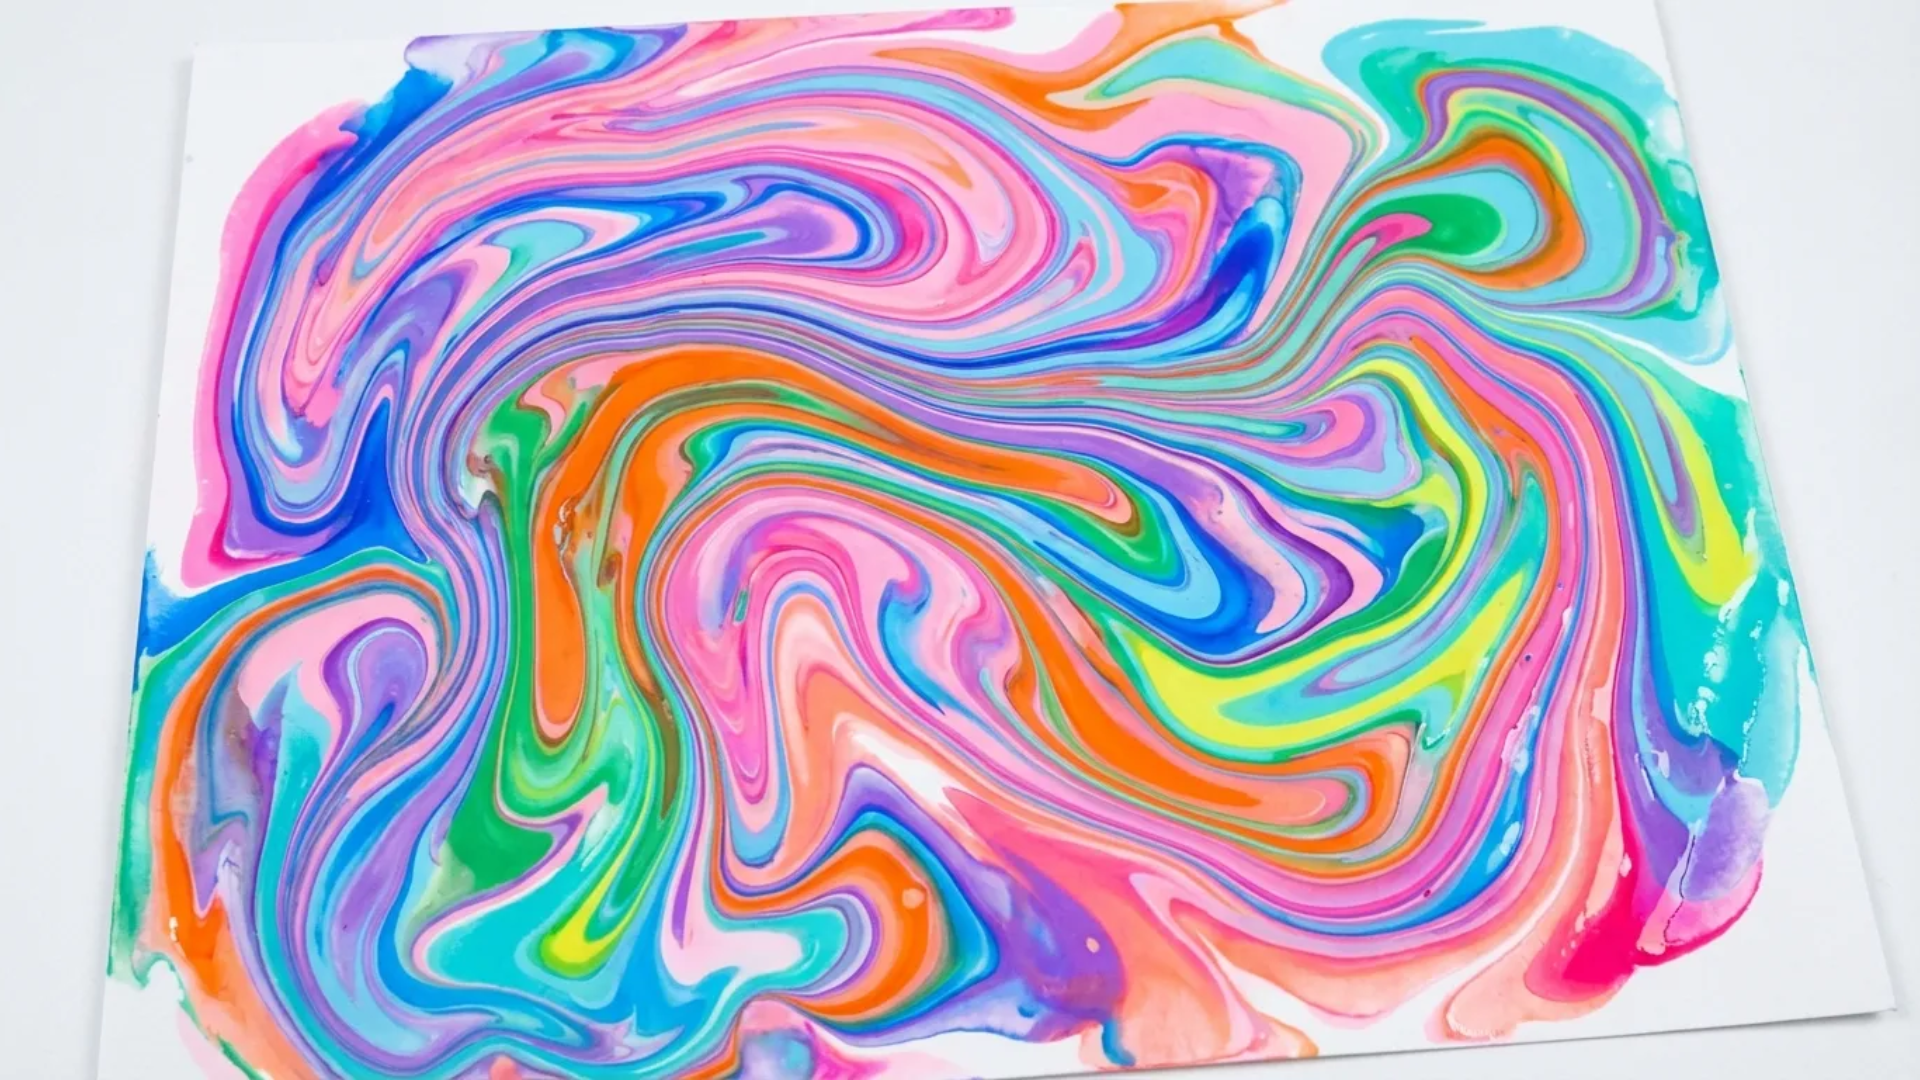
23. Spin Art
Spin art has been a classroom staple for decades because each piece is one-of-a-kind. You can make a simple version at home using a lazy Susan or salad spinner.
Steps:
- Secure a piece of round cardstock to the top of a lazy Susan or salad spinner insert.
- While slowly spinning the paper, drip small amounts of tempera paint in different colors near the center.
- Increase the speed and add more paint, then remove the paper and set it flat to dry before framing.
24. Sticker Story Scene
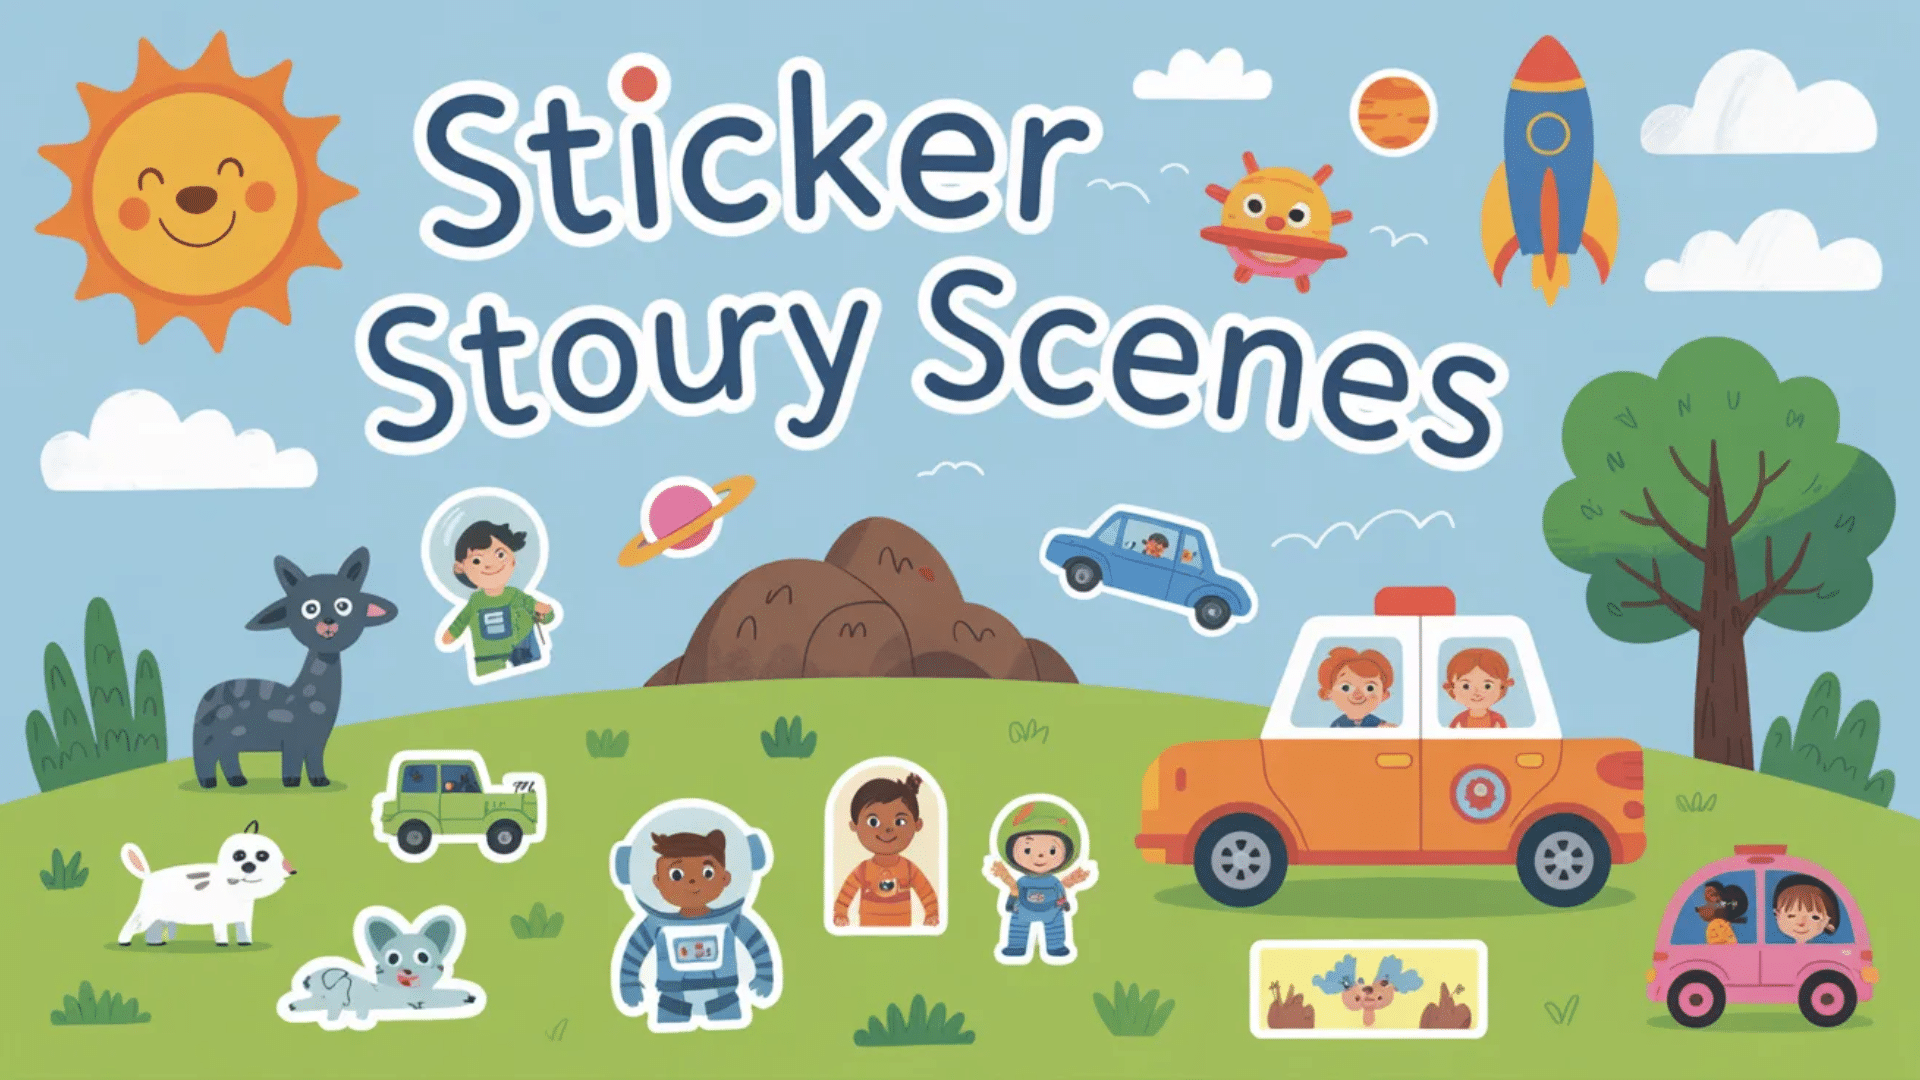
Sticker scenes are perfect for younger kids who want quick results without complicated steps. This activity builds storytelling skills while keeping the process mess-free.
Steps:
- Give your child a blank sheet of paper and a variety of themed stickers, such as animals, vehicles, or space.
- Have them arrange the stickers to create a full scene before pressing them down.
- Add simple background details with crayons or markers to complete the story.
25. Handprint Tree Art
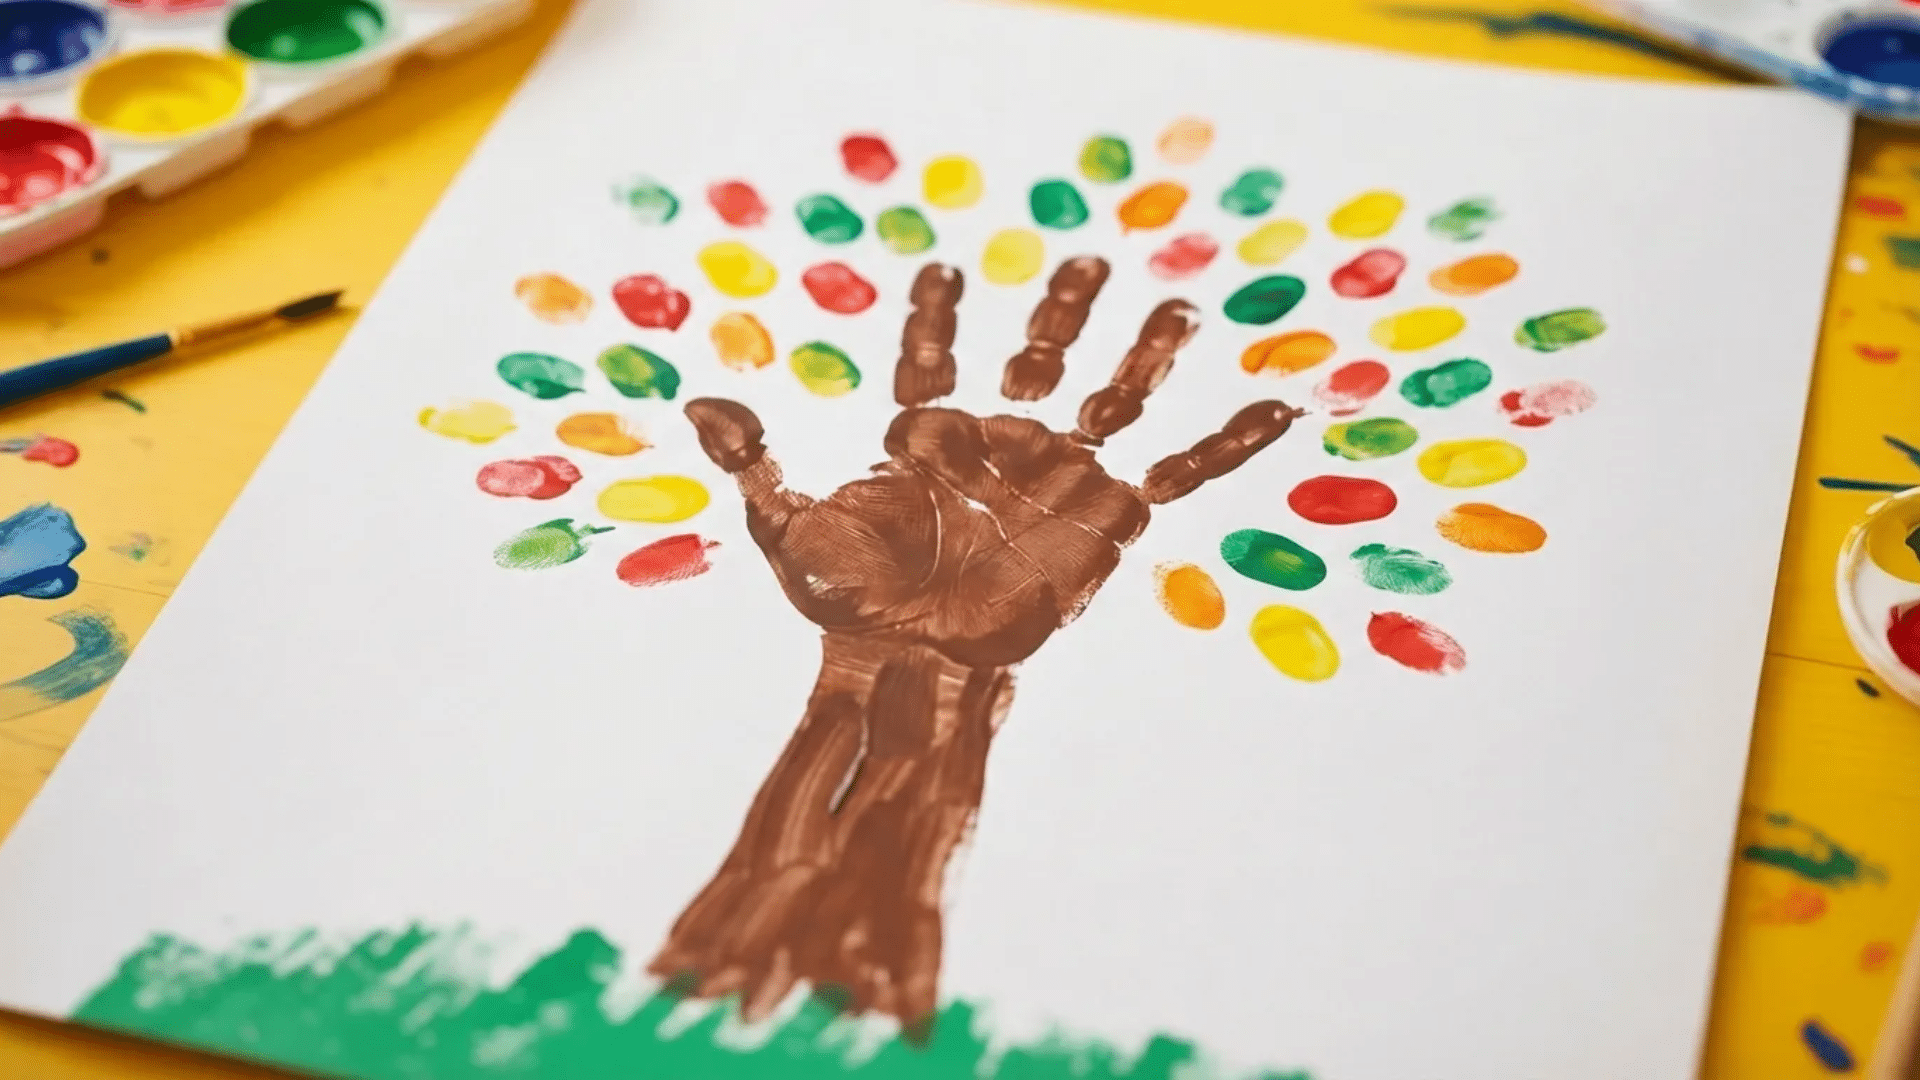
This simple painting turns a child’s hand into the trunk and branches of a tree, making it a sweet seasonal keepsake. It works beautifully for fall, spring blossoms, or even winter snow scenes.
Steps:
- Paint your child’s hand and arm brown and press onto white paper to form a tree trunk with branches.
- Once dry, use fingertips dipped in paint to add colorful leaves around the branches.
- Let dry flat before displaying.
26. Button Rainbow Collage

This bright collage strengthens sorting and color recognition skills while creating bold wall art. It also gives children practice with careful gluing and pattern placement.
The finished rainbow has texture and dimension that make it visually interesting.
Steps:
- Draw a large rainbow outline on cardstock.
- Sort buttons by color, then glue them along each rainbow stripe.
- Allow glue to dry completely before hanging.
27. Paper Chain
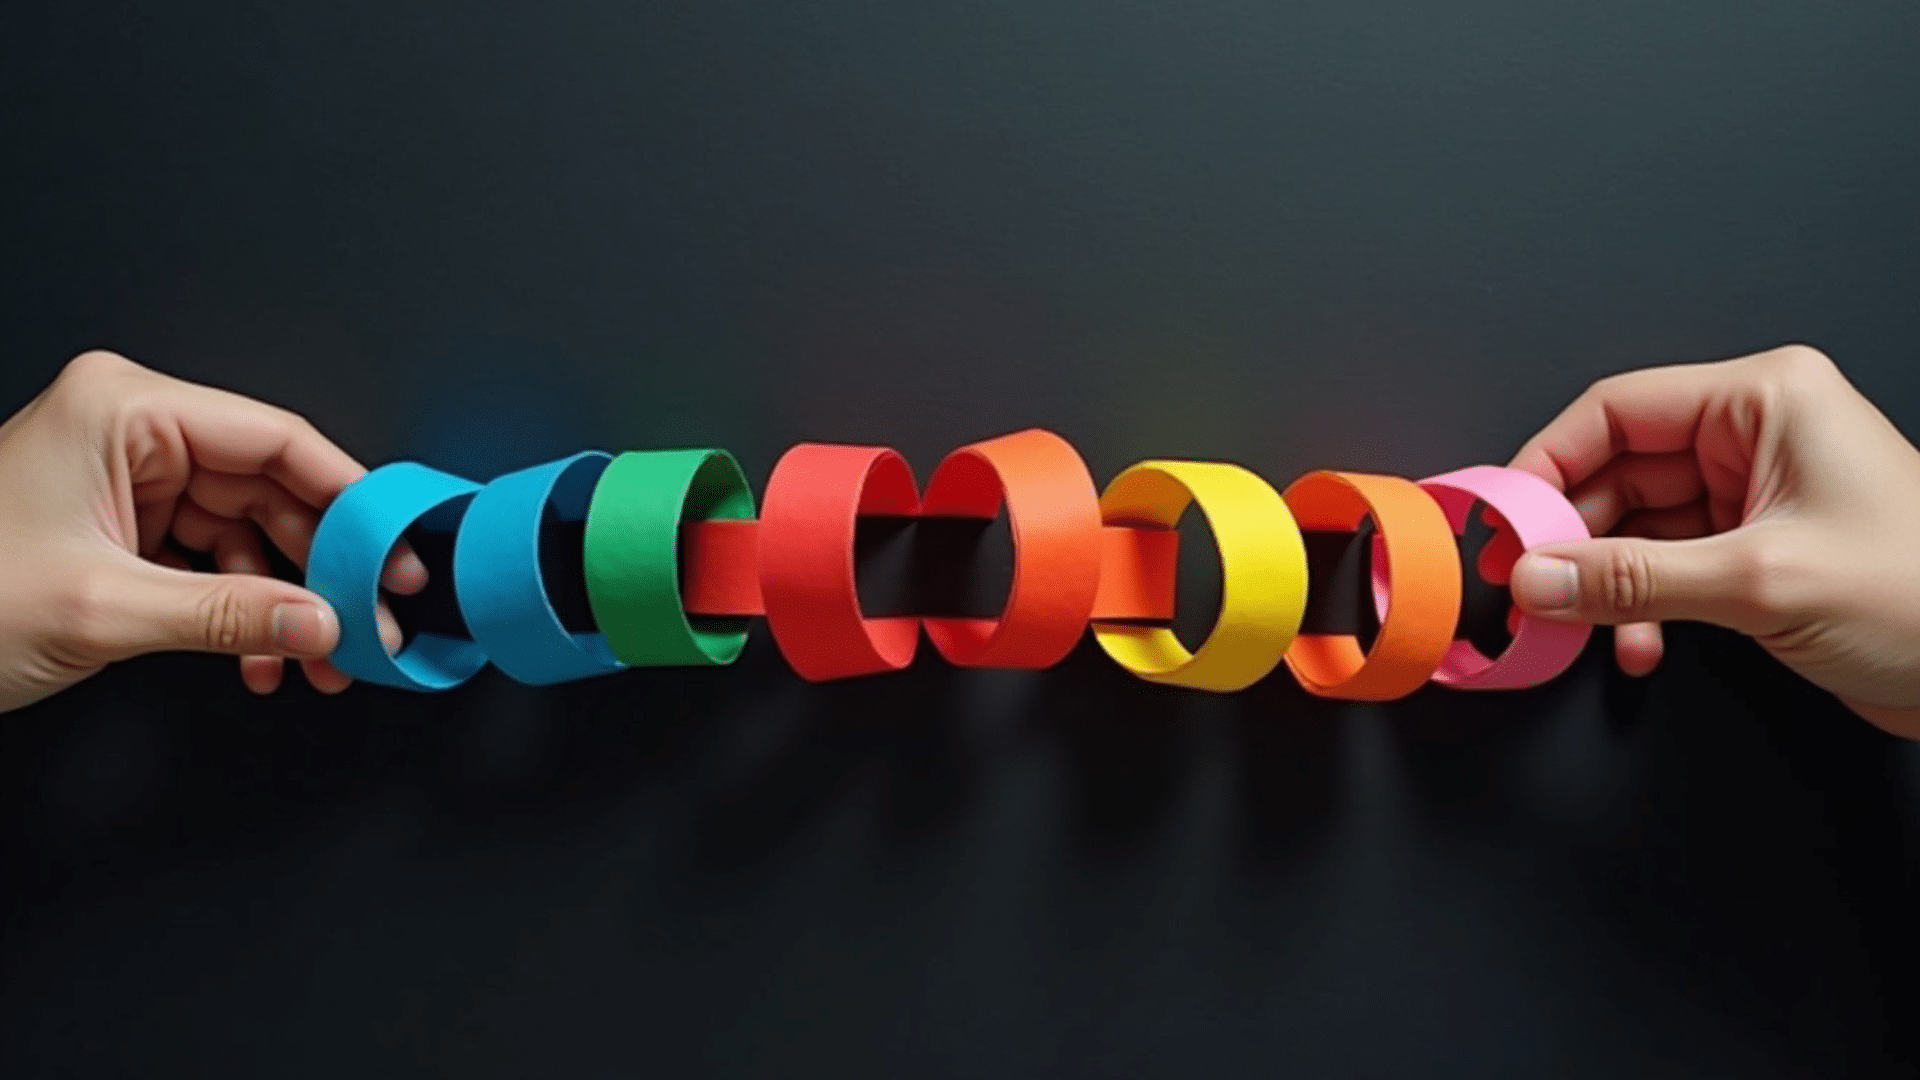
A paper chain craft that doubles as a playful decoration and fine motor practice. Kids love watching the caterpillar grow longer with each added loop.
It is simple enough for preschoolers and can easily be adjusted in length.
Steps:
- Cut colored construction paper into strips.
- Loop and glue the first strip into a circle, then thread and glue additional strips to form a chain.
- Add eyes and antennae to the front loop to turn it into a caterpillar.
28. Crayon Rubbing Texture Art
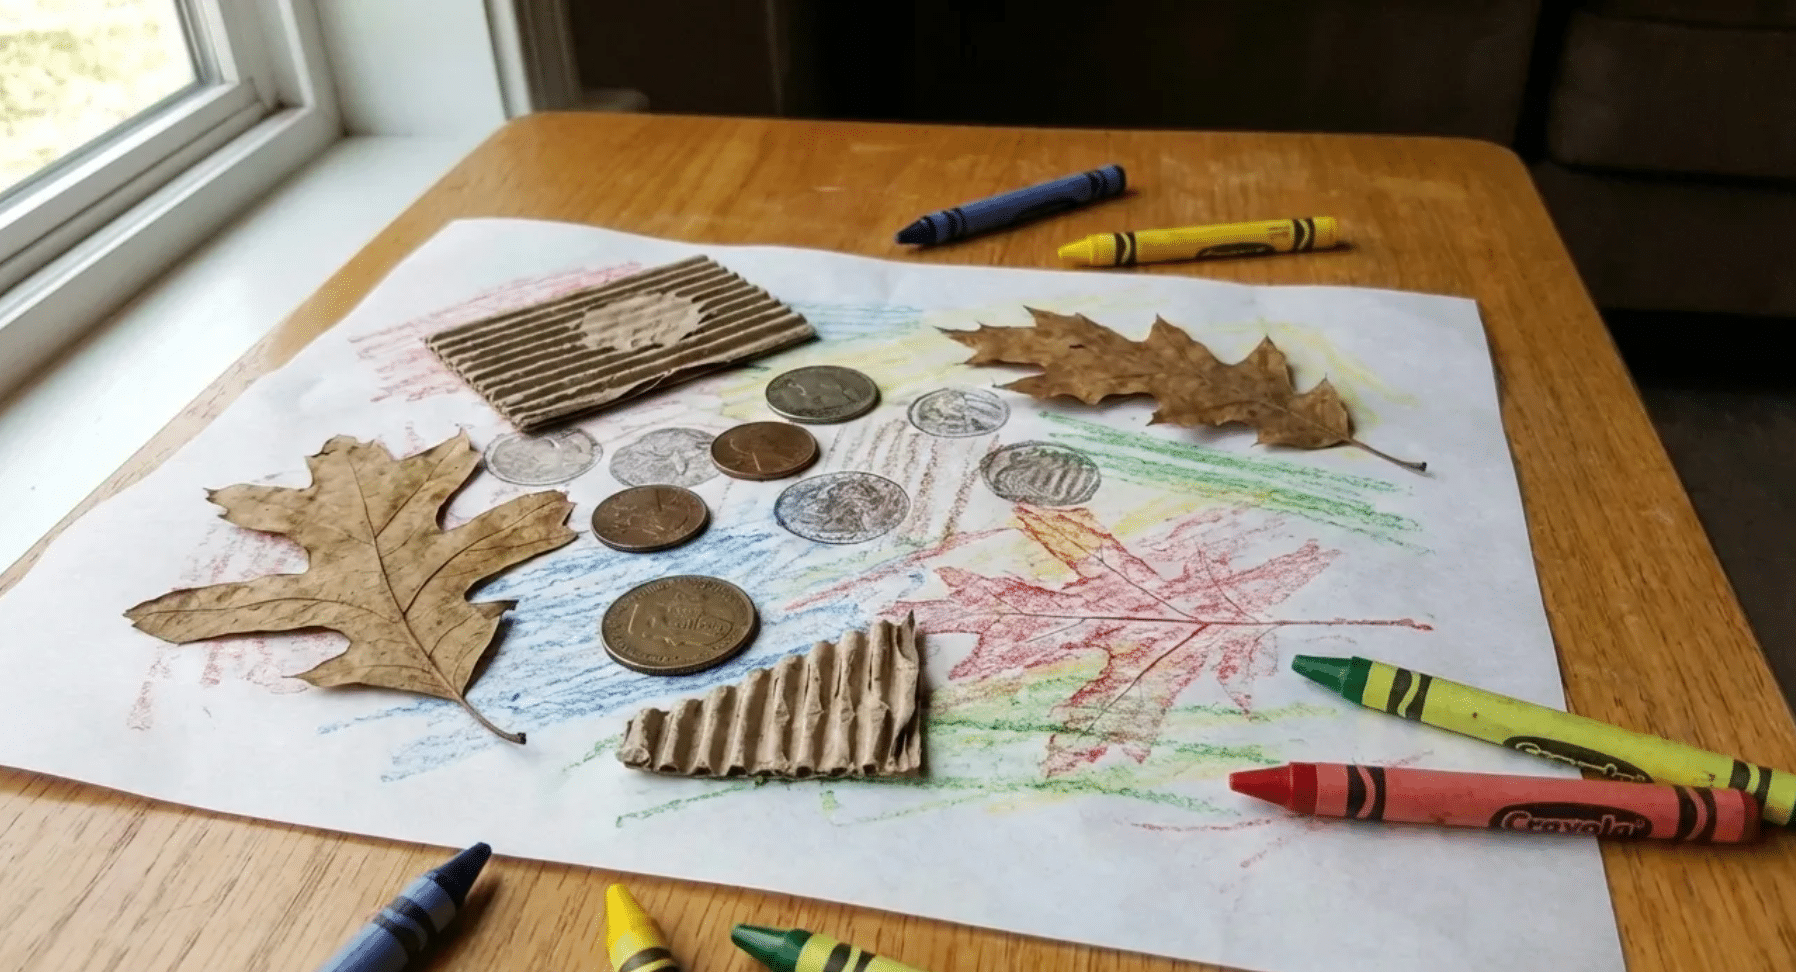
This easy project turns everyday objects into hidden texture designs. It encourages children to observe patterns and surfaces in a new way.
The surprise of seeing textures appear makes this activity especially engaging.
Steps:
- Place textured objects such as leaves, coins, or cardboard under thin paper.
- Remove the crayon wrappers and rub the sides of the crayons across the paper surface.
- Layer multiple rubbings in different colors to build a composition.
29. Origami Animals
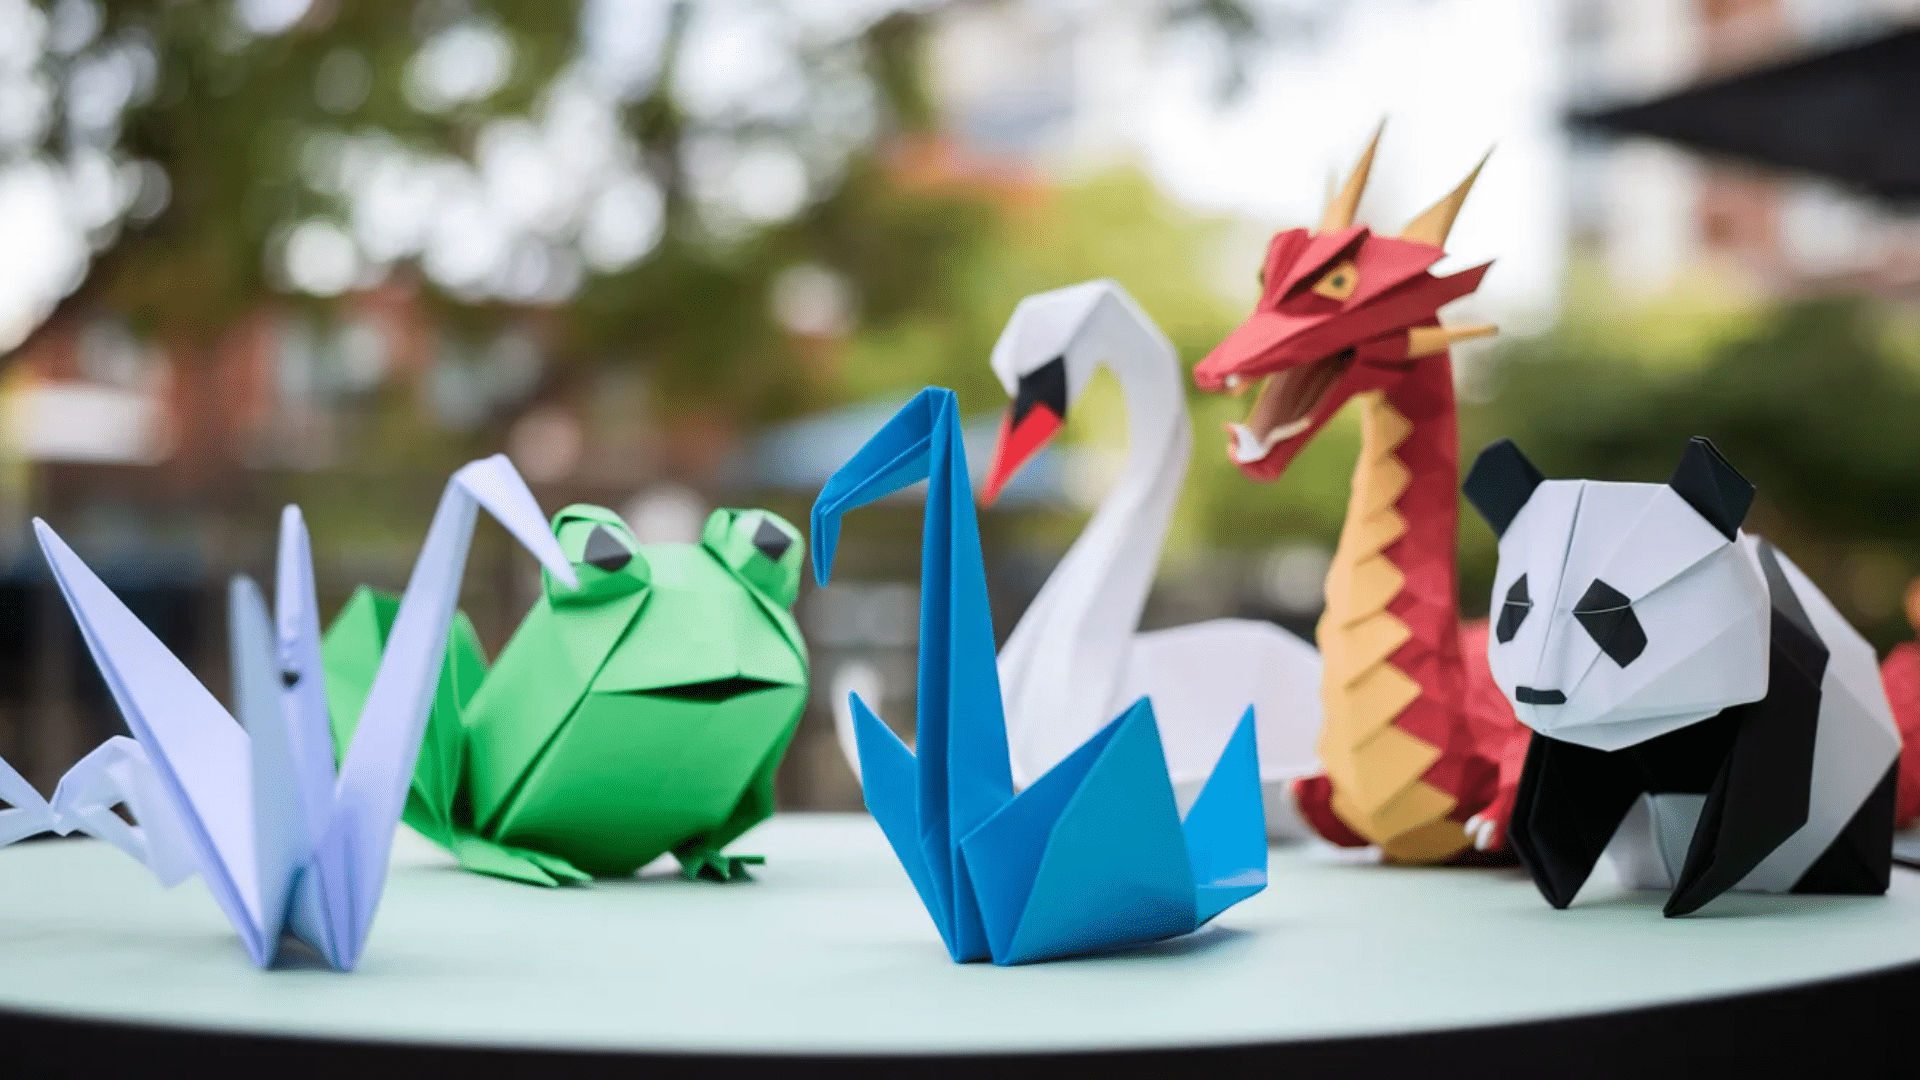
Origami is both an art form and a puzzle, making it perfectly suited for older kids who enjoy a challenge. Starting with simple animals builds the foundational folding skills needed for more complex designs later.
Steps:
- Choose a beginner model, such as a dog, cat, or bird, and find a clear step-by-step diagram to follow.
- Use a square sheet of origami paper and follow each fold carefully, creasing firmly to keep the model crisp.
- Once the model is complete, add eyes and details with markers to bring the animal to life.
30. Hand Fans
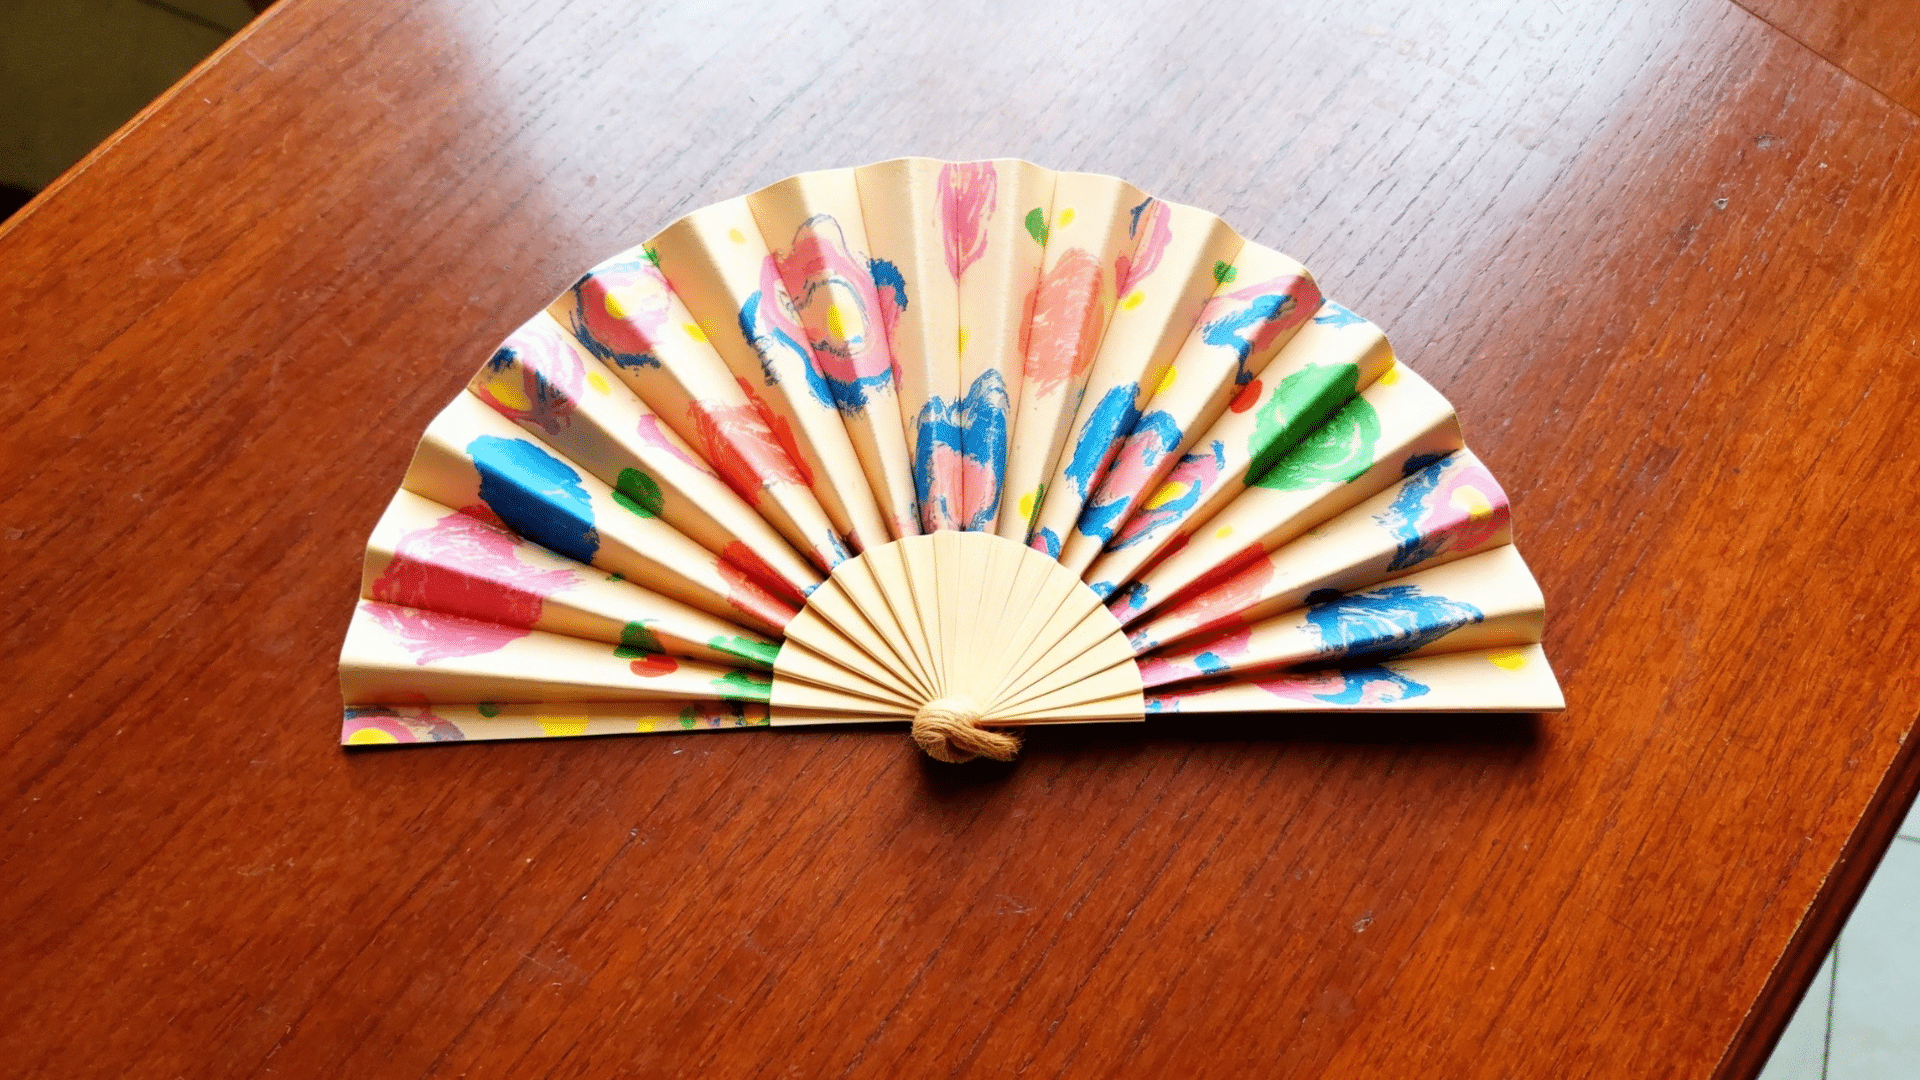
A practical craft kids can actually use, especially on warm days. Decorating the paper first gives children ownership of the finished product.
Once folded, the fan opens and closes smoothly, which feels satisfying.
Steps:
- Have your child decorate a sheet of sturdy paper with paint or markers.
- Once dry, fold the paper accordion-style from top to bottom.
- Pinch the bottom together and secure with tape or a rubber band to create a fan.
31. Cupcake Liner Flowers
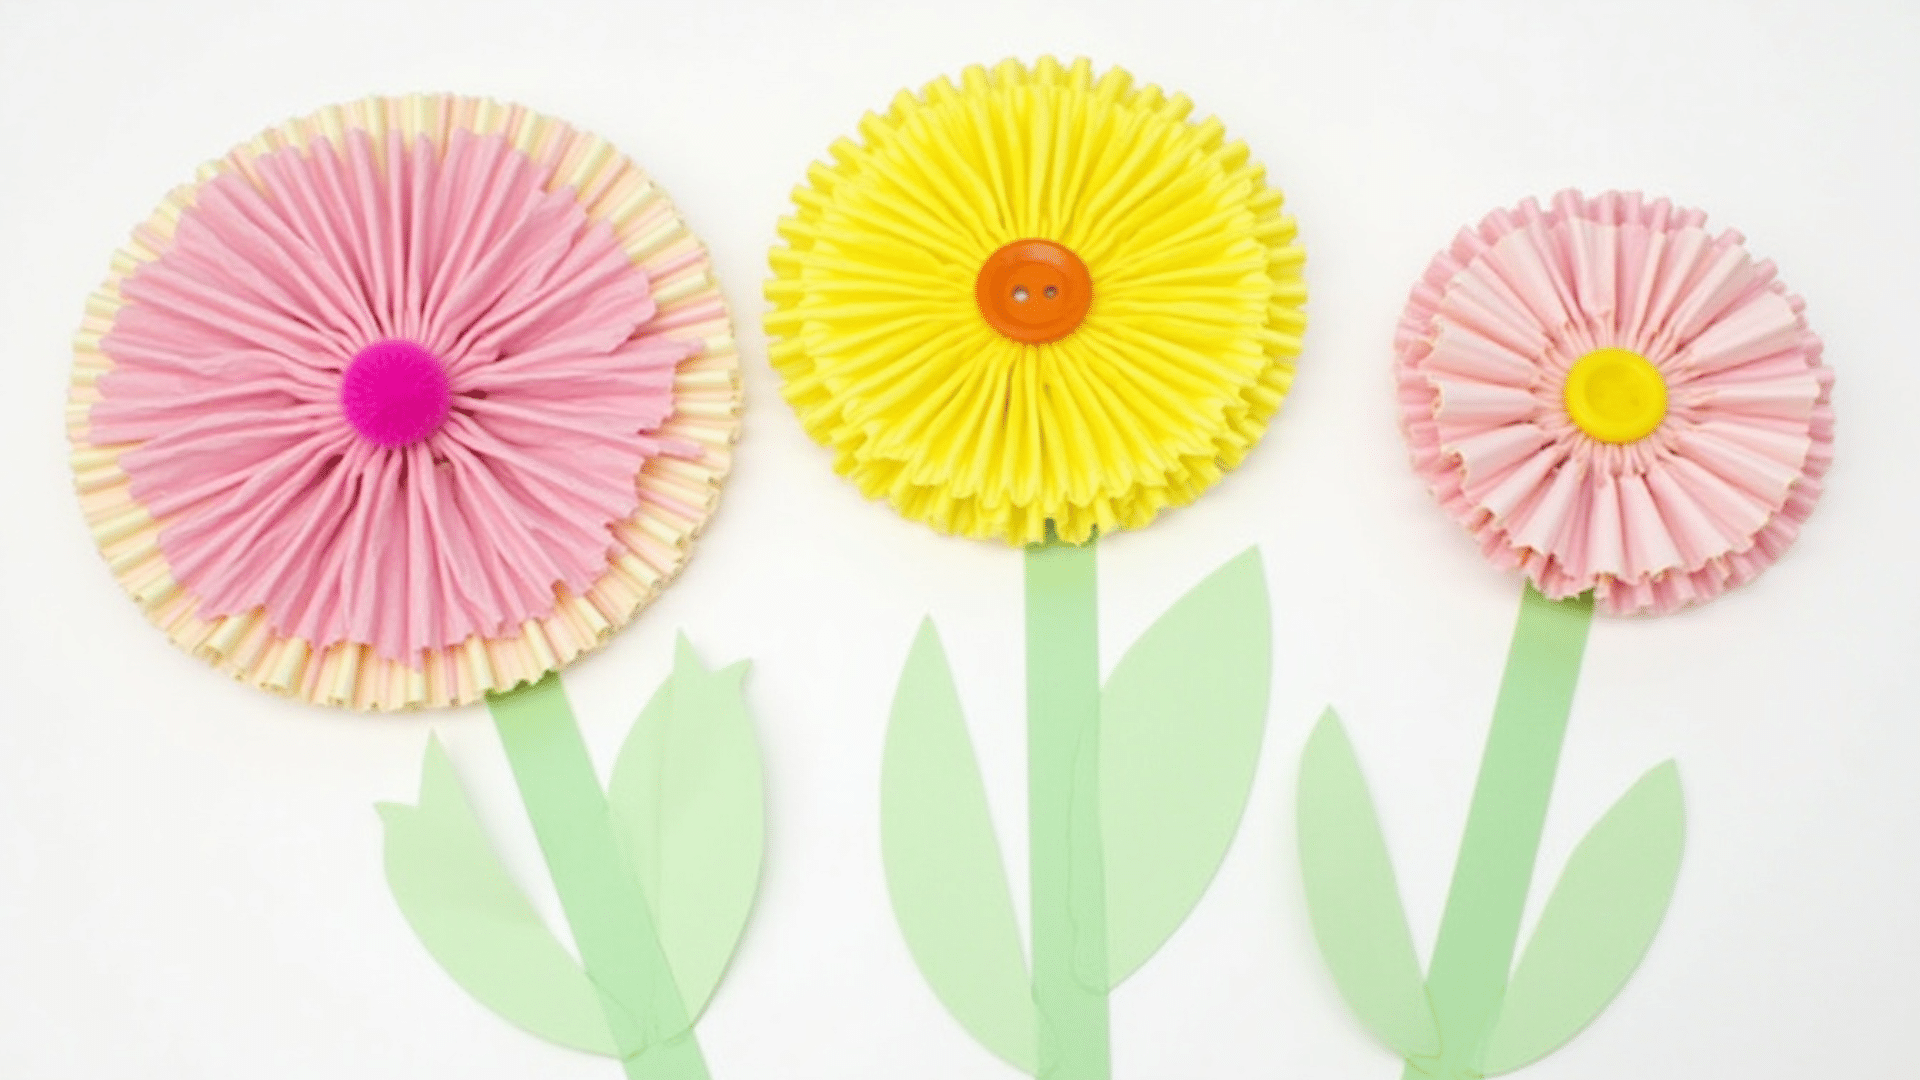
Cupcake liners instantly become layered flowers with almost no prep. This craft is bright and cheerful and works well for homemade cards or wall displays. It is also an easy introduction to layering and composition.
Steps:
- Flatten colorful cupcake liners and glue them layered on top of each other.
- Add a button or pom pom to the center.
- Draw stems and leaves with markers to finish the bouquet.
32. Paper Plate Mask
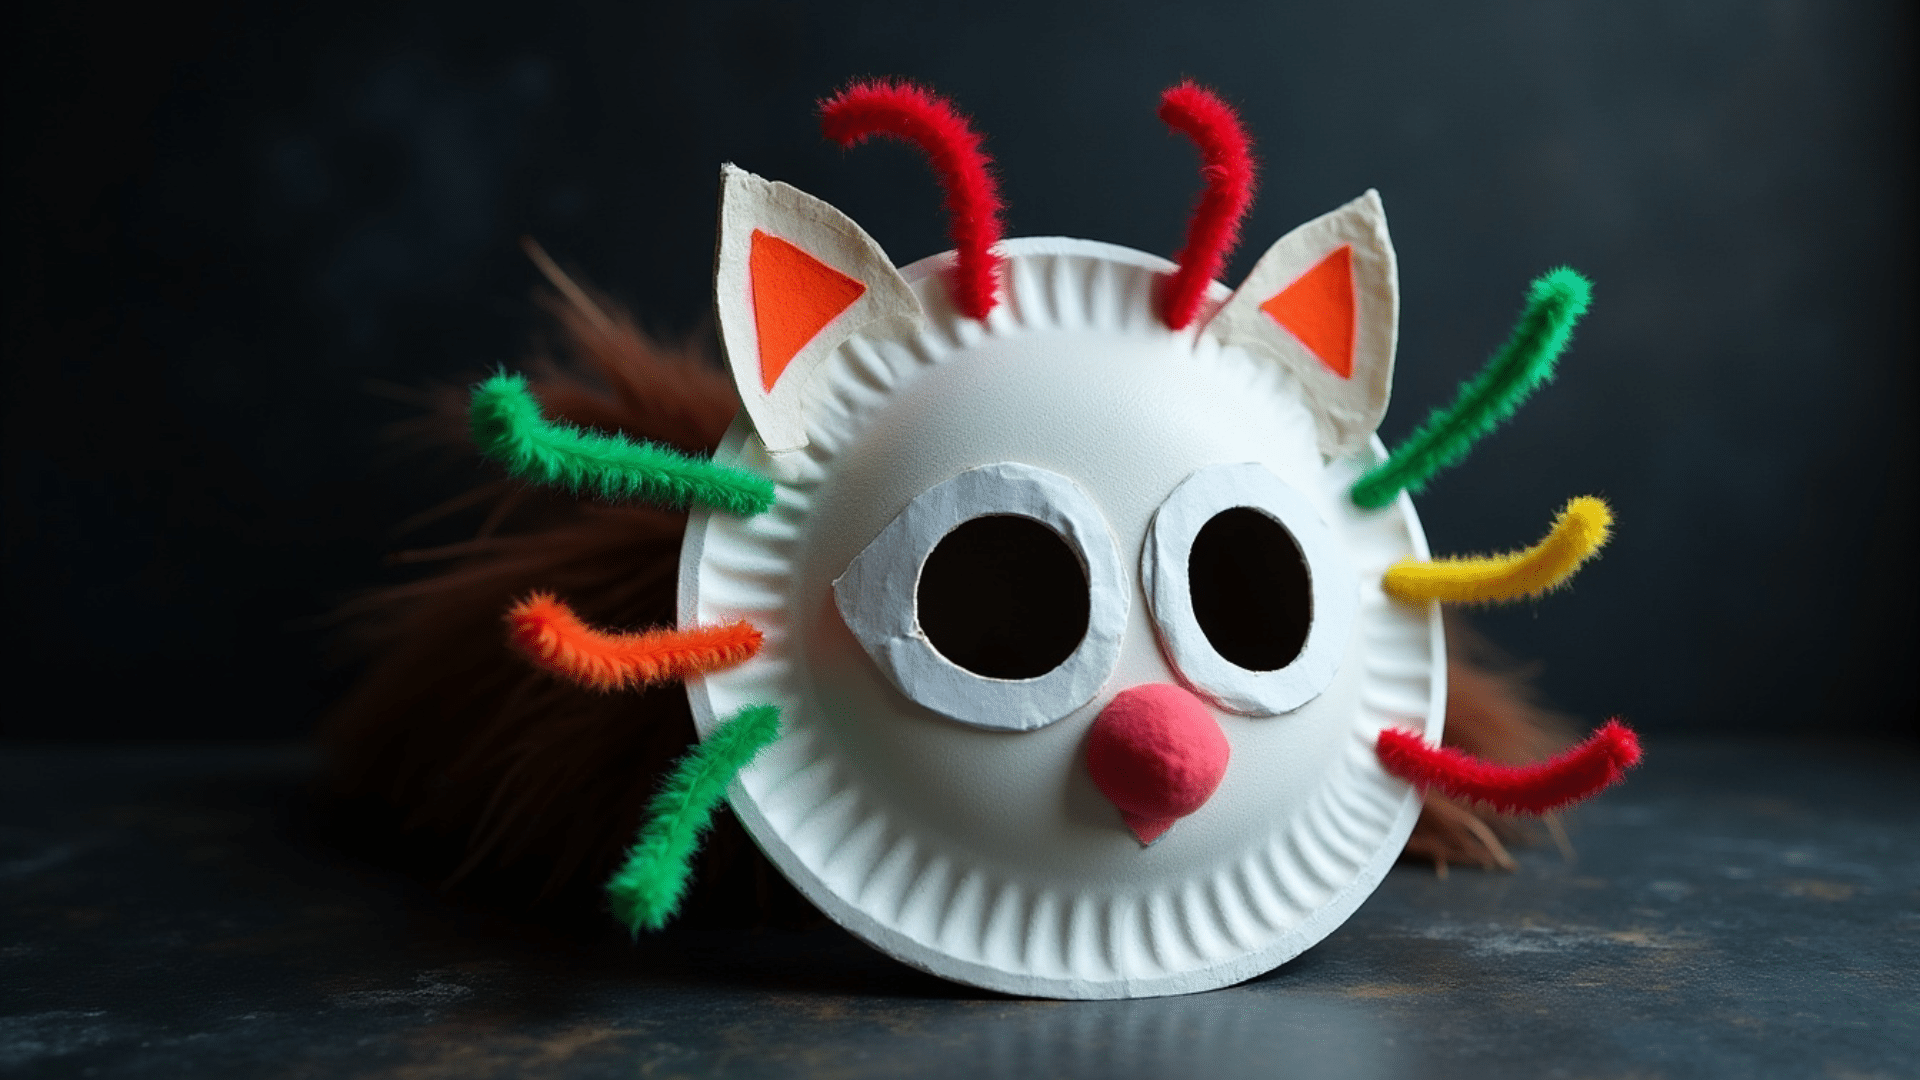
A simple dress-up craft that encourages imaginative play with minimal supplies. Once finished, children often move straight into pretend play, extending the activity far beyond the crafting stage.
Steps:
- Cut eye holes into a paper plate and let your child decorate it with paint, markers, or collage materials.
- Attach a string or a craft stick so it can be worn or held up as a mask.
33. Yarn Wrapped Shapes
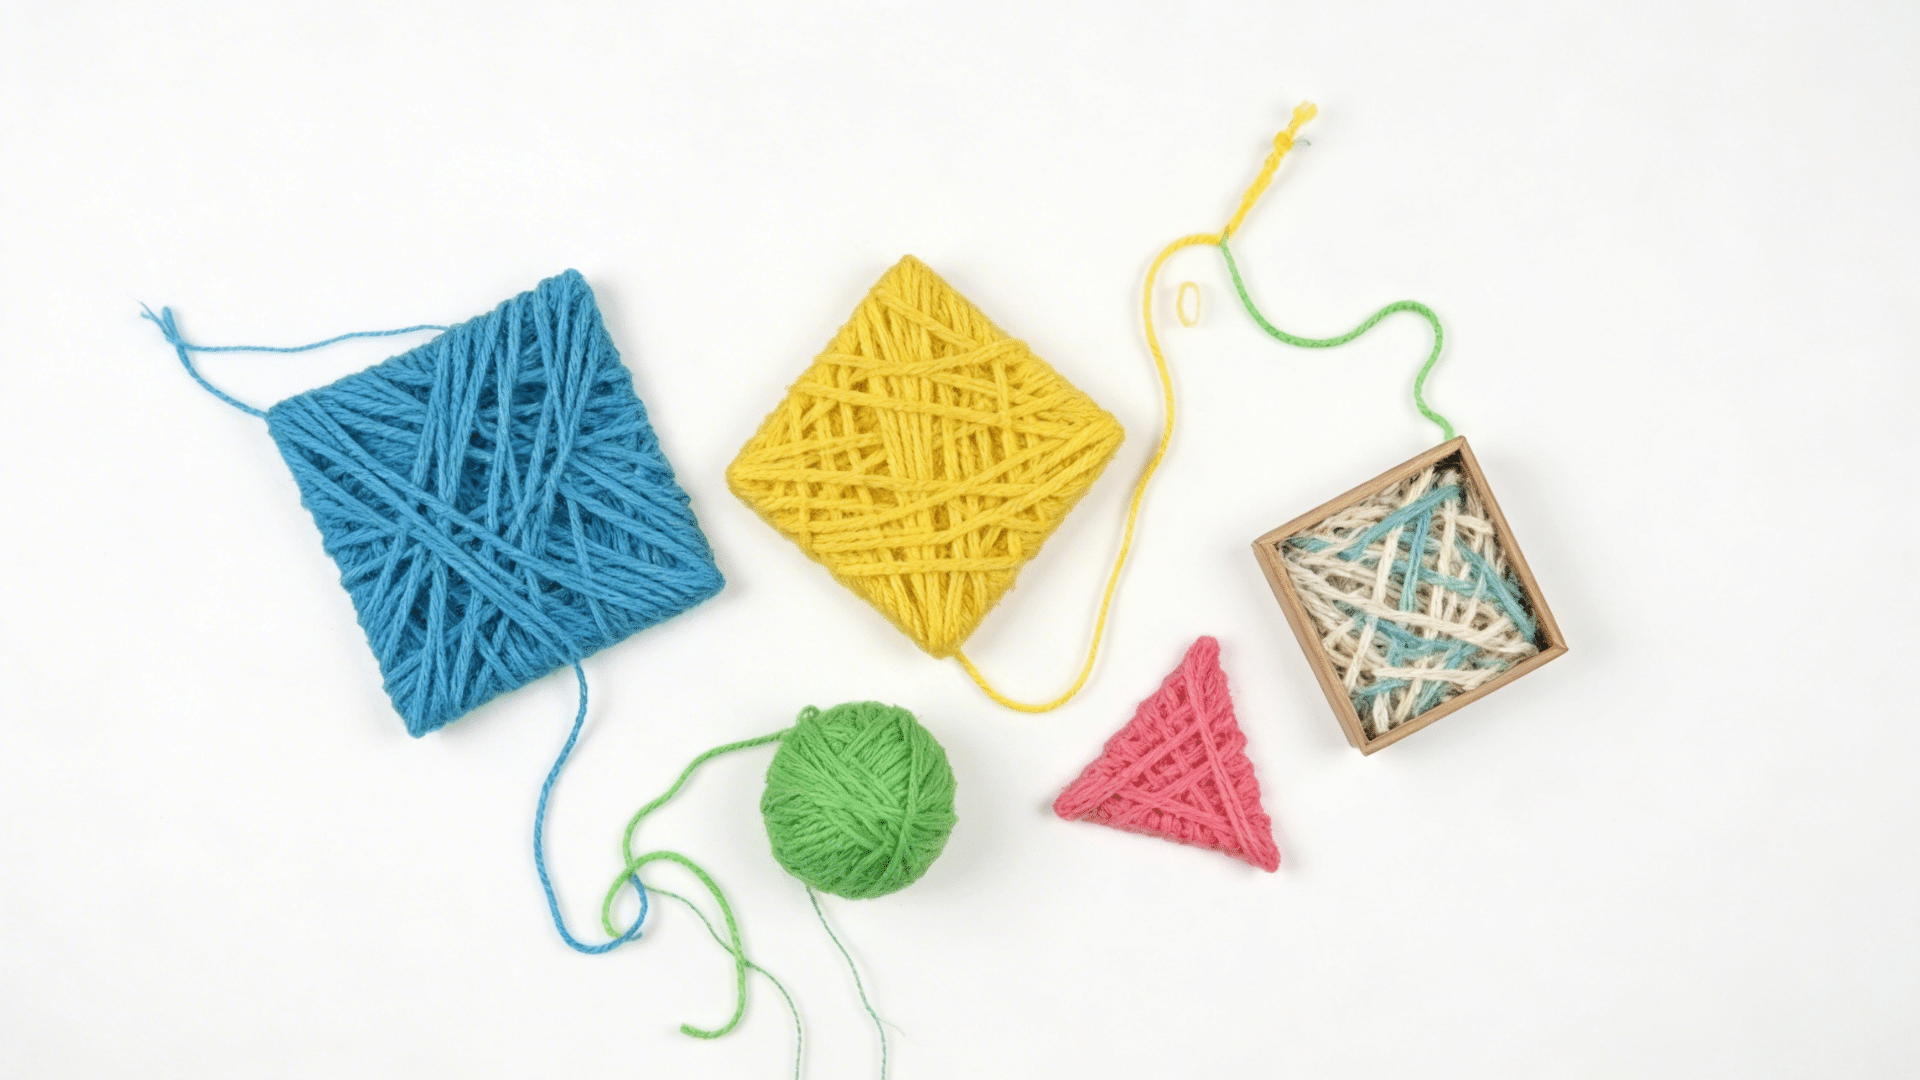
Yarn wrapping is a meditative, tactile craft that produces bold graphic art with almost no mess. Kids develop hand-eye coordination while creating pieces that look modern and graphic when finished.
Steps:
- Cut simple shapes from thick cardboard, such as stars, hearts, or letters, then notch small cuts around the edges spaced about a centimeter apart.
- Tie the yarn to one notch and begin wrapping it around the shape, looping into each notch and changing colors whenever you like.
- Tie off the final end securely once the shape is fully covered, then display individually or as a group.
34. Pinwheel Making
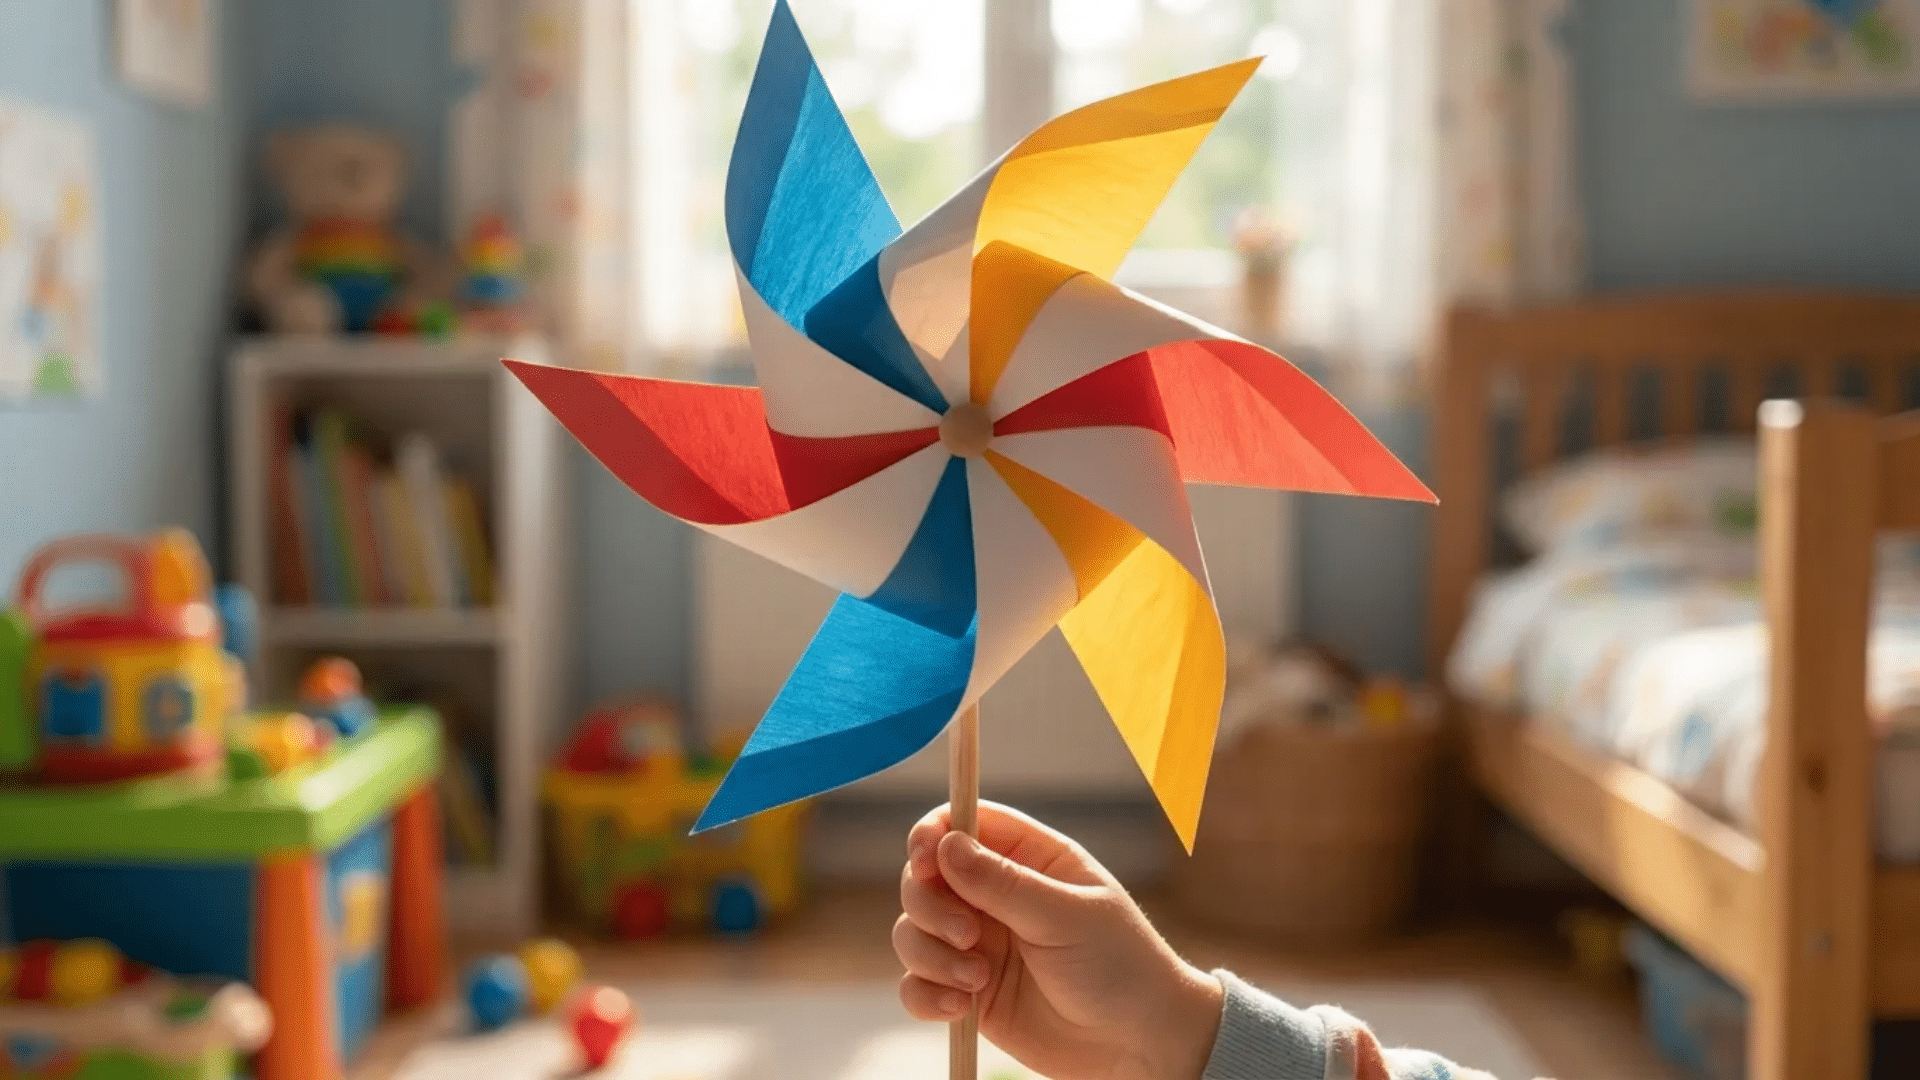
Making a pinwheel from scratch gives kids a tangible understanding of how a simple design can harness air movement to create motion. It is both an art project and a mini engineering challenge.
Steps:
- Cut a square from lightweight cardstock, decorate both sides with bold patterns, then draw diagonal lines from each corner toward the center without cutting all the way through.
- Fold every other corner point into the center and secure all four with a brad fastener pushed through the middle.
- Attach the brad loosely to the top of a straw or dowel so the pinwheel can spin freely in the breeze.
35. Suncatcher Mobiles
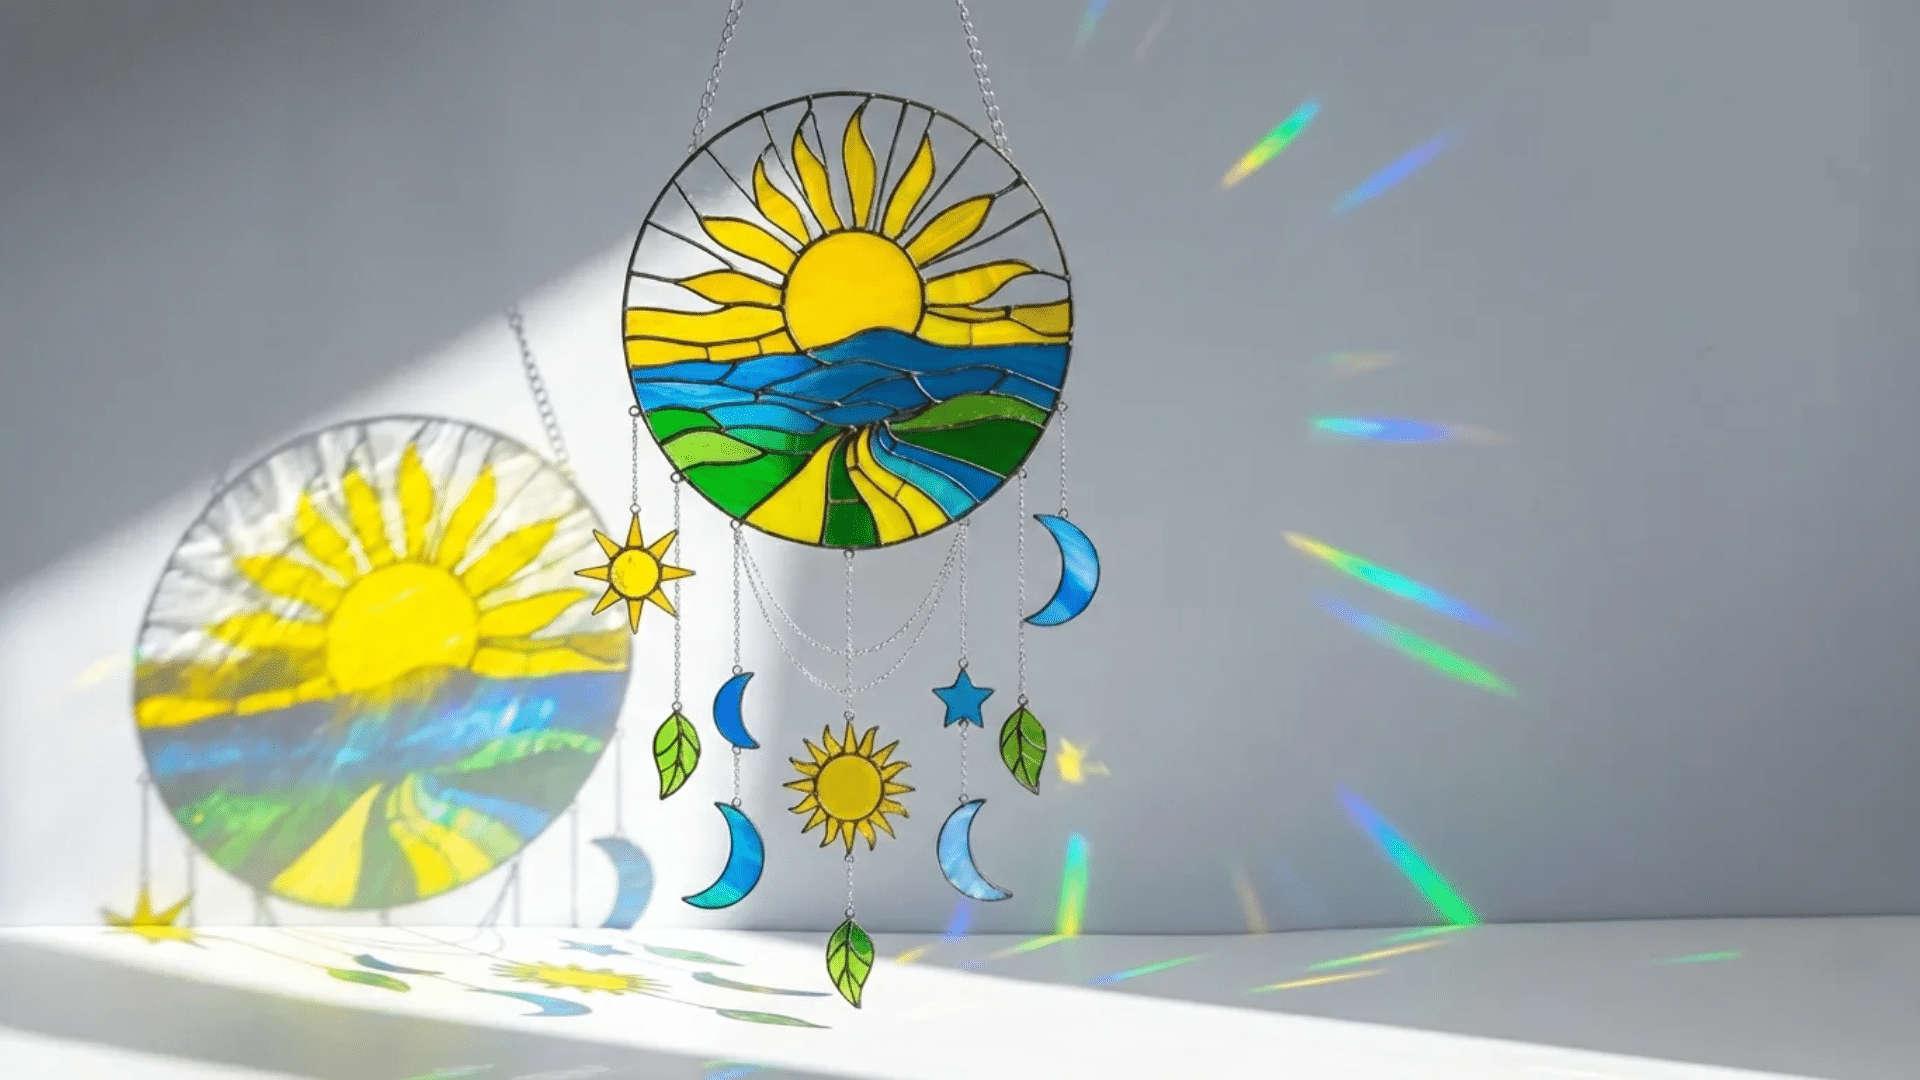
Suncatcher mobiles bring color, light, and movement into any room. They are especially beautiful hanging near windows where sunlight can activate the translucent materials.
Steps:
- Cut simple shapes from clear transparency film, color them with permanent markers or paint mixed with white glue, and let each piece dry.
- Punch a hole at the top of each shape and thread varying lengths of fishing line through each one.
- Tie all the strings to a single horizontal dowel at different heights, then hang the completed mobile in a sunny window.
36. Decoupage Flower Pot
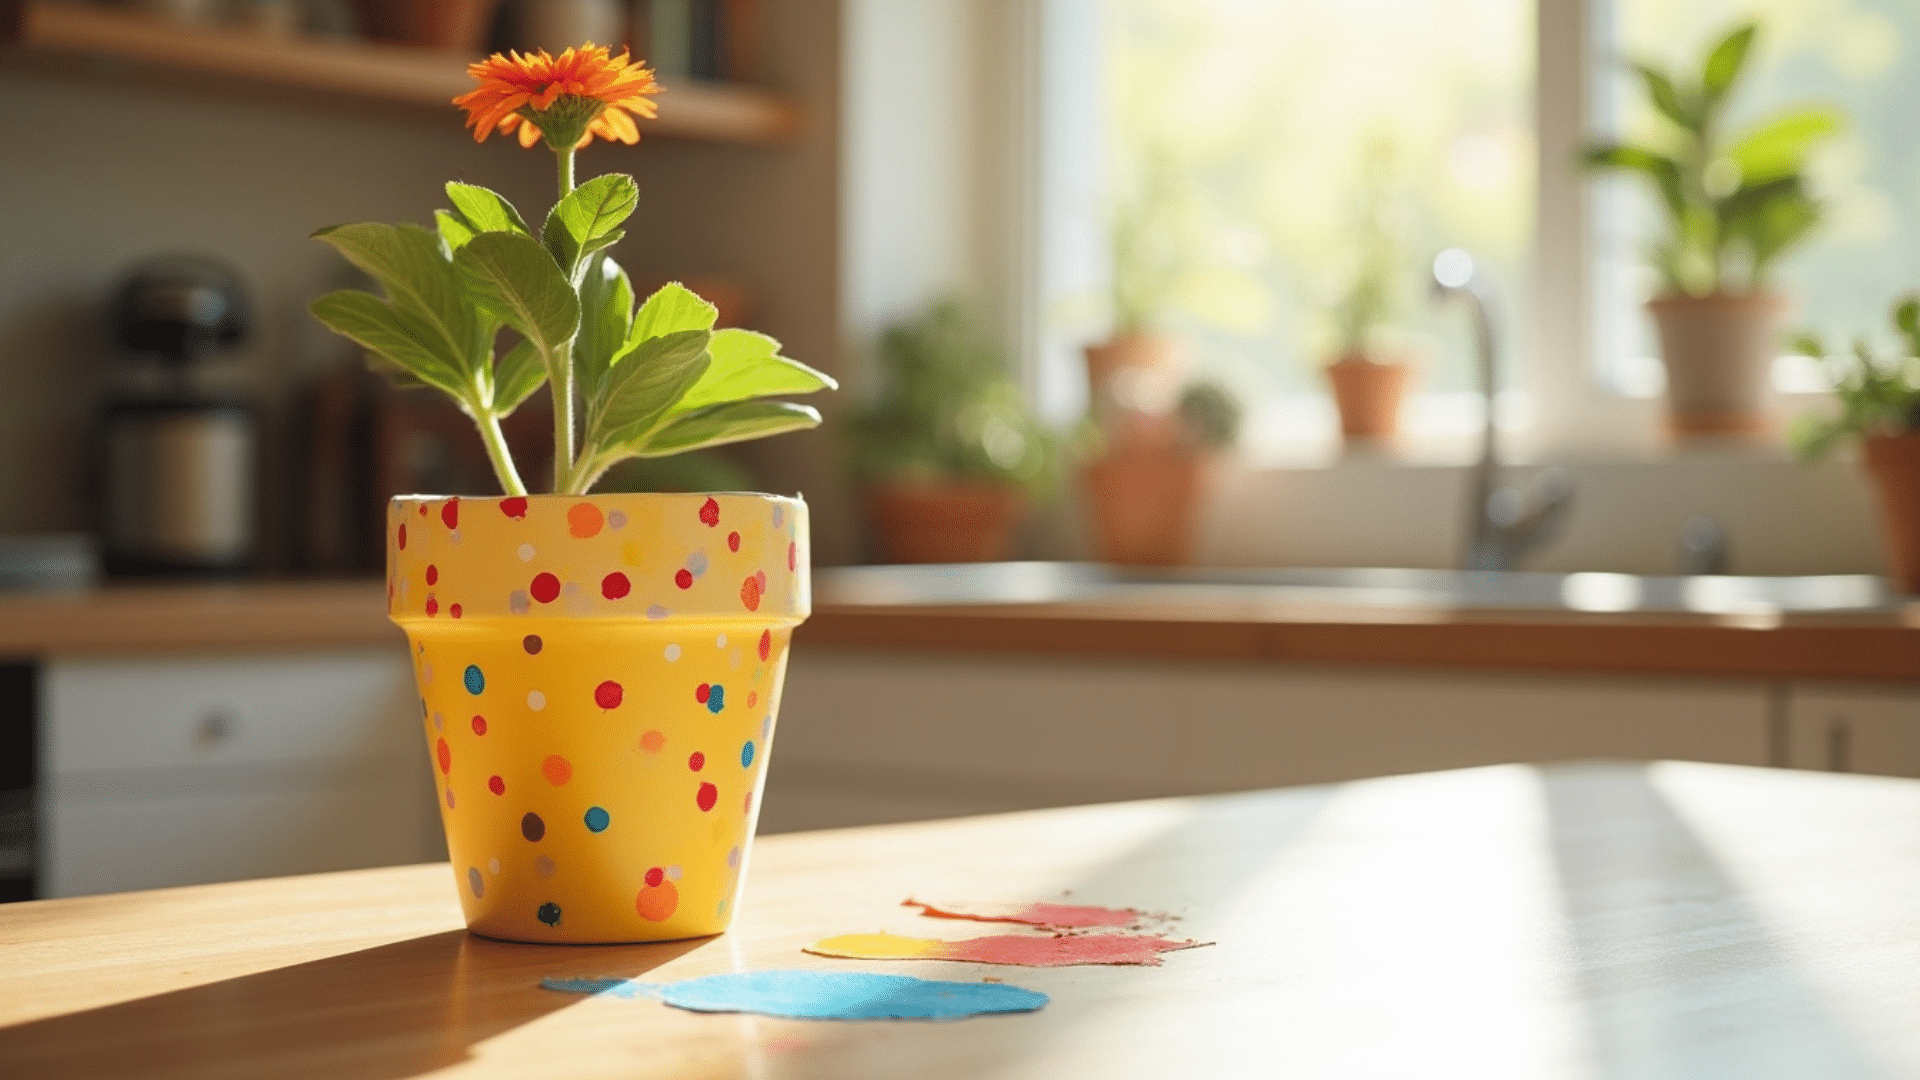
A simple terra cotta pot becomes something special and fully functional once it has been decorated and sealed with this classic craft technique.
Steps:
- Tear tissue paper, patterned napkins, or painted paper into irregular pieces, then brush a thin coat of Mod Podge onto a small section of the pot.
- Press paper pieces onto the glued section, smooth out air bubbles, then brush another layer of glue over the top to seal.
- Continue around the entire pot and allow it to dry overnight before planting a seedling or succulent inside.
37. Washi Tape Art
Washi tape art requires zero painting skills and almost no mess, making it a perfect option for days when a full paint setup is not practical.
The beautiful patterns and colors of the tape do all the decorative work.
Steps:
- Gather washi tapes in different patterns and widths, then apply strips across white cardstock in a geometric, overlapping, or freeform design.
- Layer different patterns on top of each other or cut the tape into shapes with scissors to outline and fill a simple drawing.
- Press all edges down firmly once the design is complete to prevent peeling, then frame or display as is.
38. Homemade Greeting Cards
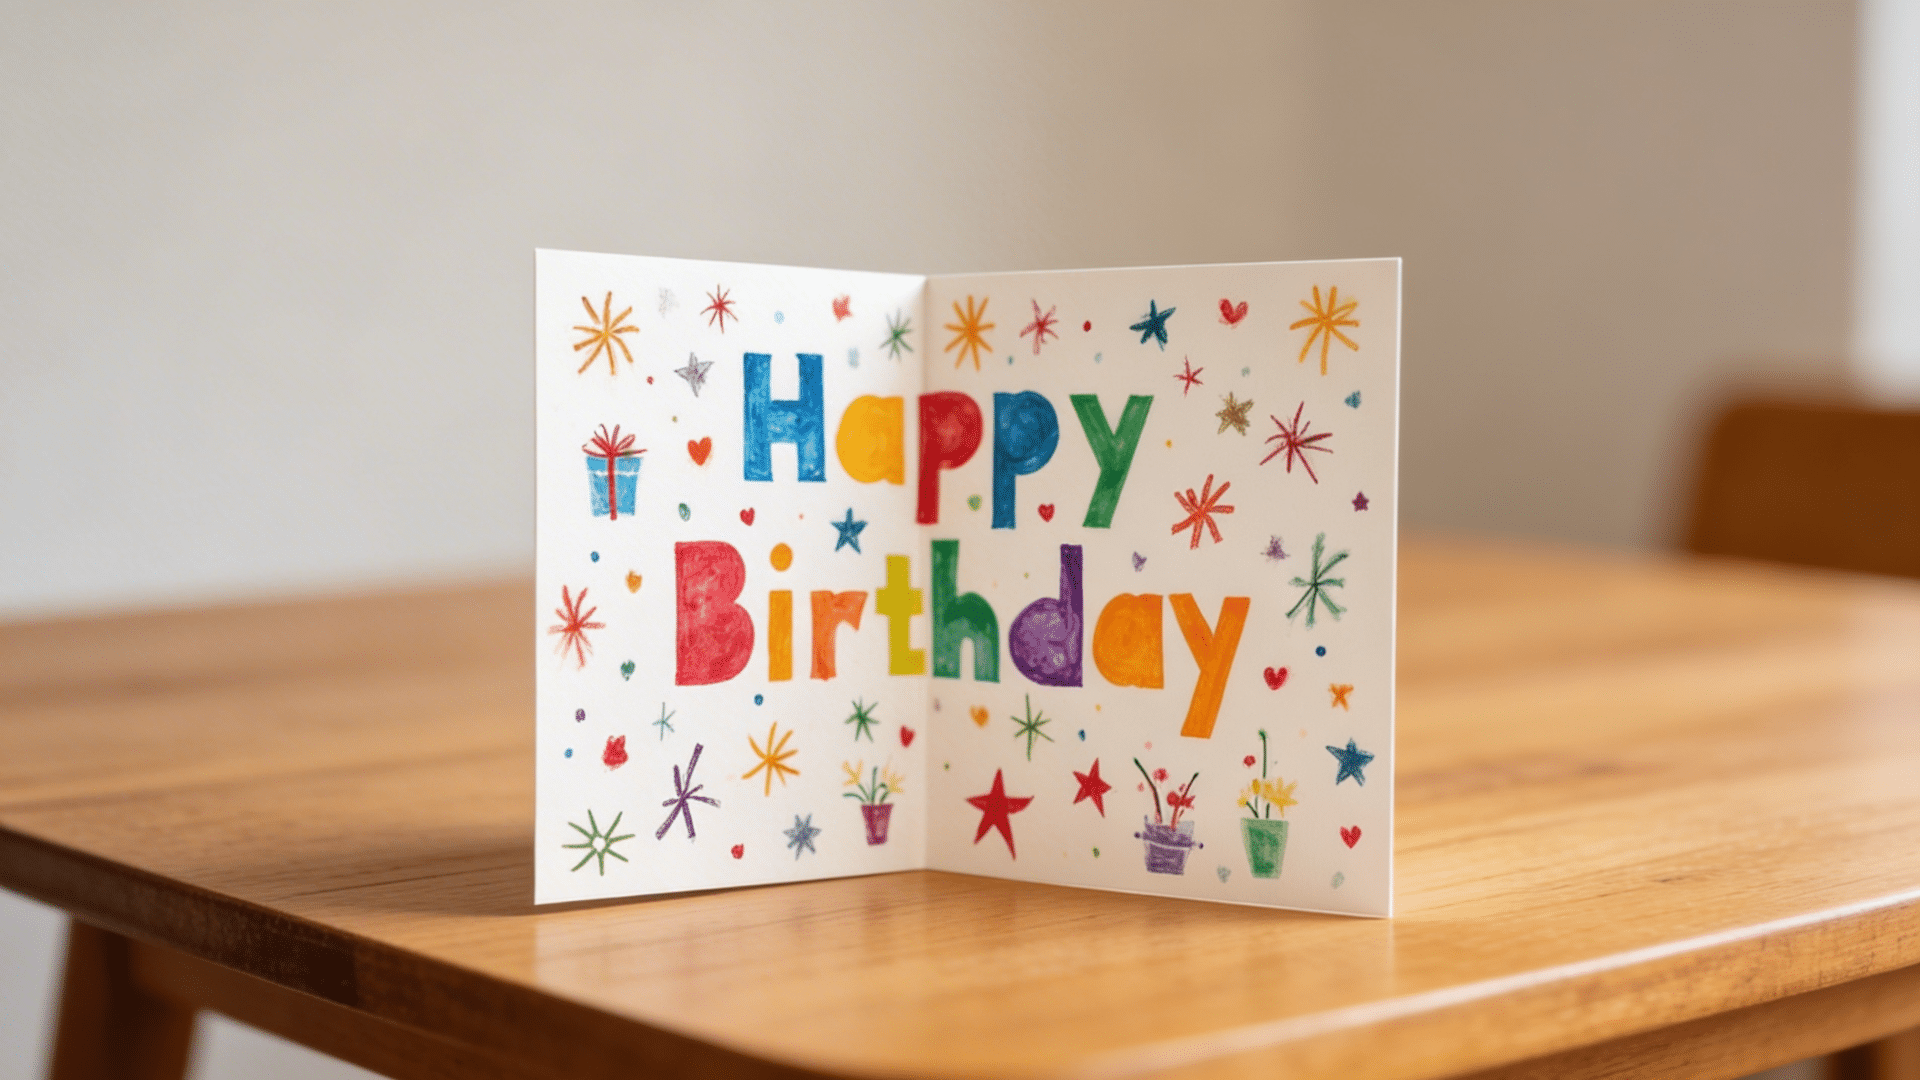
Making homemade greeting cards is one of the most meaningful projects a child can undertake because the finished product serves a clear, joyful purpose. A handmade card is always more cherished than a store-bought one.
Steps:
- Fold a sheet of heavy cardstock in half to make the card base, then decorate the front with stamping, watercolor, collage, or markers.
- Let the front dry completely, then help your child write a personal message inside.
- Add a decorative border or sticker accents to the inside if desired, then deliver it to the lucky recipient.
39. Wax Paper Leaf Pressing
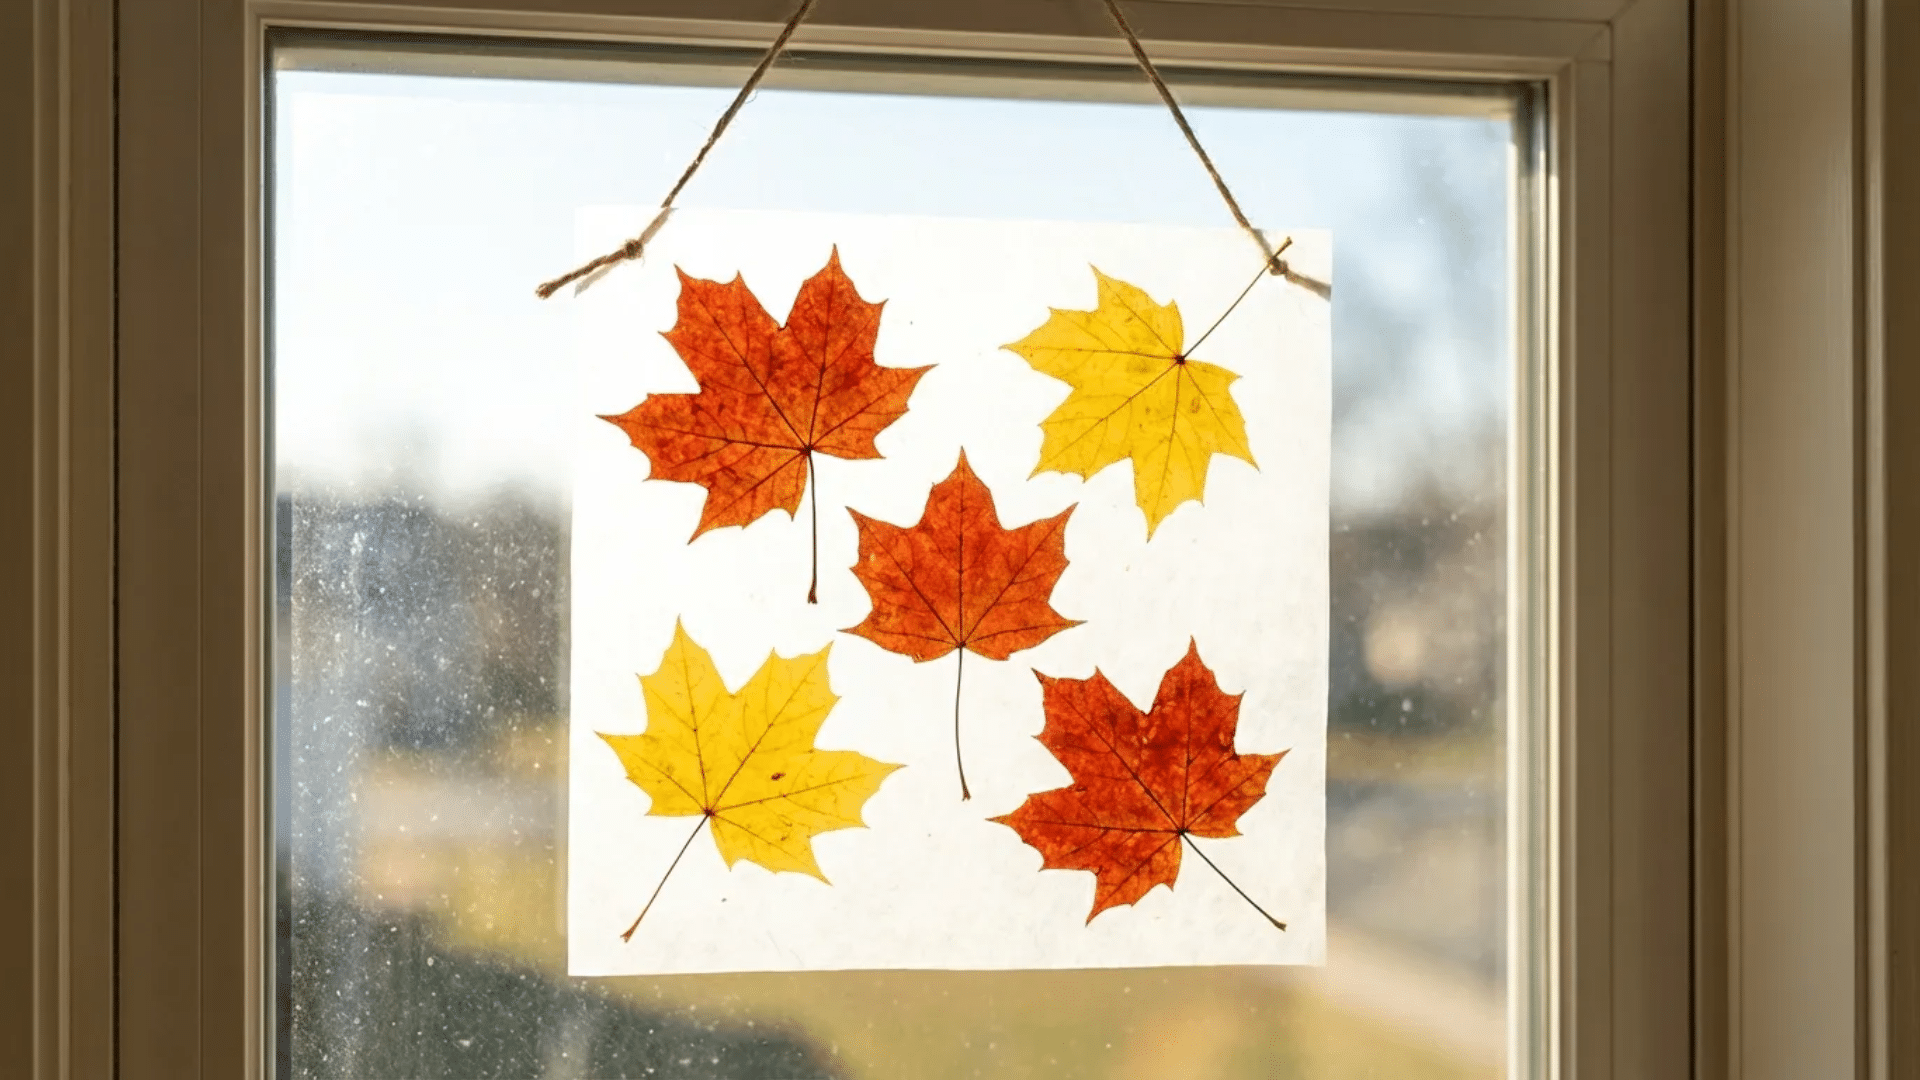
Pressed leaf art captures the fleeting beauty of autumn foliage and creates translucent, glowing decorations. This is a wonderful fall activity that begins with a nature walk.
Steps:
- Collect freshly fallen leaves in various colors and shapes, then arrange them on a sheet of wax paper and lay a second sheet on top.
- Place a thin cloth over the wax paper sandwich and press with a warm iron on low heat until the wax melts and seals the leaves inside.
- Allow it to cool completely, then trim the edges and hang it in a window where light can shine through the leaves.
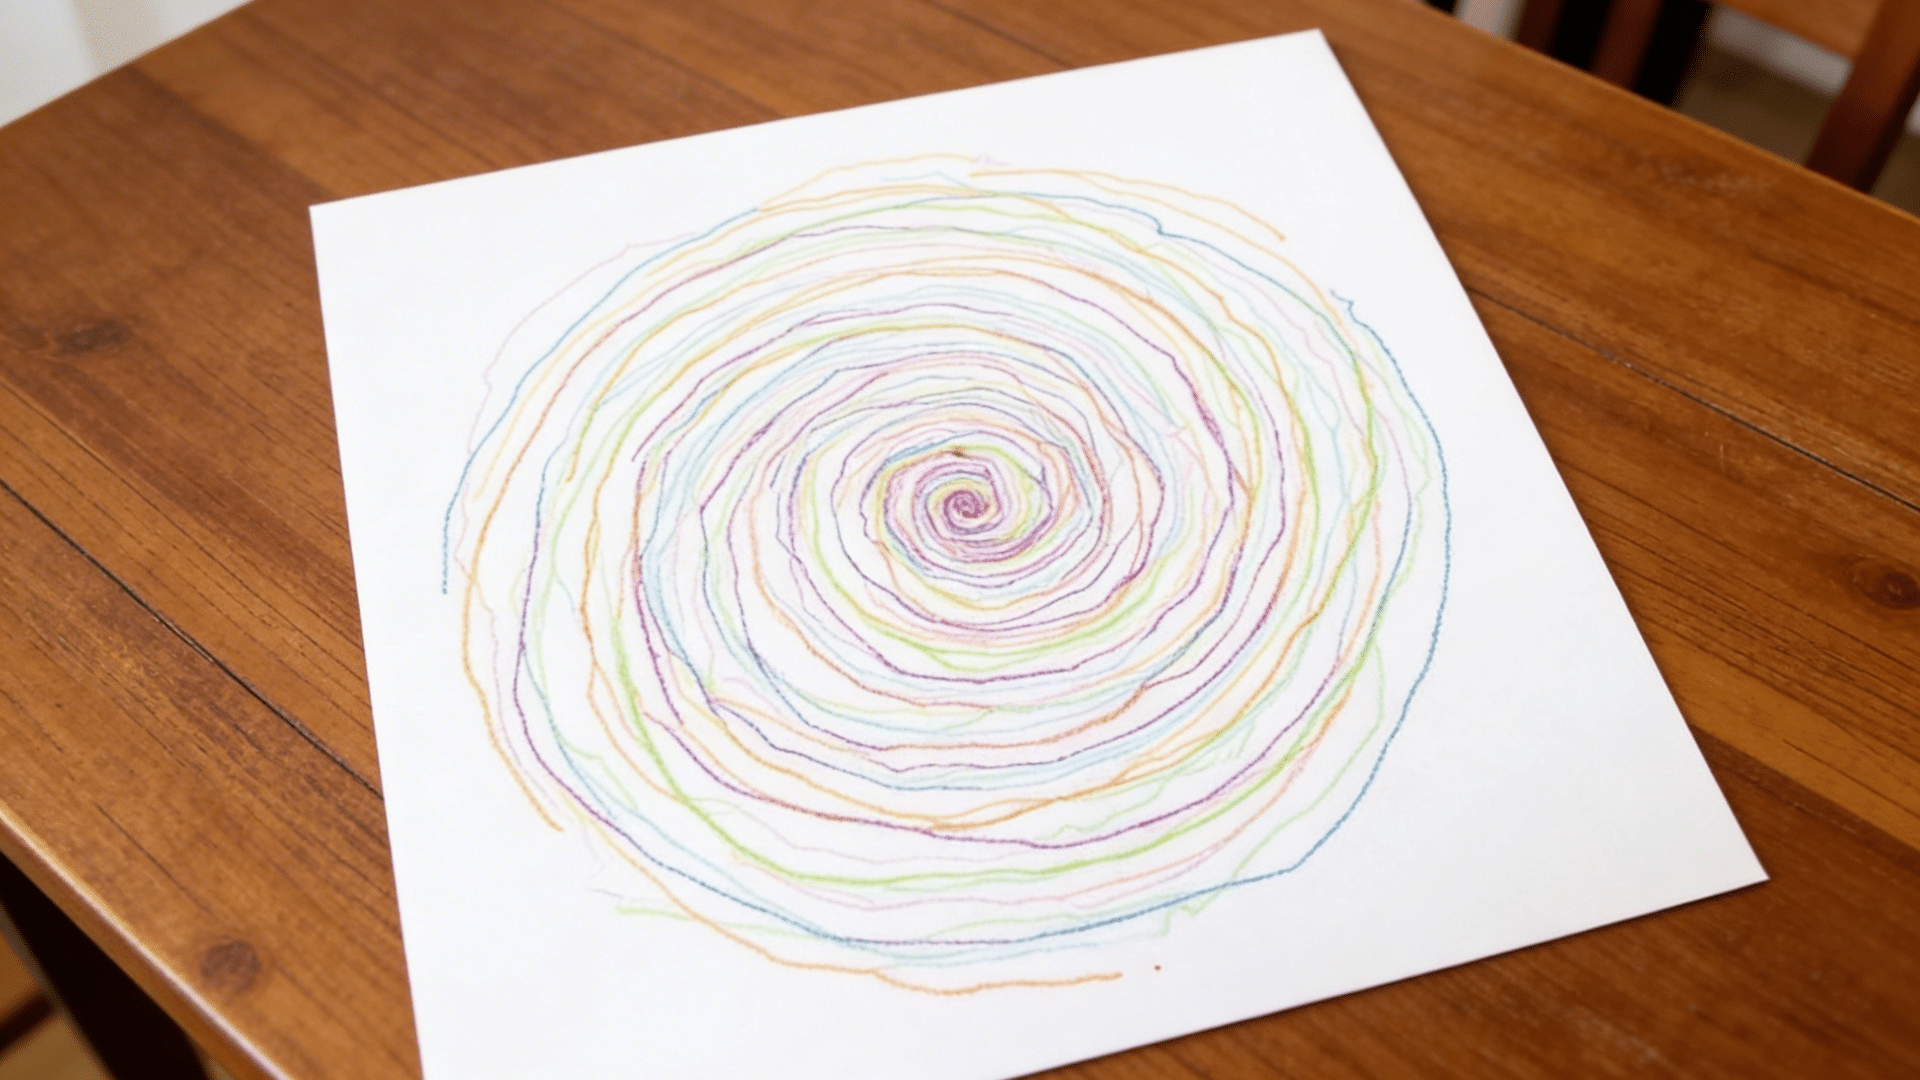
40. Dot Mandala Painting
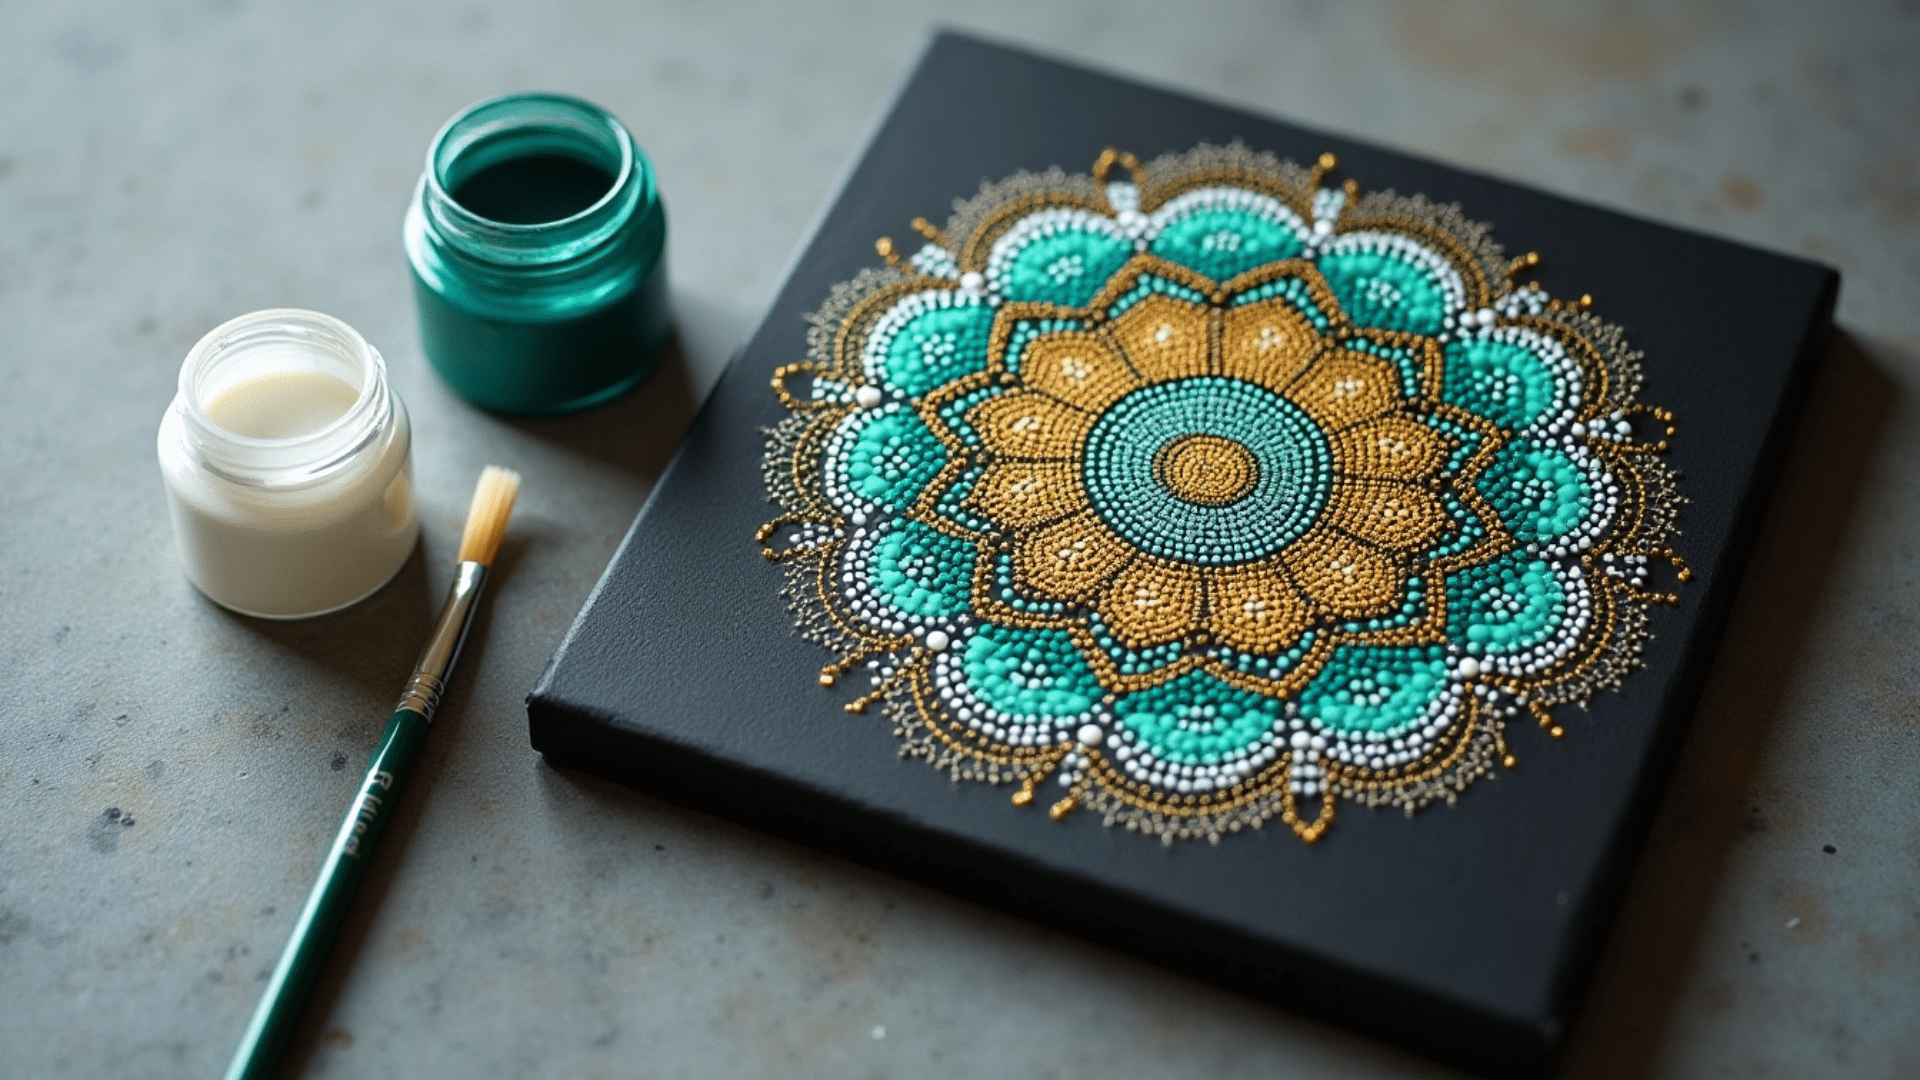
Dot mandalas are mesmerizing, meditative, and perfect for older kids who enjoy repetition and pattern-making. The results look genuinely complex and beautiful despite using a very simple technique.
Steps:
- Draw a circle on cardstock, mark the center, and lightly sketch a few evenly spaced guideline spokes radiating outward.
- Starting from the center, use the handle end of a paintbrush dipped in acrylic paint to dot evenly spaced circles along the spokes, moving outward in concentric rings.
- Change colors and vary dot sizes as you build outward, letting each ring dry before adding the next, then erase any visible pencil lines.
41. Cardboard Tube Sculptures
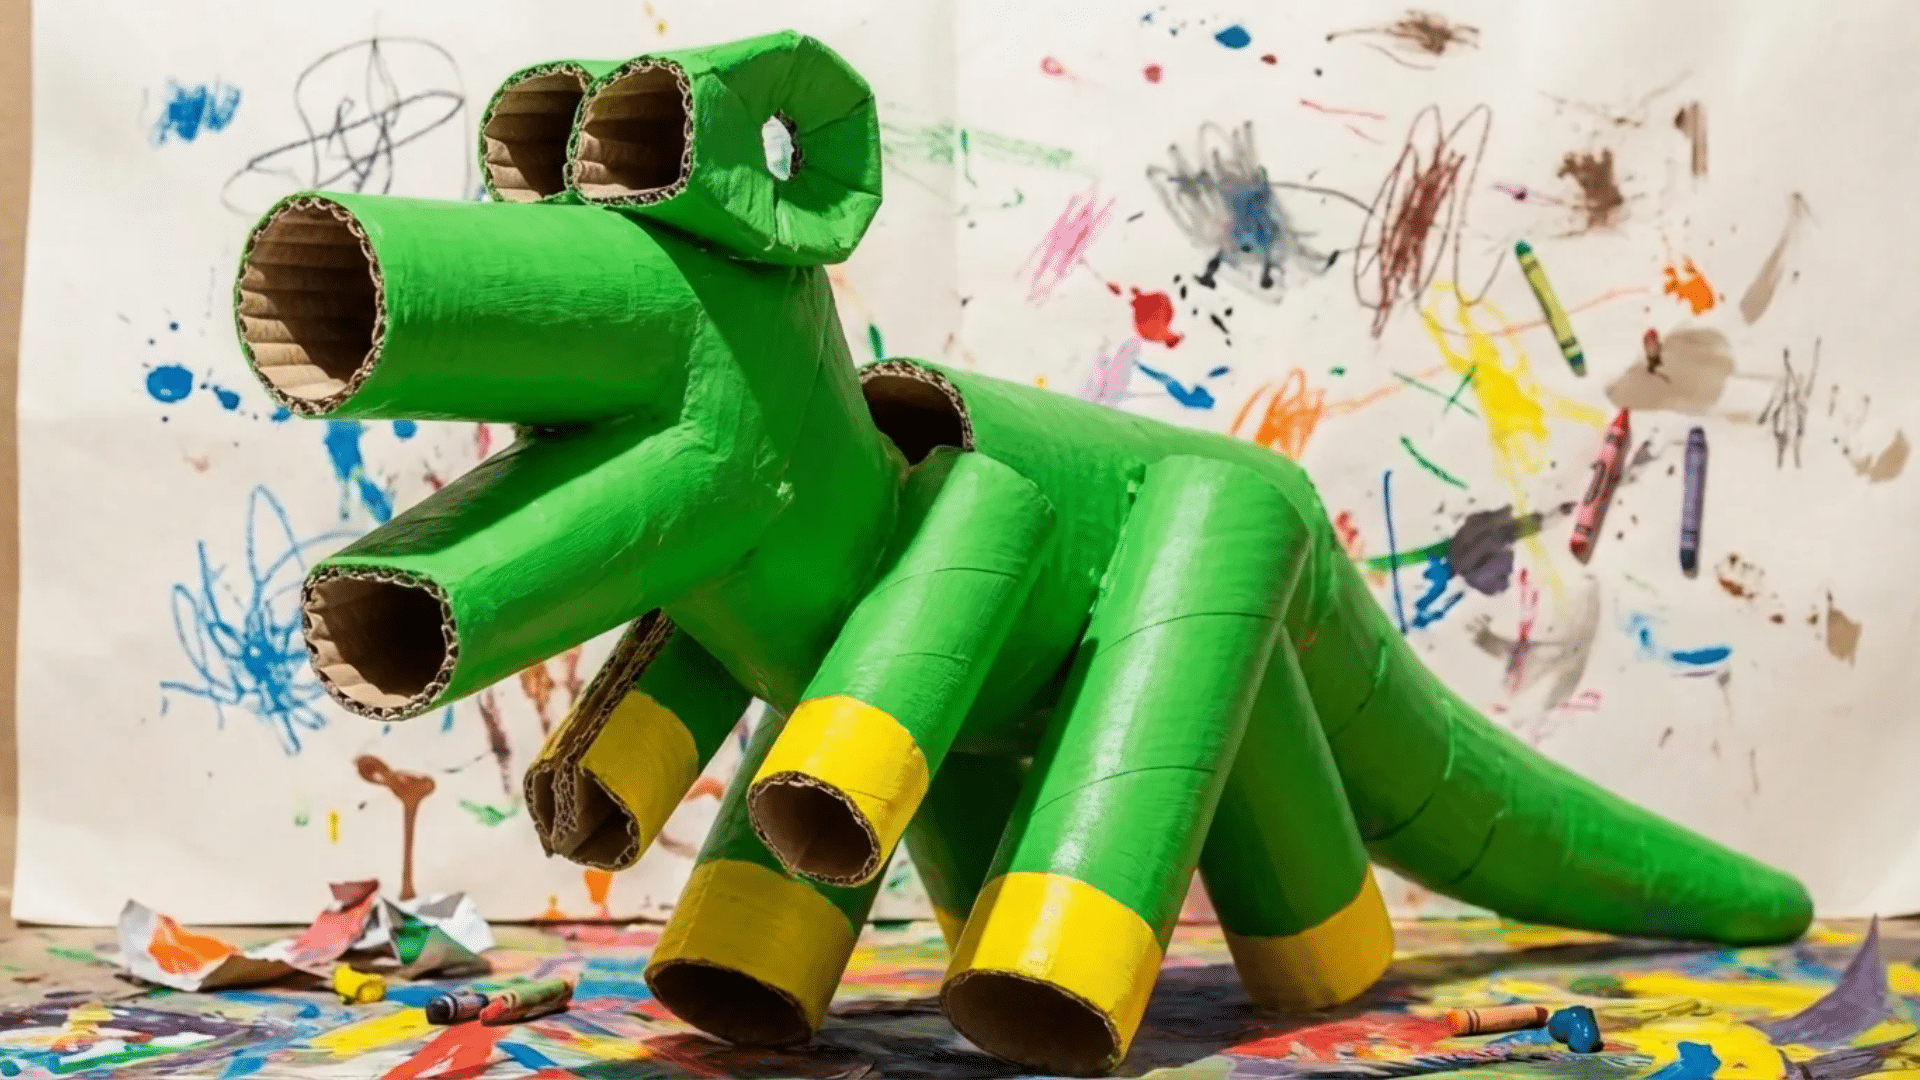
Cardboard tube sculptures introduce kids to three-dimensional construction and structural thinking. By connecting tubes with slots, tape, or glue, children can build towers, creatures, and abstract structures.
Steps:
- Collect cardboard tubes in various sizes, cut some to different lengths, and cut slits into the ends of others so they can slot together without glue.
- Assemble the tubes into any structure your child imagines, reinforcing connections with masking tape for stability.
- Paint the entire sculpture once assembled, or paint individual pieces before connecting them for a colorful mosaic effect.
42. Melted Crayon Art
Melted crayon art produces lively, dripping rivers of color that look dramatic and alive. This is a project that requires an adult to operate the hair dryer, but kids can own every other part of the creative process.
Steps:
- Arrange the unwrapped crayons side by side along the top edge of a canvas board, then glue them in place with a hot glue gun.
- Prop the canvas vertically against a wall protected by a drop cloth, then aim a hair dryer on high heat at the crayons and watch them melt and drip downward.
- Move the dryer slowly across the crayons to control the direction of the drips, then lay the canvas flat to cool and harden before displaying.
43. Finger Knitting
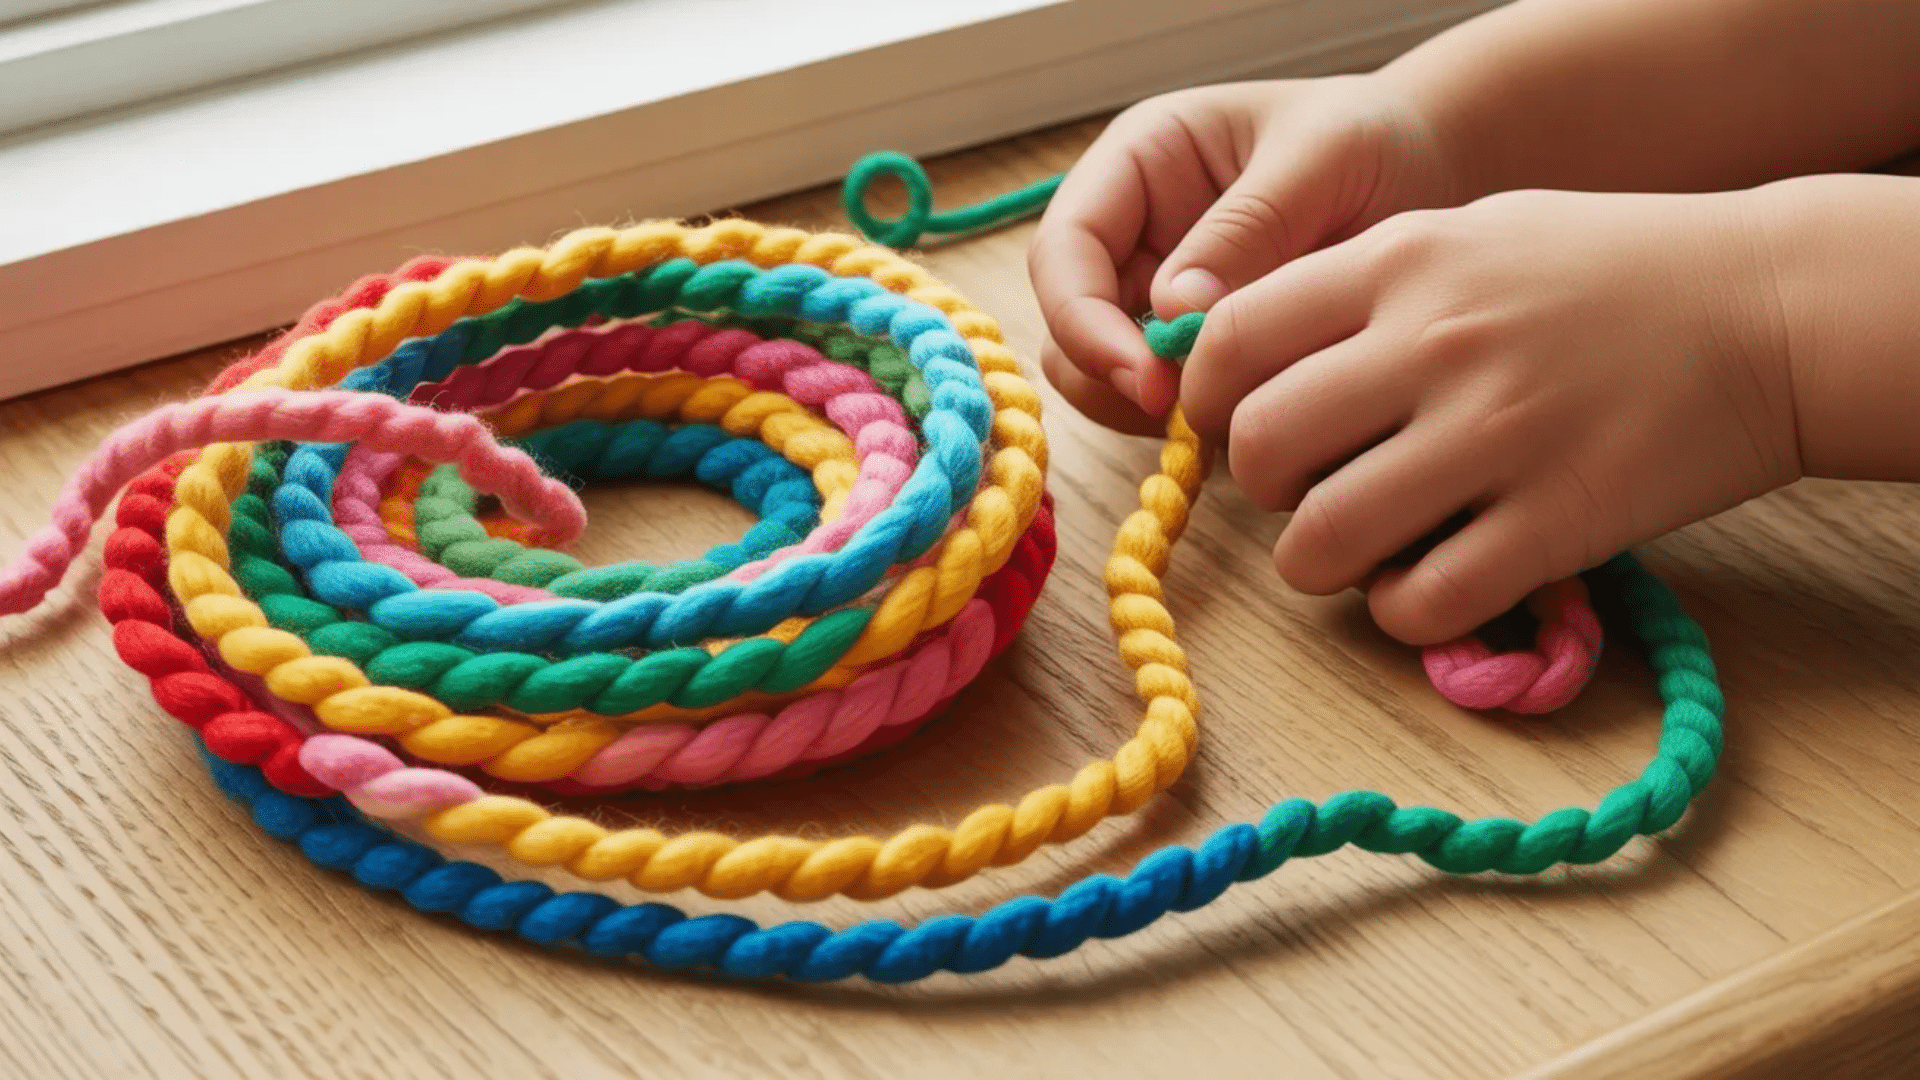
Finger knitting introduces kids to textile art without needles or complex equipment. Using only their own hands and a ball of yarn, children can create long cords that become scarves, bracelets, or wall hangings.
Steps:
- Drape yarn across your palm and weave it between your four fingers in an over-under pattern to cast on the first row.
- Wrap the yarn across all four fingers in front, then lift the bottom loop on each finger up and over the top loop to complete the first row.
- Continue wrapping and looping row by row until the cord reaches the desired length, then thread the tail through the remaining loops to cast off and secure the end.
44. Painted Wood Slice Ornaments
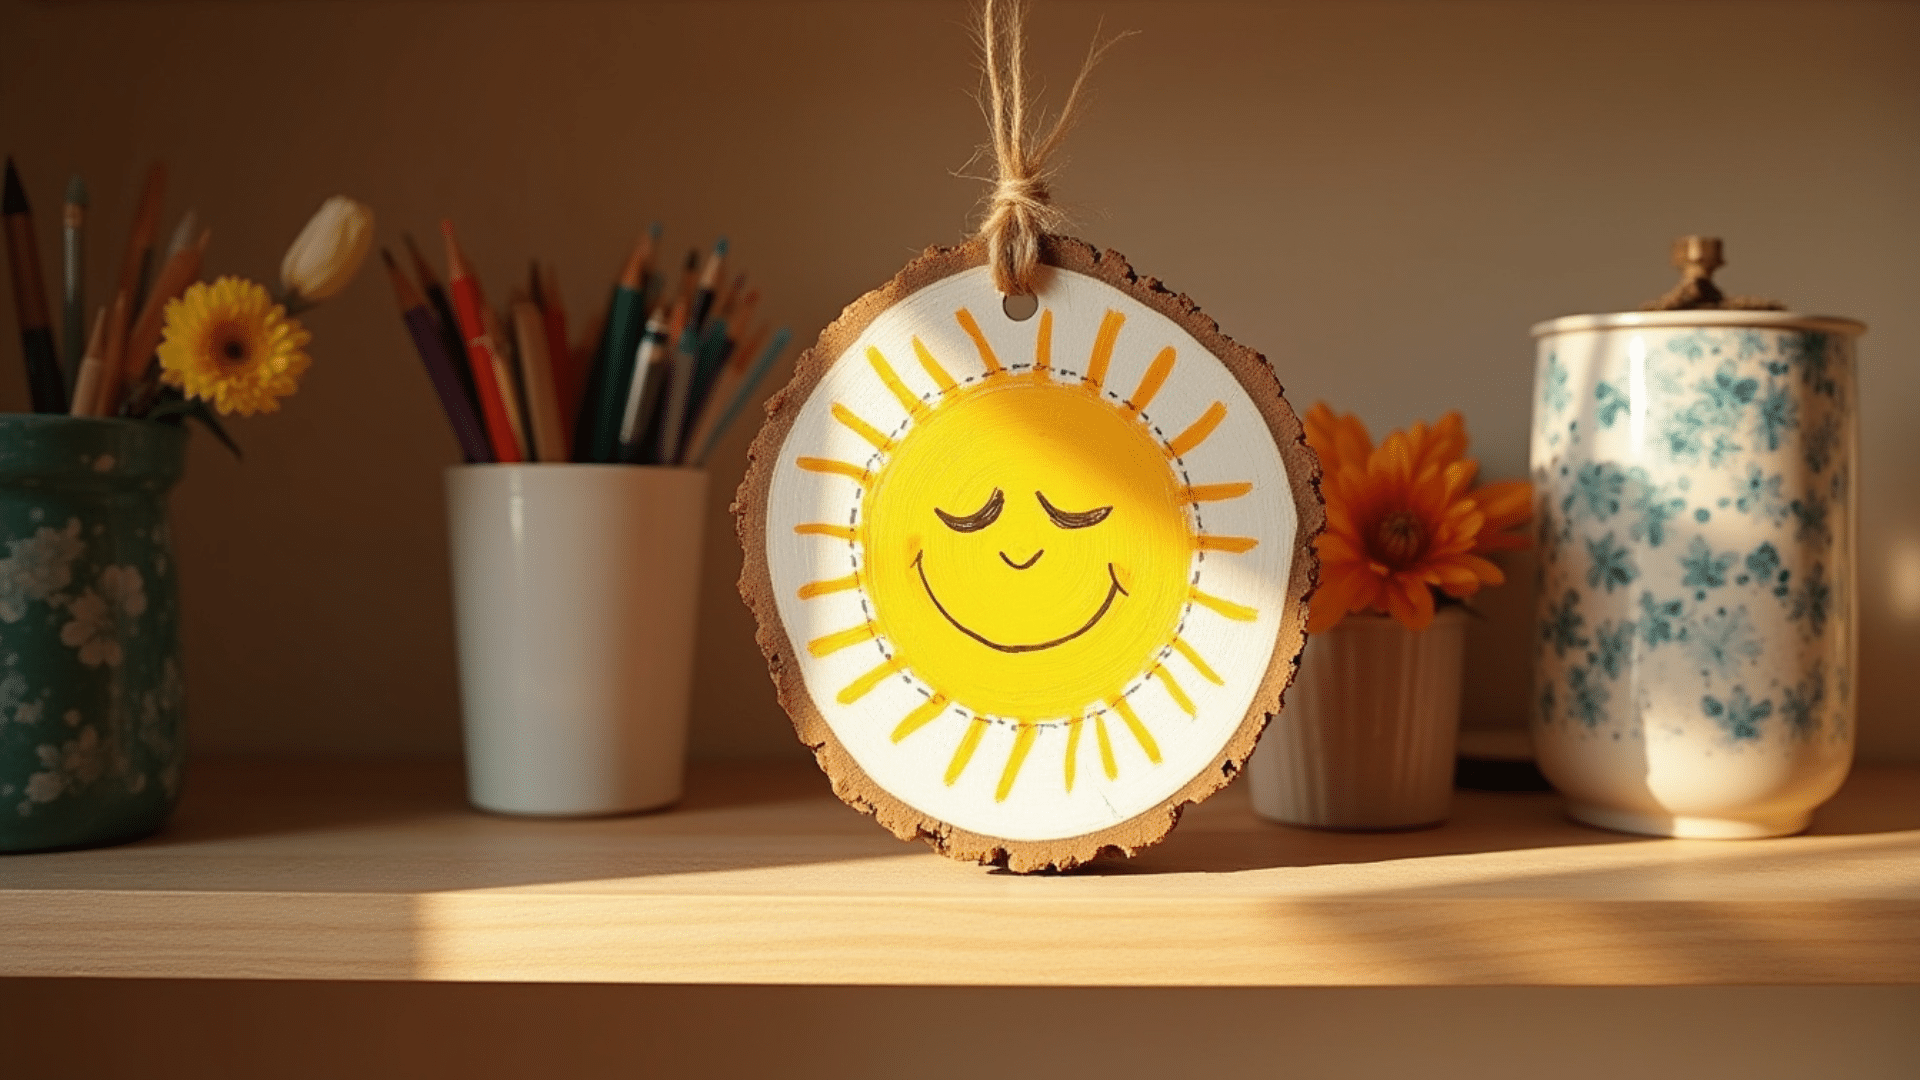
Wood slice ornaments blend natural materials with painting and personalization to produce genuinely heirloom-quality results. They make wonderful holiday decorations or gifts that families return to year after year.
Steps:
- Sand thin wood slices lightly, wipe away any dust, then apply a base coat of white paint if desired or paint directly onto the natural wood for a rustic look.
- Use acrylic paint and a fine brush to add a design such as a simple landscape, animal, monogram, or seasonal motif.
- Once dry, seal the surface with clear varnish, then thread ribbon or twine through a small hole at the top for hanging.
45. Mixed Media Self-Portrait

A mixed media self-portrait is one of the most meaningful projects on this list because it invites children to look at themselves with curiosity and intention.
Steps:
- Have your child reference a mirror or photo, then lightly sketch a simple self-portrait outline onto large cardstock.
- Fill in the different sections using whatever feels right. Paint the background with watercolors, add tissue paper for clothing, and use oil pastels or markers for facial features.
- Add texture using collage elements such as fabric scraps, yarn for hair, or buttons layered over the painted sections, then allow everything to dry before displaying the finished piece.
Final Thoughts
Art is not about perfect results. It is about the process, the exploration, and the joy of making something from nothing.
Every easy art project for kids on this list gives children the opportunity to experiment, develop confidence, and express themselves in ways that words cannot always capture.
No matter if your child spends ten minutes on a quick Q-tip dot painting or an entire afternoon building a cardboard creation, the time they invest is building skills and memories that will stay with them for life.

