
Got a pack of coffee filters sitting in your kitchen? Good, because they’re about to become your favorite art supply. Coffee filter art has been quietly winning over DIY lovers, teachers, and home crafters for years.
With just a few simple supplies, these everyday filters can turn into colorful flowers, butterflies, tie-dye designs, and more.
This guide has everything you need, from basic coloring techniques to seasonal decor and beyond.
Why Coffee Filters are Great for Art Projects
Coffee filters are a simple craft supply that can turn into colorful and creative art pieces. They are lightweight, easy to color, and simple to shape, which makes them perfect for both kids and adults.
- Affordable: Coffee filters are inexpensive and easy to find in most grocery stores.
- Highly Absorbent: They soak up watercolor, markers, and dye easily, creating soft blended color effects.
- Very Versatile: They can be folded, cut, dyed, or shaped to make flowers, butterflies, decorations, and many other crafts.
- Kid-Friendly: Soft material and simple handling make them perfect for school activities and beginner art projects.
- Lightweight and Easy to Shape: Their thin texture allows them to bend and hold different shapes for creative designs.
Basket vs. Cone: Which Filter Should You Use?
Not all coffee filters are built the same, and the shape actually matters for different projects. Here’s a simple guide:
| Filter Type | Shape | Best Used For | Why It Works Well |
|---|---|---|---|
| Basket Filters | Flat-bottomed and wide | Flowers, butterflies, and flat art pieces | They open up wide and provide more surface area for coloring and decorating. |
| Cone Filters | Tall and pointed | 3D crafts like angels, trees, and cone-shaped sculptures | The natural taper helps the filter hold its shape when stiffened or folded. |
| Large Commercial Filters | Extra large and wide | Wall art and big decorative craft pieces | The larger size provides more coverage, making them suitable for bigger projects. |
Coloring & Dyeing Techniques
The real magic of coffee filter crafts begins the moment color hits the paper. Because filters are so absorbent, colors move through them in ways that feel almost alive.
1. Watercolor Bleed Method
This is the most beginner-friendly technique and one of the most visually rewarding. The wet filter lets colors flow into each other naturally, creating soft gradients with zero effort.
Here’s how to do it:
- Lay a coffee filter flat on a waterproof surface and lightly mist it with water.
- Drop liquid watercolor or diluted food coloring onto the wet filter and watch the colors spread and blend.
- Add a second or third color while the filter is still wet, then let it dry flat for 30-60 minutes.
Pro Tip: The wetter the filter, the more the colors will spread. If you want sharper color edges, use slightly less water.
2. Marker + Rubbing Alcohol Method
This technique gives you more control over pattern placement while still producing that gorgeous color-spread effect.
Here’s how to do it:
- Color directly onto a dry coffee filter with washable markers, filling in sections with different colors.
- Fill a spray bottle with rubbing alcohol and spray or drop it onto the marker-covered filter to dissolve and blend the colors.
- Let it dry flat and enjoy the tie-dye-style results.
Color Tip: Yellow + blue = green bleed. Red + blue = purple. Keep complementary colors next to each other for the richest blends.
3. Dip Dyeing & Ombré
This method creates clean gradient effects, perfect for home décor.
Here’s what to do:
- Prepare three cups with light, medium, and dark diluted dye.
- Fold the filter and dip each section into the different colors, starting with the darkest color and overlapping slightly.
- Unfold carefully and lay flat to dry for a smooth gradient effect.
4. Drying & Setting Your Colors
Once you’ve colored your filters, proper drying makes a real difference in the final result.
| Drying Method | Best For | Notes |
|---|---|---|
| Flat air dry | Delicate bleed artwork | Prevents color pooling at edges |
| Hang on a line | Large batches | Space filters out to avoid sticking |
| Low iron (on parchment) | Flattening wrinkled filters | Use lowest heat setting |
| Microwave (15 sec bursts) | Quick drying | Watch carefully to avoid burning |
How to Paint Coffee Filters: Step-by-Step Guide
Painting coffee filters is a fun and easy art activity suitable for all ages. The process is simple, and it’s a great way to create colorful pieces that can later be used in other arts and crafts projects. Here’s a detailed guide to get started:
Tools and Materials Required
Before you start painting, make sure you have all the necessary materials at hand. Here’s a list of the tools and supplies you’ll need to create beautiful painted coffee filters:
| Tools/Materials | Purpose |
|---|---|
| White Coffee Filters (Basket Type) | The base material for painting |
| Liquid Watercolor Paint | For painting and creating a smooth, blended effect |
| Watercolor Palette | Alternative painting option for more controlled designs |
| Paintbrush | For applying watercolor paint |
| Washable Markers | For creating designs that will spread when sprayed with water |
| Dropper or Pipette | To transfer liquid watercolor onto the filter |
| Small Spray Bottle of Water | To create a watercolor effect with markers |
| Waterproof Art Mat or Tablecloth | To protect your workspace from paint spills |
Now that the tools and materials are ready, follow these simple steps to paint your coffee filters.
Step 1. Set Up Your Work Surface

Protect your work surface with a waterproof mat or tablecloth to avoid any mess. This will make cleaning up afterward much easier.
It’s also a good idea to have some paper towels or napkins on hand to quickly wipe away any paint spills or drips as you work.
Step 2. Paint with Liquid Watercolor Paint
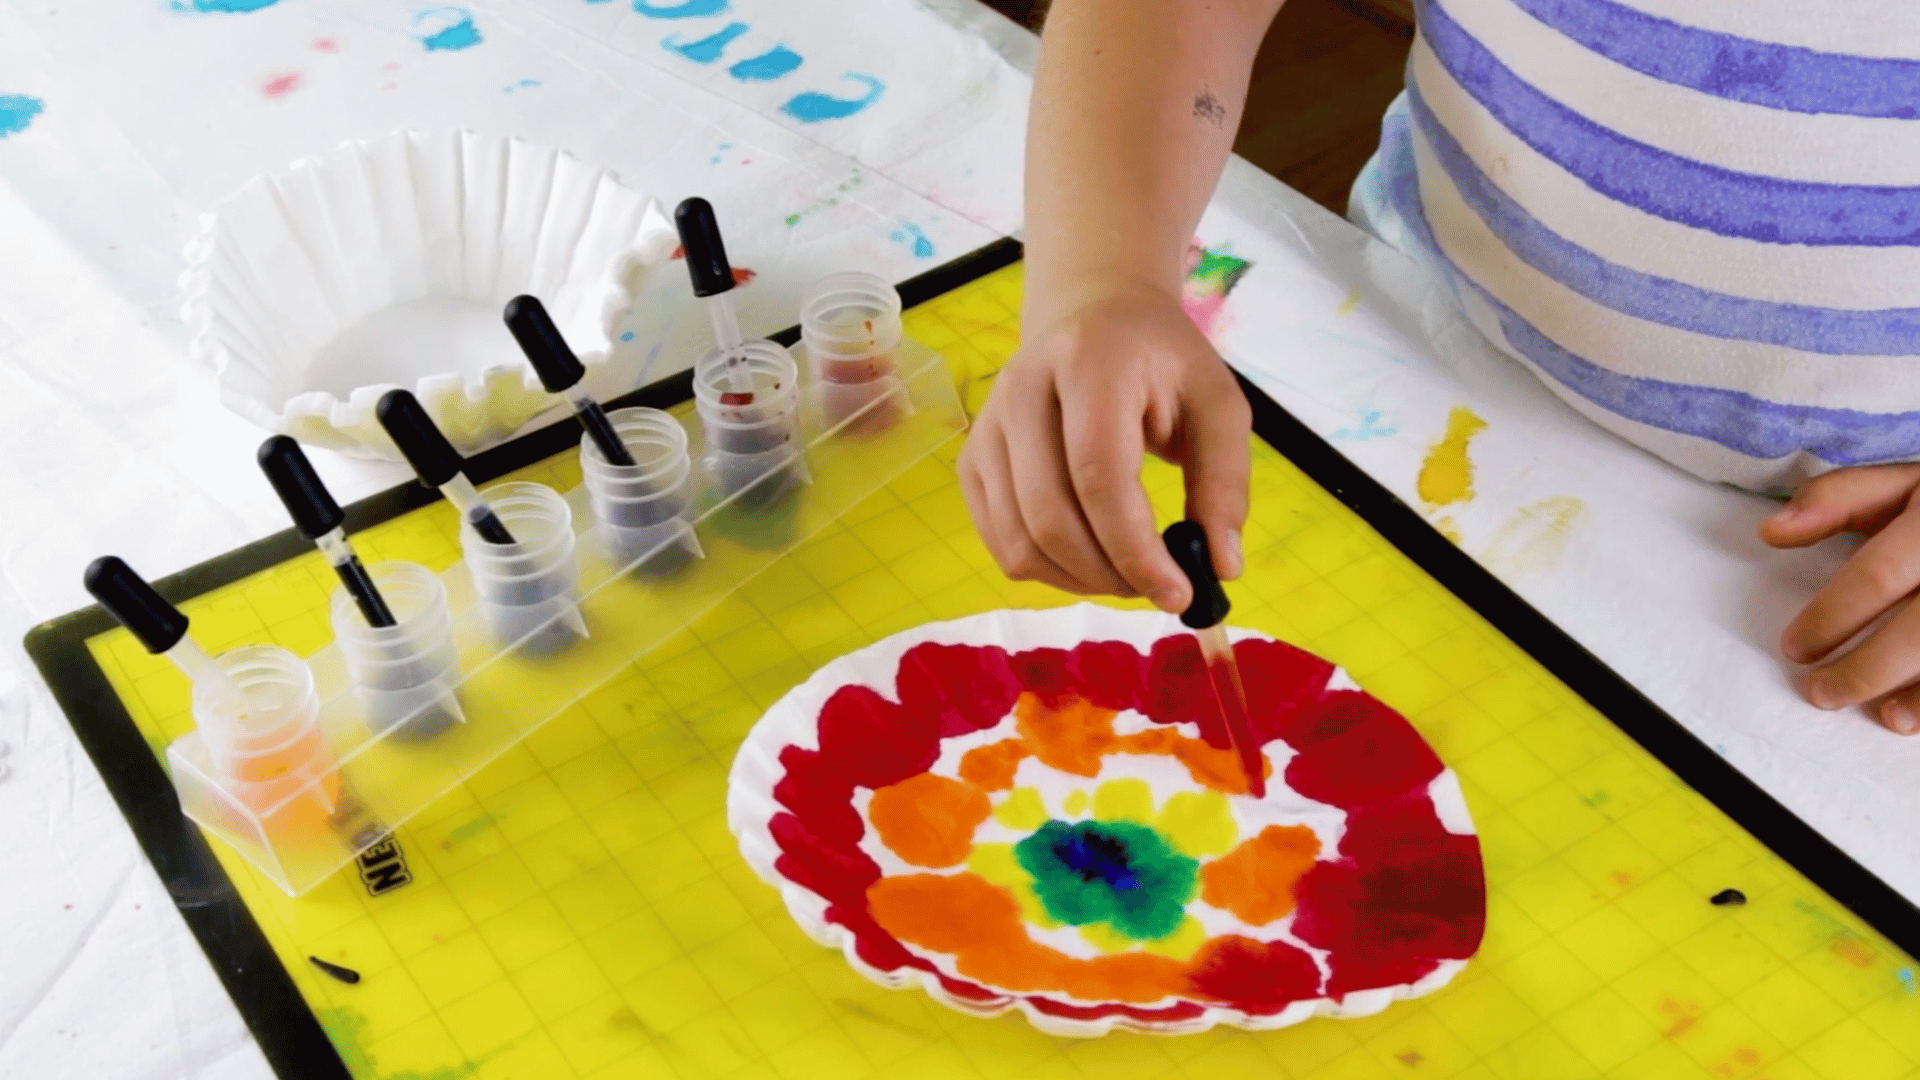
If you’re using liquid watercolor paint, pour it into a small dish and use a dropper to transfer the paint onto the coffee filter.
Watch as the paint spreads across the filter, creating beautiful patterns. Feel free to layer on different colors to create a vibrant design.
Step 3. Paint with Watercolor Palette
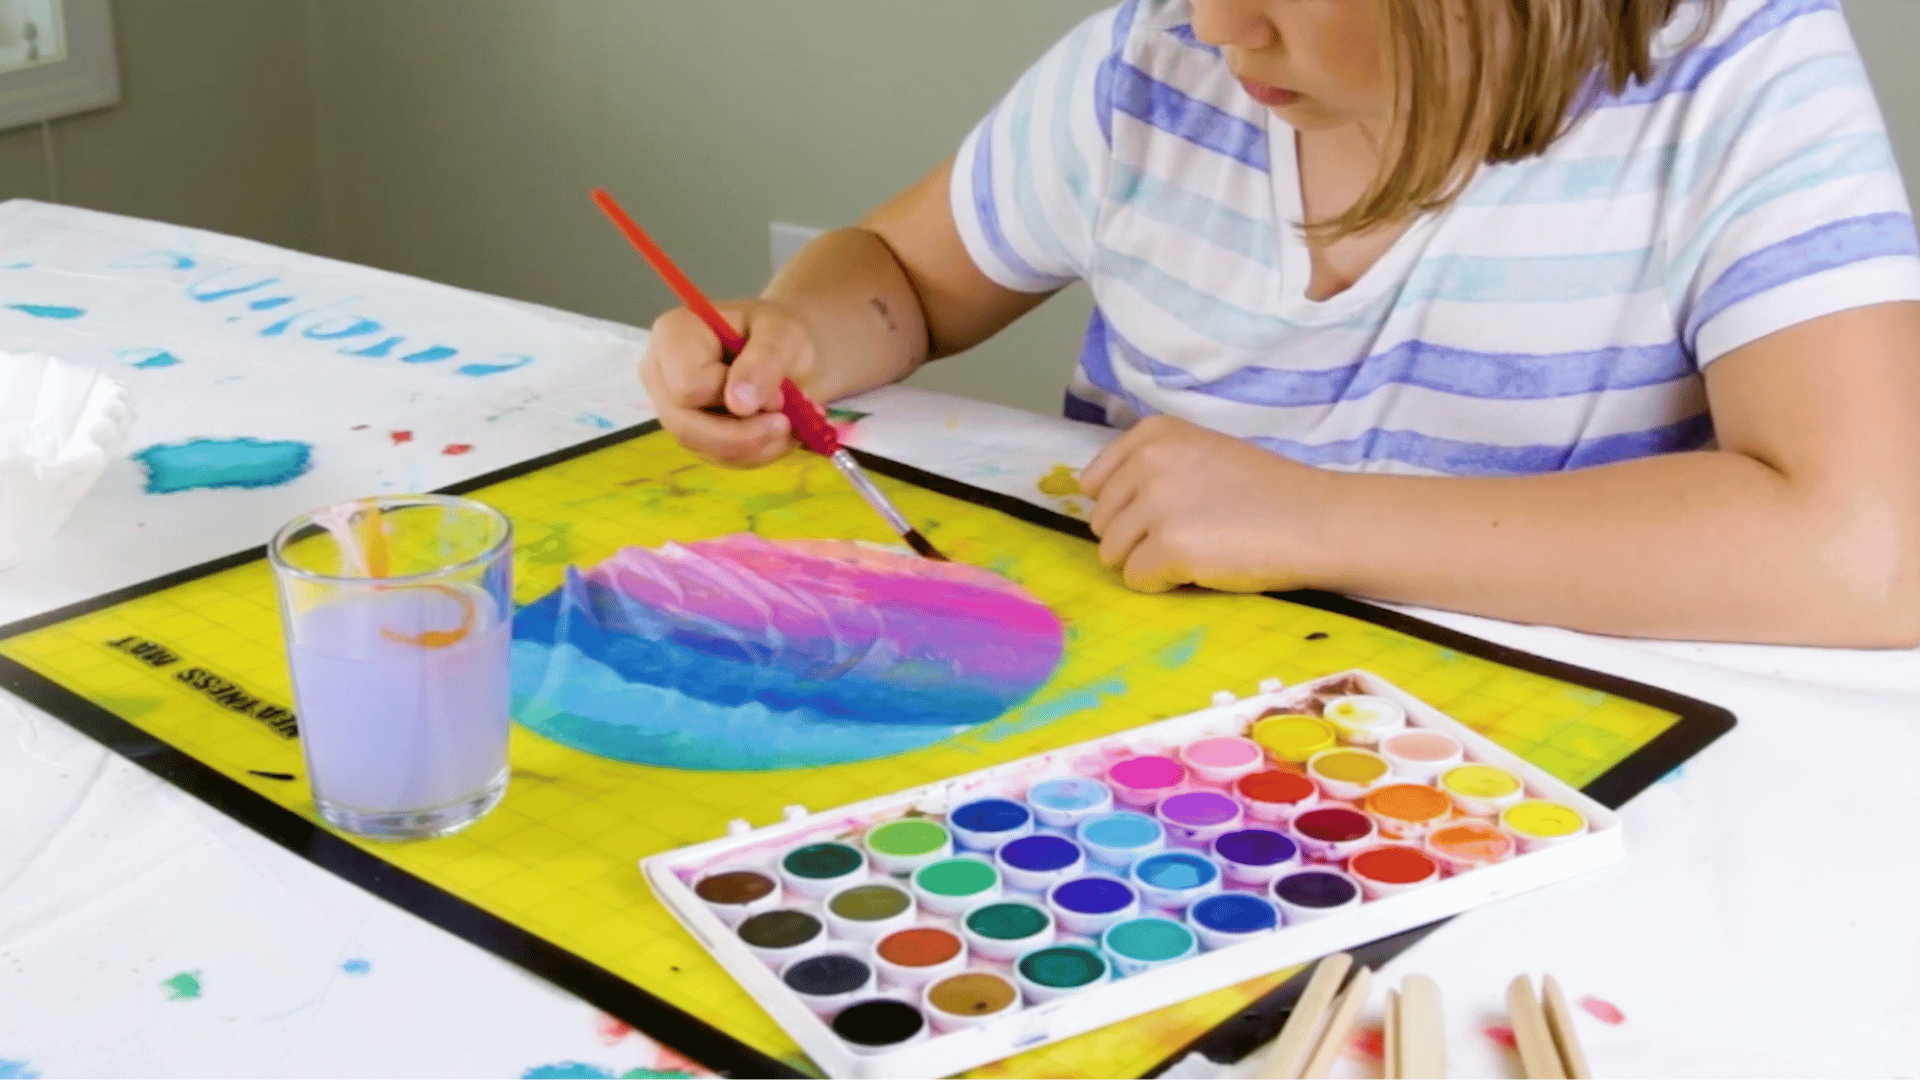
For a more controlled painting method, use a watercolor palette and a paintbrush. Dip your brush into the paint and gently apply it to the coffee filter, creating soft strokes or detailed designs depending on your preference.
You can layer different colors to create depth or blend shades for a more seamless transition. Don’t be afraid to experiment with different brush techniques to achieve the look you want.
Step 4: Draw Designs with Markers
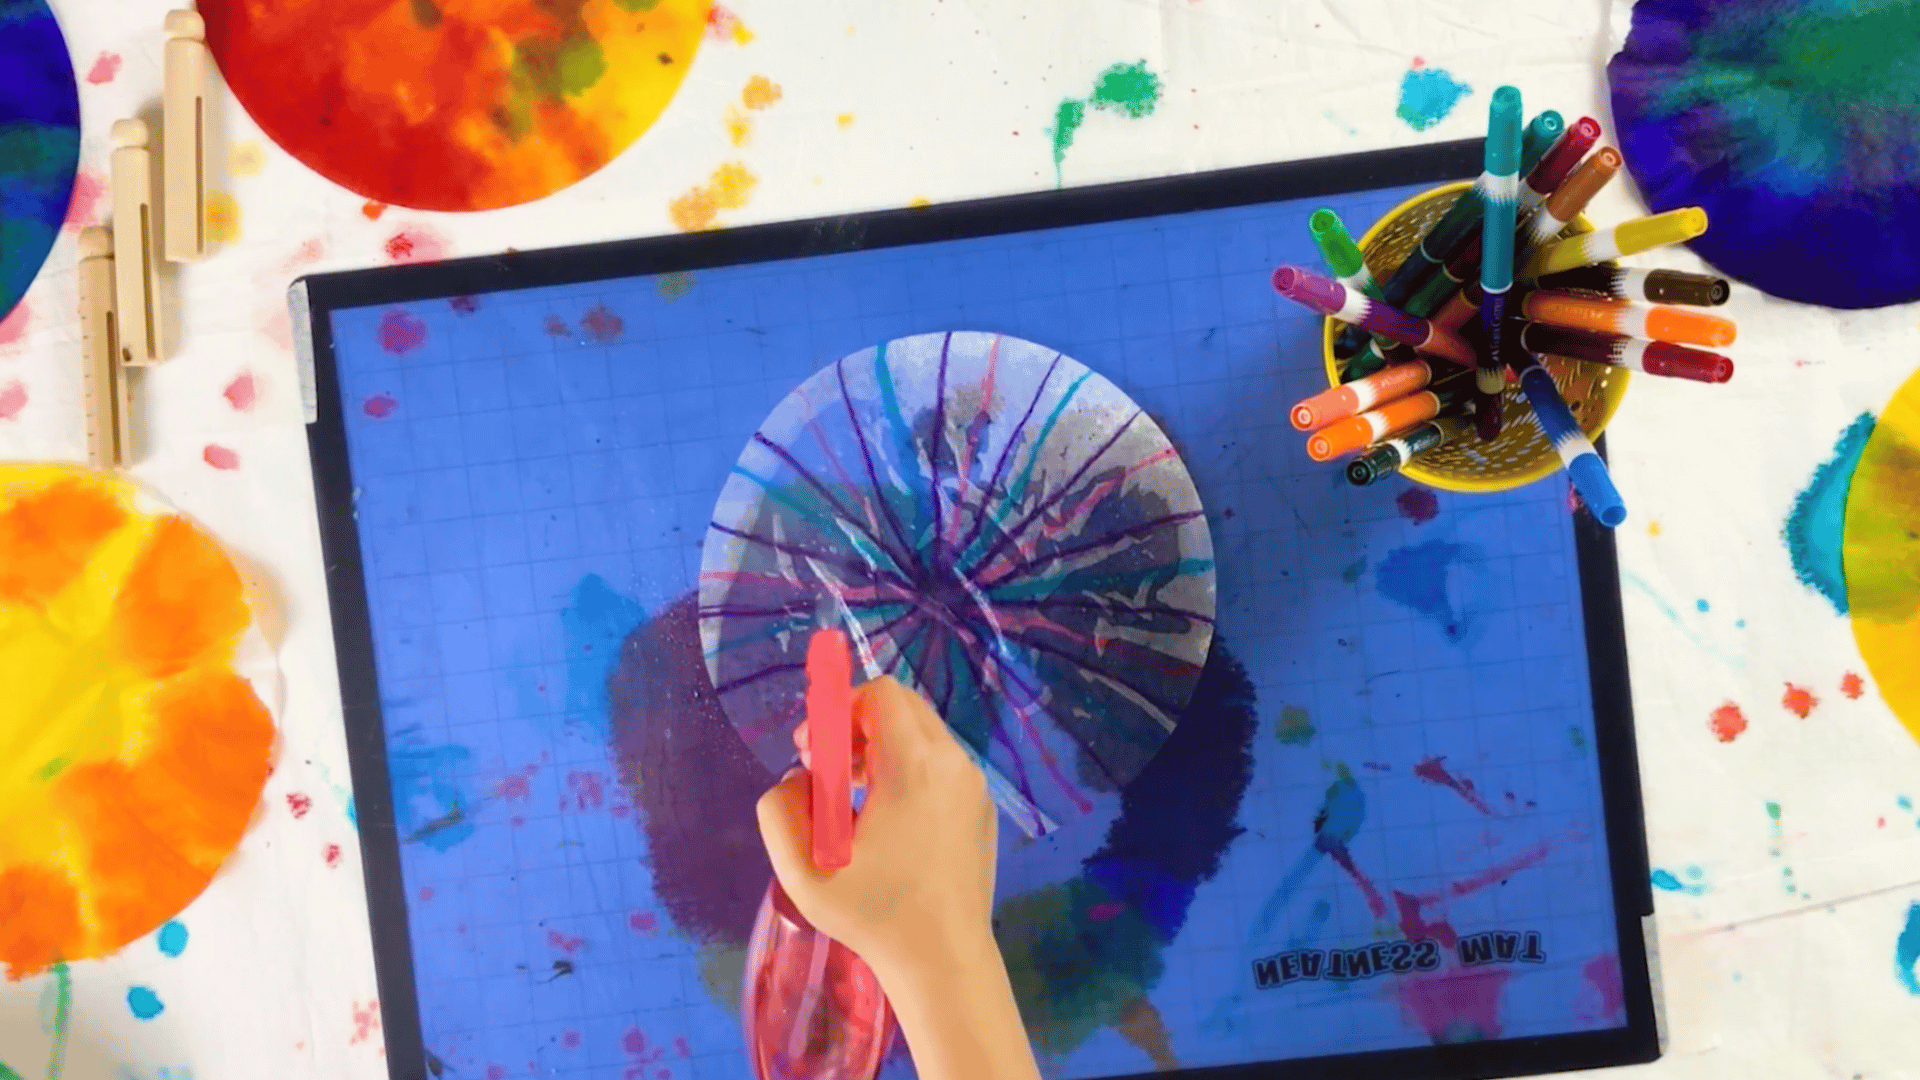
Use washable markers to draw fun designs on your coffee filter. You can create colorful patterns, pictures, or even random doodles, whatever inspires you.
The markers will create bold, vibrant lines that will blend beautifully when sprayed with water.
Step 5: Add Water from a Spray Bottle
Use a small spray bottle of water to lightly mist the coffee filter. The water will cause the marker colors to bleed and spread, creating a soft, watercolor-like effect.
Watch the colors merge and form beautiful designs as the water activates the ink.
Step 6. Let the Filters Dry

Once you’ve finished painting your coffee filters, set them aside to dry completely. You can paint multiple filters at once, then leave them to dry while you move on to other creative projects.
Refer to the video below for a clear idea:
Creative Coffee Filter Ideas Kids Can Try
Here are some fun and easy coffee filter crafts that kids will love to create. These projects are perfect for rainy days, parties, or school activities. Let their imagination run wild with these simple and colorful ideas
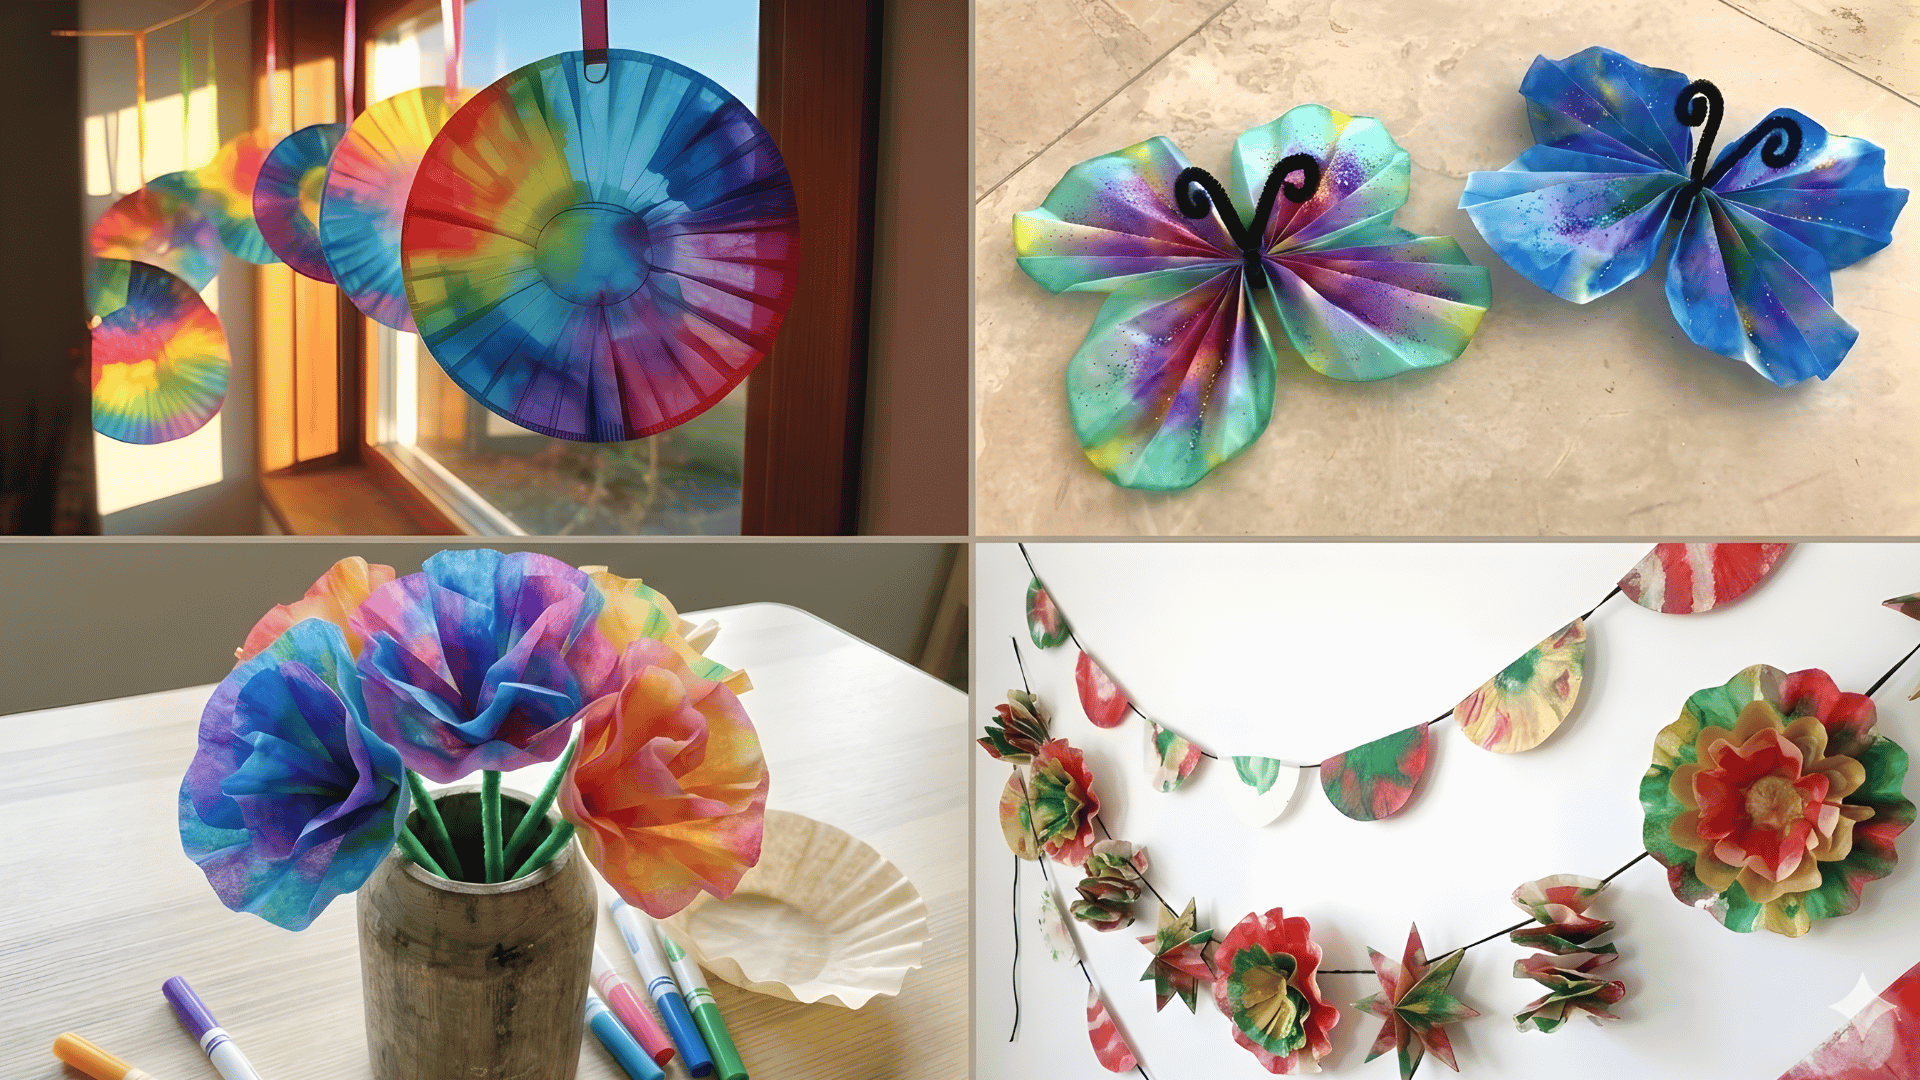
1. Coffee Filter Flowers
Coffee filters make perfect petals for creating beautiful flowers. Simply fold a coffee filter, cut the edges to form petals, and then unfold to reveal the flower shape.
You can paint or color the filter before cutting to add a burst of color. Attach a pipe cleaner or a small wooden stick as the stem, and you have a lovely handmade flower
2. Coffee Filter Butterflies
Turn coffee filters into beautiful butterflies by folding and coloring them. After coloring the filter, fold it in half and attach a clothespin for the body.
You can use markers, crayons, or watercolor to decorate the wings. These cute butterflies are perfect for party decorations or simple crafts.
3. 3D Sculptures & Garlands
Create 3D sculptures and garlands by folding, stacking, and attaching coffee filters together. You can make flowers, stars, or even abstract sculptures.
String them together to make a fun garland, perfect for hanging in a room or across windows.
4. Sun Catchers
Transform painted coffee filters into sun catchers by gluing them onto transparent contact paper or simply taping them to a window.
As the sunlight shines through, the colorful filter creates a beautiful glow. This is an easy and rewarding craft that adds color to any room
5. Coffee Filter Snowflakes and Doilies
Cut coffee filters into intricate designs to make snowflakes, delicate doilies, or a spider web. The thin material is perfect for cutting, and the end result is beautiful and detailed.
Hang them on windows, use them as table decorations, or string them together for a festive touch.
6. Coffee Filter Jellyfish
Coffee filters can easily turn into colorful jellyfish. Start by coloring the coffee filter with markers or watercolor and let it dry.
Flip the filter upside down to create the jellyfish head. Attach ribbons, yarn, or paper strips underneath to make the tentacles. Hang it with a string for a fun ocean craft.
7. Coffee Filter Rainbow Art
Kids can create bright rainbow art using coffee filters and markers. Draw rainbow colors across the filter and lightly spray it with water.
The colors will spread and blend across the paper, creating a soft rainbow effect. Once dry, it can be displayed on walls or windows.
8. Coffee Filter Tie-Dye Art
Coffee filters are great for making simple tie-dye art. Start by drawing patterns on the filter using washable markers.
Lightly spray the filter with water so the colors spread and blend together. As it dries, it creates a soft tie-dye pattern that kids can hang as artwork or use in other crafts.
9. Coffee Filter Balloons
Coffee filters can also be used to make colorful balloon crafts. Let kids decorate the filter with markers, paint, or crayons.
Once dry, glue a string or yarn piece to the bottom to create the balloon string. Several of these can be grouped together to look like a bunch of balloons.
10. Coffee Filter Leaf Art
Turn coffee filters into colorful fall leaves. Color the filters with warm shades like red, yellow, orange, and brown.
Spray lightly with water so the colors blend together. After drying, cut the filter into leaf shapes and use them for seasonal decorations.
11. Coffee Filter Monsters
Kids can create funny monsters using coffee filters. Decorate the filter with bright colors and patterns.
Glue on googly eyes, paper teeth, or yarn hair to give the monster personality. Each child can design their own silly creature.
12. Coffee Filter Ice Cream Cones
Coffee filters can be used to make pretend ice cream cones for a sweet craft idea. Color the coffee filter with fun pastel shades to look like ice cream scoops.
Cut a triangle from brown paper to make the cone and glue the colored filter on top. Kids can add sprinkles using small dots of marker or glitter.
Conclusion
Coffee filter crafts prove that good art doesn’t need expensive materials. It’s just a little curiosity and a willingness to try things out.
From coloring techniques to 3D sculptures and home décor, coffee filter art covers more ground than most people expect. Whether you’re doing it solo, with kids, or building something to sell, there’s a project here for you.
So grab a pack of filters, pick a technique that sounds fun, and get started. Let your imagination run free with these versatile and fun crafts.

