June 2011Occasionally Crafty: June 2011

Thursday, June 30

Three Things Thursday (Patriotic Edition)

Well, the 4th of July is almost here, and again, I have a basket full of crafts I meant to get to, and just didn't.  On top of it all, there are so many great patriotic projects I've seen out there that I just have to bookmark them to make for next year.  Hopefully.

Here's this week's Three Things I love:

1.  These Patriotic T-shirt transfers (and the adorable headband!) from the letter 4 are super cute!  She provides the patterns, so go download them and make your own cute shirts!


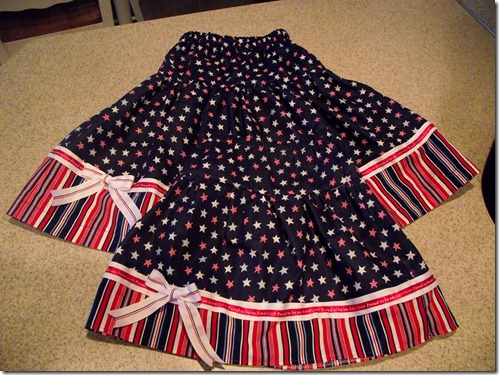
2.  These Patriotic Skirts from I'm a Mom, Not a Professional, are so cute!  My daughter would love one of these- maybe I'll still try to crank one out!

025

3.  These Red, White, and Blue Sandwich cookies from Itsy Bitsy Paper look delicious!  Wouldn't they be the perfect addition to your 4th of July Barbecue?  Yum.


Thanks for the inspiration, ladies!  Grab a featured button if you like, and have a great 4th of July!


Photobucket


Photobucket

Wednesday, June 29

Scrappin' Wednesday


I just got home from an AMAZING trip with my hubby to Mexico.  We went snorkeling, biking, walking, zip-lining, shopping, eating, wading, sunbathing, and ruin-exploring.  The picture above is El Castillo at Chichen- Itza- one of the new 7 Wonders of the World.  What an experience!  It was wonderful, and though I am now peeling from my sunburn and a little jet-lagged, I'm excited to be home with my three lovely children.  It's good to go on vacation, and it's great to come home.

I've missed the blog, too.  I don't know how many loyal readers I actually have, but I miss writing, crafting, and interacting with those of you who do visit regularly.  So, I'm back in my routine with a scrapbook page for you today.

This is my youngest son's first taste of rice cereal.  He was a little over five months.  I love the middle picture- he made such a cute face when he tasted the cereal, and I'm so glad I was able to capture it.  Got any cute pictures of your babies eating?


(it looks a little funny because it is on a white background, so sorry about the weird margins!)

Hope you are having a great week!

Photobucket

Thursday, June 23

Three Things Thursday

As always, there are some great projects out in blogland this week!  I'm thrilled to find ones that are useful to me, my home, and my family.  All three this week fit the bill!  I hope you find them useful, too!

1.  My kids are finally getting old enough to REALLY help around the house (not just the kind of help where you are teaching them, but you have to redo everything when they're done!).  That includes packing for trips- and that's where this Kids Packing List Printable from The Gunny Sack comes in handy!  I love it!


2.  I love these Fabric Clips from The Chameleon Girls.  These are totally a "why-didn't-I-think-of-that" item.  I would have never thought to cute-ify binder clips like this!  I usually just buy cute ones (that cost twice as much). Thanks for saving me some dough!


3.  Everyone loves a great printable- and this Patriotic Printable from Landee See, Landee Do is just darling!  I'm putting it up as soon as I get home from my trip!


Thanks for the inspiration ladies!  Grab a featured button if you like:


Photobucket


Photobucket

Wednesday, June 22

Scrappin' Wednesday

Most people didn't believe me when I told them my youngest was a grumpy, difficult baby.  The reason they didn't believe me?   He was always SO SMILEY for everyone else, and hardly ever for me!  Still to this day, he is far happier being out of the house and "flirting" with people, than hanging out with me.  This week's layout represents him in all his smiley-ness, showing off for the camera.  But my favorite picture (even though I look a little frazzled in it) is the picture of us together, showing off his big, droopy cheeks.  He's almost 2 now, and losing some of that baby fat, so I love that I have it documented to remember.


Have a happy day!

Photobucket

Monday, June 20

4th of July Wooden Block- great for Craft Night!

I am leaving TOMORROW (!) for a trip to Mexico!  Grandma is staying with the kids while hubby and I get a whole week to ourselves on the beautiful beaches of Tulum and the Mayan Riviera!  I can't wait!  I do have some posts scheduled while I'm gone, though, so I hope you'll keep visiting!  Just know I won't be able to answer emails or respond to comments until I'm back in town!

So, on to today's post:

Last year, when I was browsing 4th of July Crafts, I came across a really cute wooden block from Savvy Chic Home.  She didn't post directions, but I knew I could put it together myself.

Then, surprise!  This year for the women's group at church, called Relief Society, I was asked to put together a 4th of July-themed craft night for the ladies.  Wow- I love crafting for myself, but have never done something like this before!  We have ladies of all ages, from 18-80, at all crafting abilities, so I wanted to keep it simple, but cute.  I knew the 4th of July block would be perfect for a group, with a little advance work.

Here's the sample I made for the group:


Want to make one?  It's easy!  I don't have step-by-step pictures, but really, you can figure it out just by looking at the picture.  They didnt' really need my help to put it together!

Time required:  about an hour
Supplies needed:
1 wooden 2x4 block, cut to 12 inches.
Red paint, paintbrush
Blue cardstock or patterned paper
White cardstock- for stars
Red cardstock- for letters or letter stickers, or red marker!
Craft Cutter (Silhouette, Cricut, etc), star die-cut, or scissors
Glue, Mod Podge, glue stick
Buttons or other embellishments.
Twine- cut to fit your block
Red Ribbon- about 10 inches

First, sand your block.  Most of the wood will be kept bare, though you can stain it if you want.

Next, paint one of the 4 inch wide sides red- one to two coats, depending on your paint coverage.

Third, Cut your blue cardstock into three rectangles- mine were 3.25 in x 3.75 in.  Glue them onto your block, leaving a border of red on each side and between the rectangles.

Fourth, cut three stars from your white cardstock.  Make sure they fit into your rectangles.  I used my Silhouette for this, so it was easy to make them the right size.  Glue your stars onto the blue rectangles.  I kept mine straight and even, but some of the women made theirs angled for a cute, fun look.

Fifth, cut the letters "U", "S", and "A" from red cardstock.  Alternately, you could use letter stickers, vinyl, or even just freehand it with a red marker!  Glue or write your letters into the center of each star.

Sixth, embellish with buttons.  I used star buttons and regular buttons.  You could even cut out paper stars and use glue dots or foam tape to make them stand out.

Finally, wrap a length of twine around the block and tie a knot at the top.  Leave the ends long.  I used a little hot glue to hold the twine tightly in place.  Finish by tying your red ribbon into a bow, heat-sealing the ends, and glueing it on top of your twine knot!

When everyone came, I had everything cut out for them already-- another way the Silhouette makes my life so easy!  I also precut the twine and ribbon, so all they had to do was a little paint, some gluing, and embellishing.  Easy peasy.


They all turned out so cute- everyone did a wonderful job!  We finished up the night by eating these patriotic cupcakes.  They are a simple vanilla cupcake recipe, with buttercream, red sprinkles, and candy melts molded into stars.  The wrappers are from Michael's- on clearance for 99 cents!


It was great fun for me to create with/for other people.  I hope they'll call me again (crossing fingers)!


Photobucket

Thursday, June 16

Three Things Thursday (Friday?)

It's still Thursday here....but it's probably Friday for most of you!  My computer was not working, and I was busy rearranging furniture and personal effects ALL DAY!  That meant no time to fix the computer, and thus, no features until now.  We still have one more repair to go, tomorrow morning, and then our house will finally be back to normal.  I'm sure you just can't wait to hear the story- but, I tell you, it's not all that exciting.  Maybe even downright pathetic on the excite-o-meter.  But it's kept our lives a little more interesting for the past two months.....

Anyway, here are some things I love from this week:

1.  This Patriotic Wreath at The Country Chic Cottage is sweet and beautiful.  I love the yarn wrapped wreaths, but frankly, don't have the patience to make them right now.  Burlap, I can do.


2.  I love this Double Ruffle Headband from Six Sister's Stuff.  They shared a tutorial, but what I'd really like to know is, how do they look so cute wearing them?  I swear I look like I'm ten years old when I wear cute headbands!


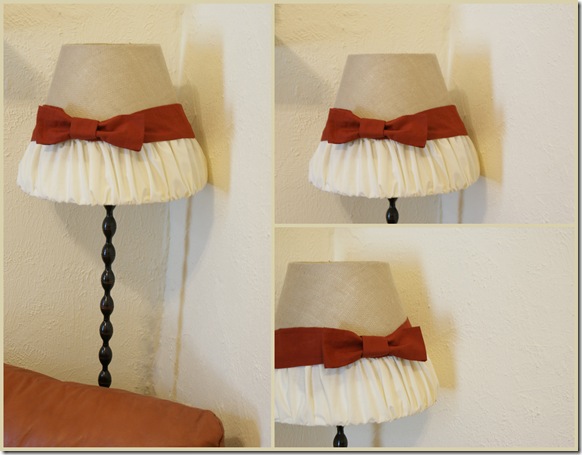
3.  Angela at Wray Sist3rs was a competitor on One Month To Win it, and submitted a burlap and lace wrapped mirror.  But I fell in love with this lamp she made!  I really want it in my room, even though it doesn't match.  Seriously cute....

mirror1


Thanks for the inspiration, ladies!  Grab a featured button below:


Photobucket


Have a great weekend everyone!

Photobucket

Wednesday, June 15

Scrappin' Wednesday-or not

You may or may not have noticed that I didn't get a scrapbook page up today. We are getting new carpet (which is kind of a long story....). Anyway, the computer is down and all my pictures are on it. I am typing this on our lovely IPad. So, I apologize. My husband is setting the computer up as we speak, so I should be back tomorrow with Three Things Thursday! Hope to see you in the morning!

Photobucket

Monday, June 13

Roll-up Accessory Case

Happy Monday!  Summer starts for us today- my daughter finally finished up school on Friday.  We are ready to have some fun- swim classes, summer movies, water park visits, etc.  The only thing I'm not looking forward to is the inevitable brother/sister fighting.  Tell me I'm not the only one whose kids fight way more when they are home from school....

We had a busy weekend- pictures for my daughter's dance recital, getting my daughter's ears pierced, and church and meetings!  I used the little down time I had to create my project for today-

Remember the roll-up accessory case I featured from Anngela's Pretty Little Things?  I really needed one for my new makeup bag, so I pulled out some scraps and got to work.

Here's what I came up with:


I chose black because I knew it would get dirty in the makeup bag.  I liked the contrast stitching on the pocket, but I didn't' like how it made the back look.  I solved that by hot gluing a ribbon down the middle of the back (ignore the glue strings.  I thought I got them all- grrr...)

Now all my brushes and small makeup items have a home.  Love it!


Have a great week!

Photobucket

Friday, June 10

Projects with Artistic Letters


Today I have some fun projects to share with you, and a special offer for the weekend!  If you, like me, have been wanting something like this in your home, 
Picture
www.BuyAlphabetPhotos.com
then you will love this!  


Photographer Jodi Gerber of ArtisticLetters has created an entire catalog of black & white letter images throughout the past 3 years – all by taking photos of objects in nature that resembled letters of the alphabet. She recently decided to offer her ENTIRE catalog of 250+ letter images to the public on CD or Download so that anyone could create their own designs!   If you've purchased something like this, you know just one sign can cost $20 or more.  But these images can be used over and over, for many different projects.  It’s a truly original way to make artwork for your home - 


www.BuyAlphabetPhotos.com

or even for scrapbooking, 

www.BuyAlphabetPhotos.com

greeting cards,  and digital designs consisting of wedding invitations, baby’s birth, etc.  

 www.BuyAlphabetPhotos.com
The possiblities are endless!

Jodi teamed up with me and is offering you Exclusive Discounted Pricing of up to $6 Off!  Please visit her website www.BuyAlphabetPhotos.com and browse the images, testimonials, and ideas. 
Then click on the “Occasionally Crafty” page and enter  CRAFT  as the password.  You’ll find the exclusive pricing and bonus freebie choices there.

 FREEBIE ALERT:  Jodi also offered my readers a Freebie alphabet set (with purchase) as a Bonus!  And here’s the great part – you get to choose a Damask set from 6 different galleries!  More info is available on the “Occasionally Crafty” page at www.BuyAlphabetPhotos.com.

 The exclusive pricing and freebie offer expires tomorrow, June 11 at 10 p.m. Eastern so be sure you take advantage of this great deal while it lasts.

You can also visit Jodi’s face book page and click “Like” to find more info, freebies, giveaways, and receive future promotions. 


Here are two projects I made using Jodi's letters: 

First, I painted and embellished an old frame, then printed out one of her "E"s to use as a monogram for the frame.  This would be a great unique gift!


Also, you know I love digital scrapbooking!  I thought these letters were perfect for documenting our trip to Chicago a few years ago (I told you I'm behind in my scrapbooking!)  Here's the layout I came up with, using Jodi's letters.


I'm so excited to use these to make gifts for friends and family.  I hope you will take advantage of this offer.  Enjoy creating!


*Disclaimer- I received a set of these letters and mattes to use and review for free, but the opinions expressed are purely my own!*


Photobucket

Thursday, June 9

Three Things Thursday

It's (unofficially) summer, and I'm having a great time viewing everyone's great ideas for summer and 4th of July decorating!  Here's some of the things that caught my eye this week:

1.  I love this 4th of July Rag Wreath from Krystal at Sassy Sanctuary.  I especially love that blue and white striped fabric.  And the pennant banner in the middle.  So cute!


2.  Have you used Washi Tape yet?  This is a great, adorable way to use it on these Washi Paper Tealights from GreenBeans Crafterole.

038

3.  It's probably because I am on a "I'm going to Mexico in two weeks and plan on being in a swimsuit the whole time" diet, but these Smores Cookies from Chef in Training are just calling my name.  I  REALLY want them.  I am saving the recipe for when I get back.  Of course, then I'll be dieting to lose the "being in Mexico and eating great Mexican food for two weeks" weight.  Sigh....


Thanks, as always, for the inspiration!  Feel free to grab a Featured Button if you like!


Photobucket


Photobucket

Wednesday, June 8

Scrappin' Wednesday

Man, I barely got this one done.  It's super simple this week, folks.  My husband formatted the computer, which means all my digital scrapbook files had to be reloaded into my scrapbooking software.  It took.....forever.

Anyway, here's a quick layout remembering my youngest son's first baseball game.  We start them young in our family!


There was a quote from Pete Rose at the bottom, but it got cut off in the picture.  Still figuring out our new version of Photoshop.....

See you here tomorrow for Three Things Thursday!


Photobucket

Monday, June 6

Summer Mantel, for now

Thanks for being patient, if you visited my blog over the weekend.  I wanted something a little more elegant, something a little less cluttered, something simple and beautiful.  I still have some more things I'd like to do, like add a tutorial page and some social media buttons, but for now, I like how it's turned out- I hope you do too!

Another work in progress is my summer mantel.  I don't usually decorate for summer- I just put up a few patriotic items around the 4th of July and my Summer Blocks.  But this year, all the bright colors in the stores were just calling out to me, so I started putting together a summer mantel.  This is what I have so far.


It's hard because we have this beautiful painting above our fireplace that I don't really want to move- so I pretty much pretend it's not there when I am decorating for seasons and such.  Maybe this isn't proper for true decorating, but that's just what I do.  Anyway- I  started off with this summer printable, from Simple Crafter, framed in a dollar store frame painted blue.

I found the jars at TJ Maxx for $3.99, and filled with them dollar store stems.

I made the pinwheel garland based on this tutorial at Hoosier Homemade.  I loved her bright colors, so I pretty much did the exact same thing.  Love it!


I'd like to get some blue mason jars and fill them with sand and candles.  Where in the world do I find blue mason jars?  Someone point me in the right direction!


Here in good old Phoenix, the weather is like summer most of the year.  But now that school is just about out, I'm ready for summer, and this mantel makes my house feel like summer too.

Photobucket

Friday, June 3

Some Changes Coming

I'm working on blog design this weekend, so please excuse my mess as I get everything in place.  Thanks!

Photobucket

Girl's Tank Dress

My sister-in-law and her friend have this great sewing blog, Made on Maple, where they keep track of all their sewing projects.  They even have some great tutorials.

Most of the projects, frankly, scare me.  I'm pretty much a beginner sewer, though I could probably do more than I think I can if I would just try.  So, I visit the blog regularly for inspiration, and to dream about "someday".

Recently, Annee posted this cute tank dress that she made for my nieces, who are twins.  They are the same age as my daughter.  When I saw it, I knew this would be a perfect project for some of that fabric I got from Korea- mainly, because it seemed simple enough.  Here's what I made:


All I had to go on were these directions and a picture:

I measured across the bottom of the tank top then doubled it to get the circumference. Then, I double that figure. For example, I believe the circumference was 22, which meant I was going for a total for 44 inches across (in total). Since I was going to use 4 different fabrics I wanted to use, I think that worked out to be 6.6 inches wide per stripe (trying to take into account the amount of seam allowance I wanted). I believe I cut 
them 19 inches long. It fell right about to her knees, if not slightly below. I liked the length.

I didn't have any step-by-step pictures or directions, but it seemed fairly obvious how to construct it.  Once I had all my strips sewn together, I joined the two ends to make a circle.  I then gathered it to fit the bottom of the tank top.

(By the way, below is my new favorite sewing shortcut.  If you think gathering takes too long, or you have problems with your threads breaking, TRY THIS!  I don't know why no one ever taught me this before:)


Go here for the full tutorial!

Anyway, I finished off the dress with a pleated ruffle.  I simply sewed a piece of fabric into a tube, pressed it flat, then turned the ends under to finish them.  Then I pressed the fabric into pleats that were 3/4 inch apart, pinned it to the tank top, and sewed a straight line down the middle of the pleats.


I love how the dress turned out, and so does my daughter!  

Linking to some parties- go party along!

Photobucket